

Restaurant Food Storage Guidelines for Safe Kitchens
Proper food storage is the backbone of any kitchen worth its salt. It’s the unsung hero that protects your customers, your reputation, and ultimately, your profits. Following the right restaurant food storage guidelines isn't just about getting a good score on a health inspection; it's smart business that cuts down on illness, slashes waste, and keeps your operation in the black. This guide will walk you through a clear, practical system for mastering food safety in your kitchen.
Why Food Storage Guidelines Matter
Think of your storage practices like the foundation of a house. If you cut corners there, the whole structure is at risk. Getting these guidelines right isn't just about ticking boxes for the health department. It's about building a strong, safe, and profitable business by focusing on three key areas: preventing contamination, controlling temperature, and managing your inventory.
The fallout from getting it wrong can be huge. Globally, a staggering 600 million people—that's almost 1 in 10—get sick from contaminated food every year. A huge chunk of these cases trace back to commercial kitchens where poor storage was the culprit. Here in the U.S., the CDC estimates 48 million illnesses annually from foodborne diseases, and so many of them could have been prevented. You can get a better handle on these challenges by learning about the top perceived risks in food safety.
The Core Principles of Safe Storage
At its heart, safe food storage is all about a system that protects both the people eating your food and your bottom line. The main ideas are pretty simple, but they are absolutely essential for any professional kitchen.
- Preventing Contamination: This is about keeping raw and ready-to-eat foods separate, using the right containers, and keeping everything spotless to stop harmful bacteria from spreading.
- Controlling Temperature: Keeping food out of the "Temperature Danger Zone" (41°F to 135°F) is the single most powerful tool you have to stop bacteria from growing.
- Managing Time: Using a system like First-In, First-Out (FIFO) is a must. It ensures you use your older stock first, which drastically cuts down on spoilage and expensive food waste.
When you start treating food storage like a critical part of your operations instead of just a list of chores, you build a culture of safety that helps everyone. This mindset turns a potential problem into a strength, protecting your brand and making sure every plate that leaves your kitchen is as safe as it is delicious.
Mastering the Temperature Danger Zone
If there's one golden rule in a professional kitchen, it's this: temperature control is everything. Think of it as the ultimate gatekeeper standing between your ingredients and a foodborne illness outbreak. When food temperatures wander into the wrong range, you’re basically sending a written invitation to harmful bacteria to come and party.
That hazardous range has a name: the Temperature Danger Zone (TDZ). It’s the span from 41°F to 135°F (5°C to 57°C) where bacteria feel right at home. In these cozy conditions, nasty stuff like Salmonella and E. coli can double in number in as little as 20 minutes. Following strict temperature rules isn't just a suggestion—it's the absolute bedrock of a safe kitchen.
This infographic breaks down some of the hard numbers around food safety and the risks that come with getting storage wrong.
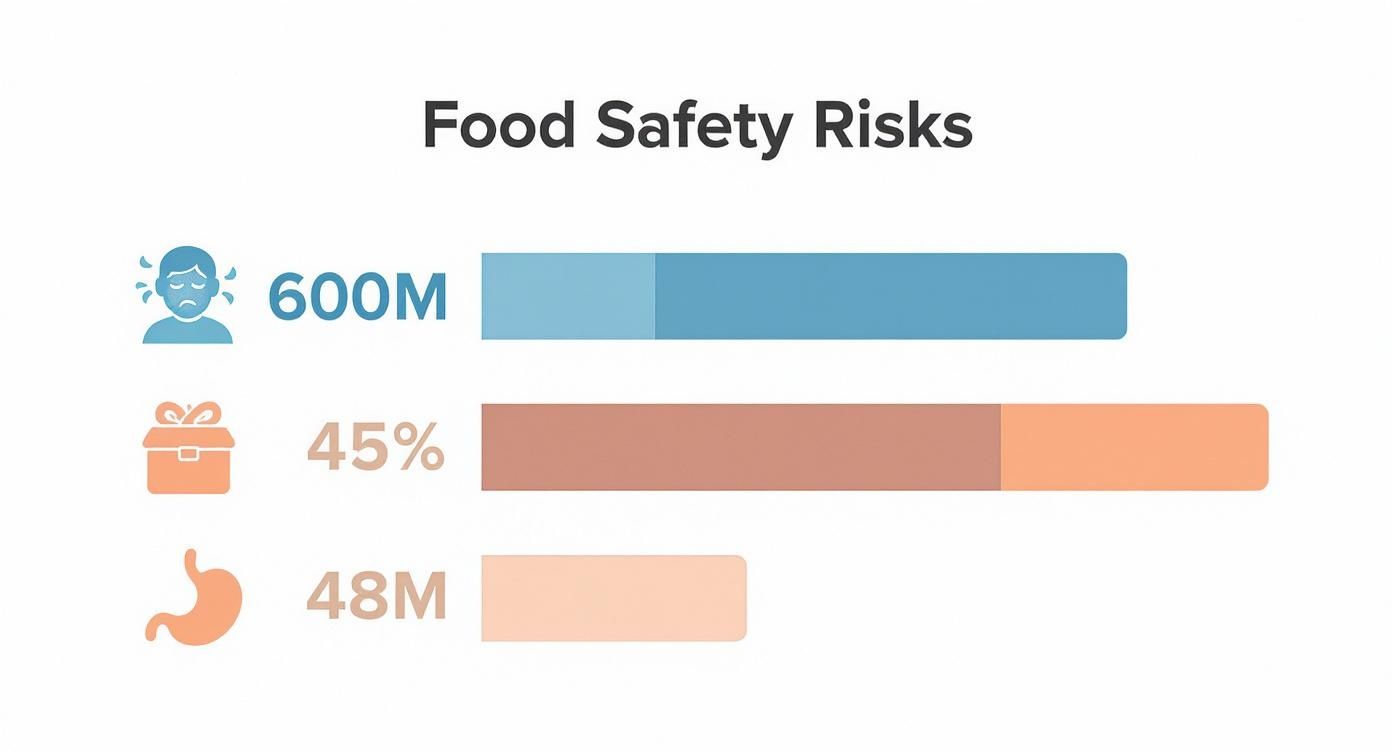
The data is pretty clear. The global impact of foodborne illnesses is huge, and a massive 45% of that risk is tied directly to how we store our food. It's a critical area every single restaurant needs to get right.
Safe Temperatures for Every Stage
Keeping things at the right temperature isn’t a one-and-done task. It’s a constant process, from the moment a delivery truck backs up to your door all the way until a dish lands on a customer's table. We're really juggling three main temperature zones: cold, frozen, and hot.
- Refrigeration: Every fridge and walk-in cooler needs to hold food at 41°F (5°C) or below. This temperature doesn’t kill bacteria, but it slows their growth way down, keeping perishables safe and fresh.
- Freezing: Your freezers should be set to 0°F (-18°C) or colder. Freezing acts like a pause button, stopping bacterial growth in its tracks and making it perfect for long-term storage.
- Hot Holding: For food held on a steam table or buffet line, the magic number is 135°F (57°C) or above. This keeps cooked food hot enough to prevent any new bacteria from growing.
To give you a quick reference, here’s a simple chart outlining the safe temperatures and holding times for common food types.
Safe Food Storage Temperatures and Times
| Food Category | Required Temperature | Maximum Storage Time |
|---|---|---|
| Raw Meats (Poultry, Ground Meat) | 40°F (4°C) or below | 1-2 days |
| Raw Meats (Steaks, Roasts) | 40°F (4°C) or below | 3-5 days |
| Cooked Meats & Leftovers | 40°F (4°C) or below | 3-4 days |
| Fresh Fish & Shellfish | 40°F (4°C) or below | 1-2 days |
| Eggs (in shell) | 40°F (4°C) or below | 3-5 weeks |
| Dairy (Milk, Cream) | 40°F (4°C) or below | 5-7 days |
| Frozen Foods | 0°F (-18°C) or below | 3-12 months |
| Hot Held Foods | 135°F (57°C) or above | 4 hours |
This table is a great starting point, but always remember to check specific local health codes, as they can sometimes vary.
The Importance of Monitoring and Compliance
You can’t just set your thermostats and forget them. Consistent monitoring is the only way to ensure you're compliant and, more importantly, safe. Systems like Hazard Analysis and Critical Control Point (HACCP) lay out clear guidelines for managing temperature, but reality often tells a different story.
Temperature abuse is still one of the most common kitchen violations. The FDA Food Code is clear—refrigerated food must stay at or below 41°F (5°C)—but health inspections often find this rule broken.
This is where daily temperature logs come in. Make it a non-negotiable task for a team member to check and record the temperatures of all storage units at the start and end of every shift. That log isn't just paperwork; it’s your proof that you’re doing things right and can help you catch a failing fridge before it becomes a disaster.
A detailed temperature log is more than just a piece of paper; it’s your kitchen’s health report card. It provides a daily record of your commitment to food safety and is one of the first things a health inspector will ask to see.
Common Mistakes and How to Avoid Them
Even with solid procedures, simple mistakes happen. One of the biggest culprits is overloading refrigerators. When you cram a cooler full, you choke off the airflow, creating warm pockets where bacteria can have a field day. Always leave space between items so that cold air can circulate properly.
Another thing to watch is your thermometers. They need to be calibrated regularly to give you an accurate reading. A wonky thermometer can lie to you, making you think everything is fine while your food is sitting right in the middle of the danger zone.
If you want to dig deeper into this, our guide on food safety and temperature control is a great resource. By really understanding these principles, you turn temperature management from a chore into a powerful system that protects your food, your customers, and your reputation.
Implementing a Flawless FIFO System
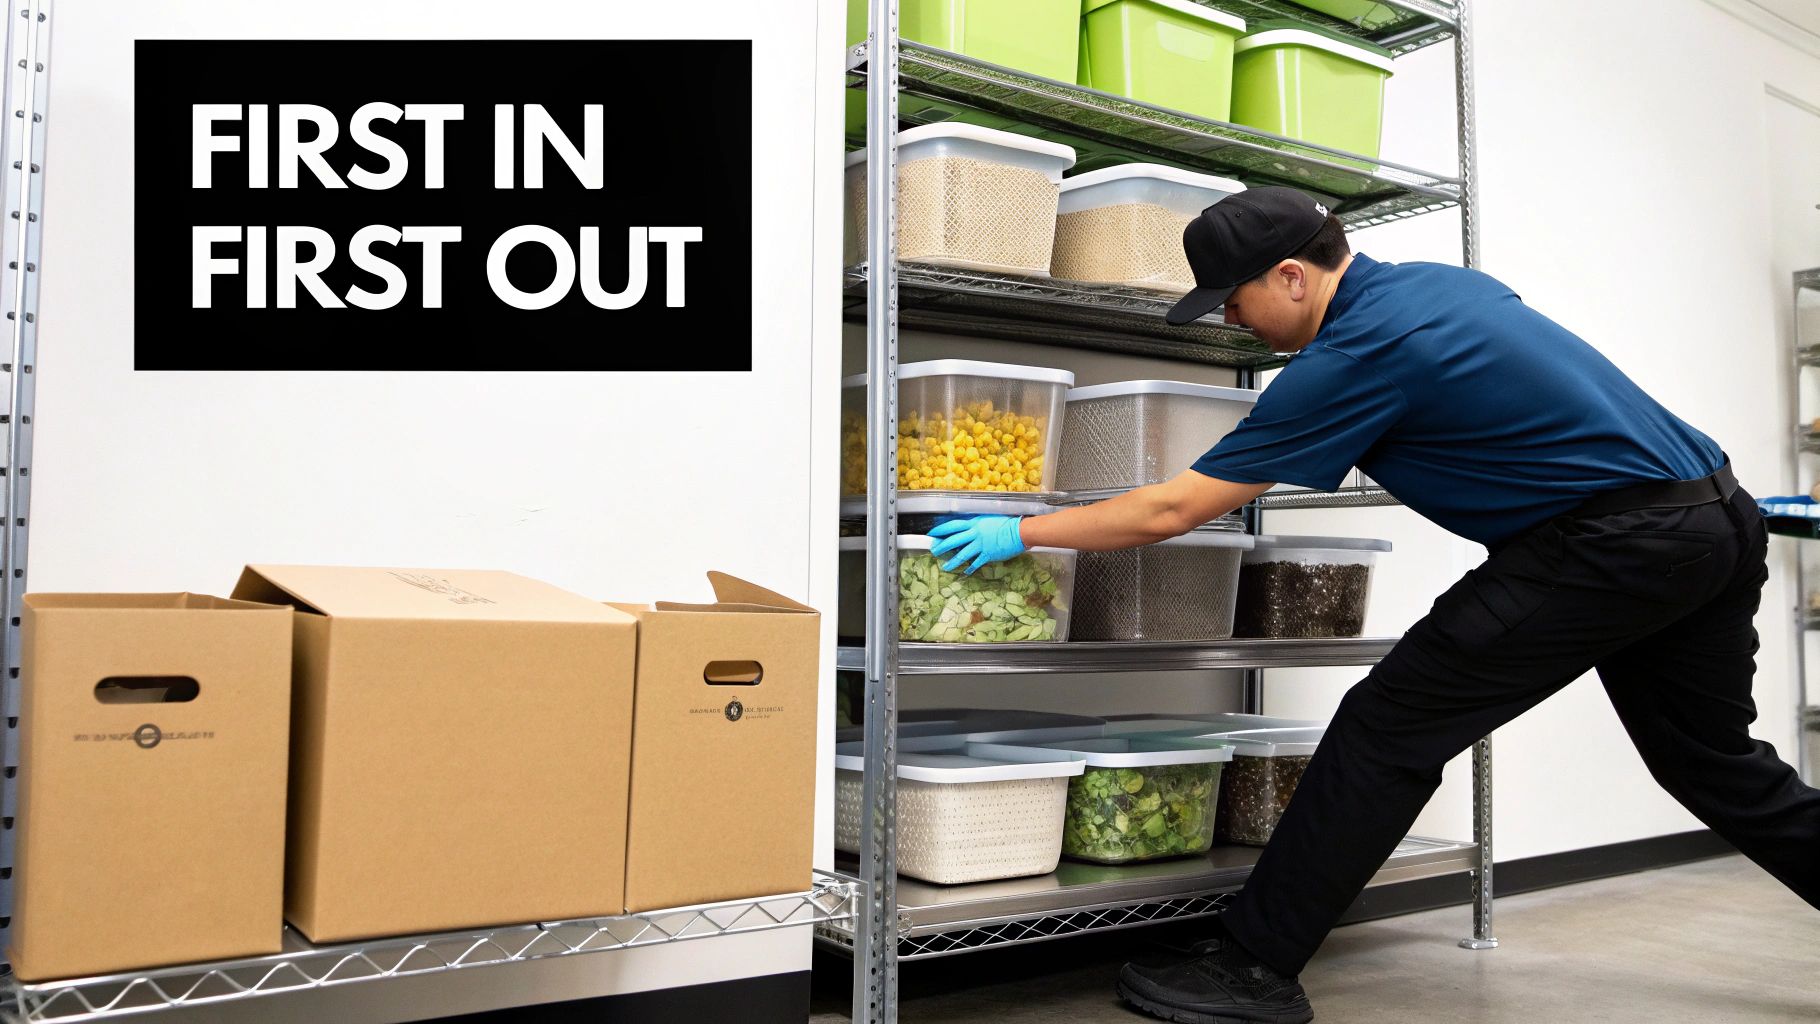
First-In, First-Out, or FIFO, is more than just a catchy acronym—it's the operational heartbeat of any smart, safe kitchen. This simple system for rotating stock is your best defense for ensuring you always serve the freshest ingredients, maintain quality, and slash costly spoilage.
Think of it like a perfectly organized line at the bank: the first person to arrive is the first to be served. The first ingredient that comes through your door should always be the first one used.
Ignoring this principle is one of the fastest ways to lose money and risk food safety. When older stock gets shoved to the back of the shelf, it’s easily forgotten until it’s spoiled and unusable. This creates a wasteful cycle that eats into your bottom line and can even pose a health risk if an expired product ends up in a dish.
The cost of this waste is staggering. In the United States, restaurants are a major contributor to the nearly 60 million tons of food thrown away each year. A huge chunk of that comes from spoilage due to poor storage habits, like failing to rotate stock or using ingredients past their prime.
The Core Mechanics of FIFO
Putting FIFO into practice doesn’t require expensive technology, just disciplined procedures that become second nature to your team. The whole process starts the moment a new delivery arrives.
- Inspect and Date: Check every single incoming item for quality and proper temperature. Immediately label each product with the delivery date and, most importantly, a clear "use-by" date.
- Rotate Stock: This is the most critical step. When stocking shelves, always pull the older items to the front and place the new delivery behind them. This simple move ensures staff members naturally grab the oldest products first.
- Organize Visually: Keep your walk-in, cooler, and dry storage areas clean and uncluttered. A tidy space makes it much easier to see what you have and get to the older items without a struggle.
A strong FIFO system transforms your inventory from a potential liability into a well-managed asset. It's a proactive approach that stops waste before it happens, guaranteeing the ingredients you paid for end up on a customer's plate, not in the trash.
Making Labeling Fast and Foolproof
Clear, consistent labeling is the language of an effective FIFO system. If your team can’t tell how old an item is at a glance, all your rotation efforts will fail. The goal is to make it effortless, even during the chaos of a dinner rush.
Your labels need to have three key pieces of information:
- Product Name: Clearly identify what’s in the container, especially for prepped items.
- Date Received/Prepped: This marks the day the item entered your inventory.
- Use-By Date: This is the most critical detail, telling everyone when the product must be used.
To make things even easier, many kitchens use a color-coded system. By assigning a different color label to each day of the week, staff can instantly spot which items need to be used next. This visual shortcut is far quicker than reading tiny print and dramatically improves compliance with your restaurant food storage guidelines.
For a deeper dive into efficient stock rotation, check out these 9 inventory management best practices.
Ultimately, a perfect FIFO system is built on training and consistency. When every team member understands their role in the process, it becomes an ingrained habit that protects your food, your customers, and your profits. To further streamline your kitchen's operations, take a look at our guide on inventory management best practices for more advanced strategies.
Organizing Storage to Prevent Cross-Contamination
A well-organized storage unit is your first line of defense against one of the biggest threats in any kitchen: cross-contamination. You have to think of your walk-in cooler or refrigerator as more than just a cold box. It's a carefully structured system designed to keep dangerous pathogens from moving between different types of food.
When raw meat juices drip onto a ready-to-eat salad, for instance, you risk transferring harmful bacteria like Salmonella or E. coli. That creates a serious food safety nightmare. Proper organization isn't about making the cooler look tidy; it's a critical part of your restaurant food storage guidelines that directly protects your customers.
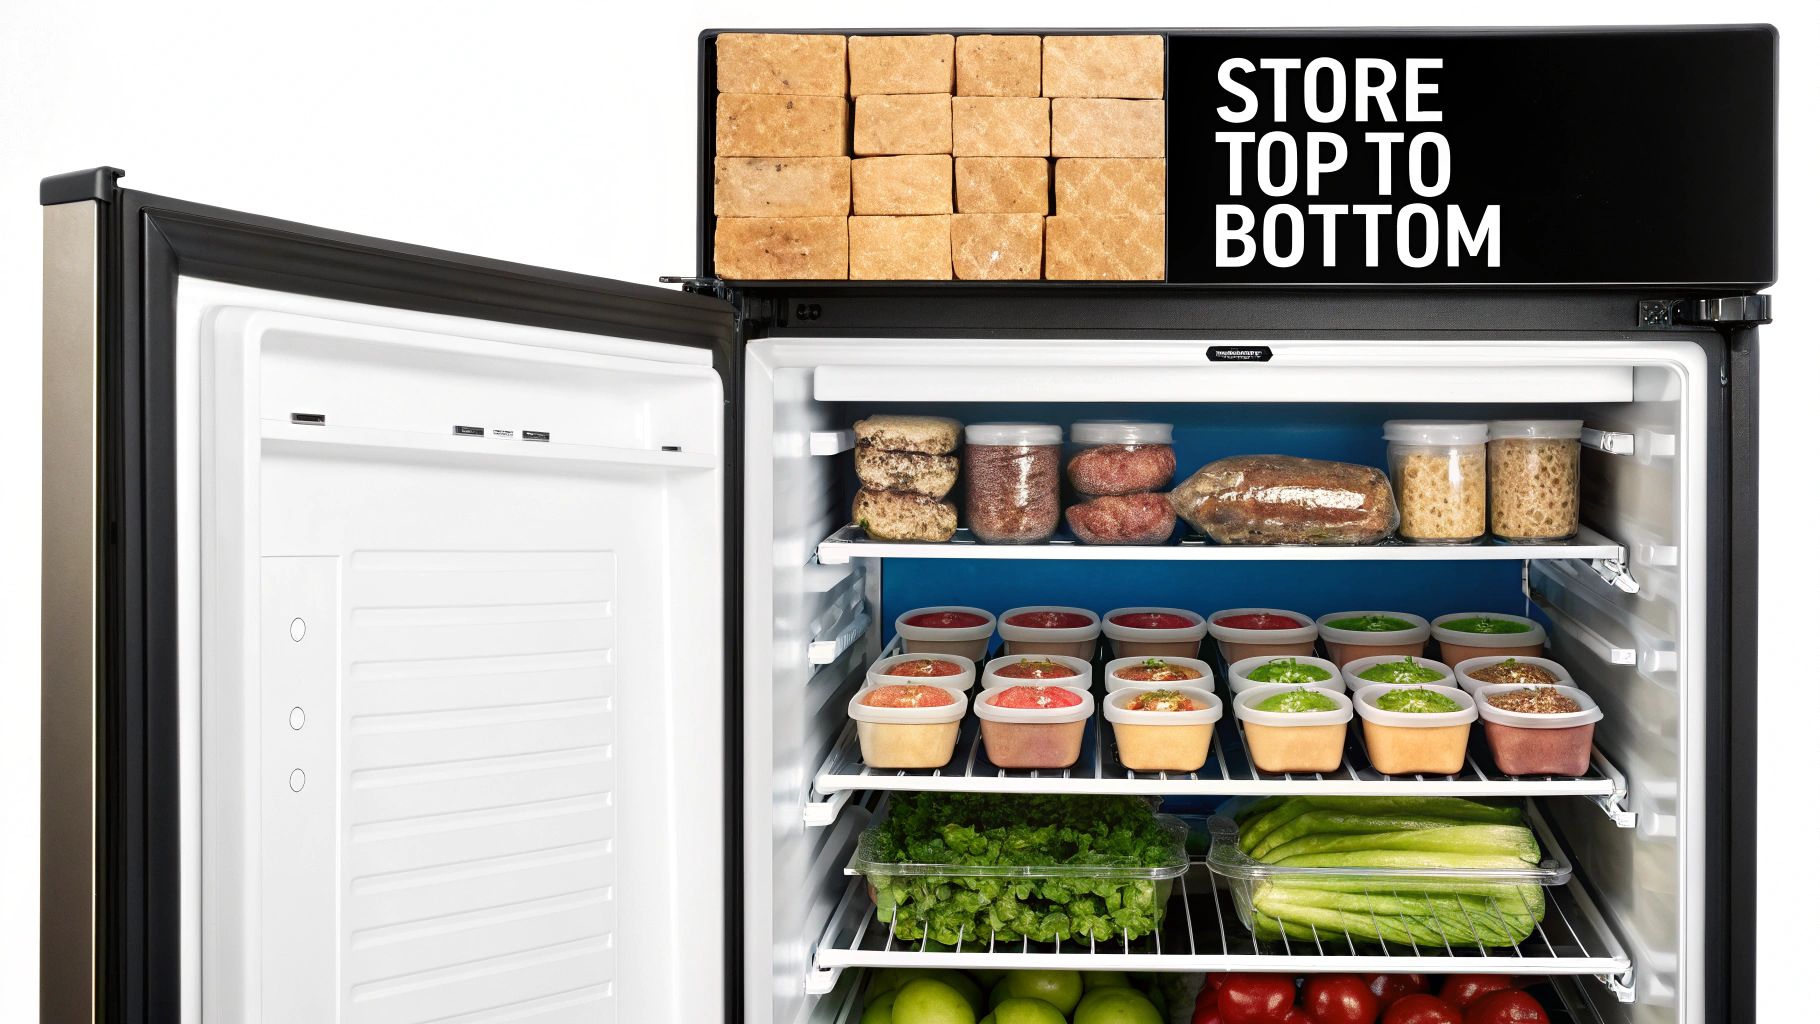
The key to stopping this is a universal, top-to-bottom storage hierarchy. This method organizes food based on the minimum internal cooking temperature needed to kill germs, with items that need the least cooking (or none at all) placed at the top.
The Universal Top-to-Bottom Storage Hierarchy
Think about water flowing downhill. Raw juices will always drip down, so the logic is simple: put foods that could cause contamination at the bottom. Keep the safe, ready-to-eat foods at the very top, far out of harm's way. This order is completely non-negotiable for passing health inspections and keeping your kitchen safe.
Here is the correct shelf order, from top to bottom:
- Top Shelf - Ready-to-Eat Foods: This is the safest spot, reserved for anything that won't be cooked further. Think cooked meats, deli items, salads, desserts, and properly cooled leftovers.
- Second Shelf - Cooked Foods & Whole Seafood: Just below the ready-to-eat items, store whole fish and other seafood. Their required cooking temperature is 145°F (63°C).
- Third Shelf - Whole Meats: This shelf is for whole cuts of beef and pork, like steaks and roasts. These also need to hit a minimum internal temperature of 145°F (63°C).
- Fourth Shelf - Ground Meats & Ground Fish: Ground products are handled more, which introduces a higher risk. They must be cooked to 160°F (71°C) and belong below the whole cuts.
- Bottom Shelf - All Poultry: Chicken, turkey, and duck carry the highest risk. Always store them on the very bottom shelf and ensure they're cooked to a minimum of 165°F (74°C).
Adhering to this hierarchy transforms your cooler from a simple storage space into an active safety system. Every shelf has a purpose, and every item has its place, all designed to make cross-contamination nearly impossible.
The Role of Containers and Cleanliness
Beyond just the shelf order, the containers you use play a massive role. Never store raw meat or poultry in its original, flimsy packaging from the supplier. It’s just asking for trouble.
Instead, transfer all raw items into dedicated, food-safe containers with secure, tight-fitting lids. This gives you an extra barrier to stop any accidental spills or drips from ruining your inventory.
Finally, this whole system is built on a foundation of cleanliness. The shelves, walls, floors, and even the door gaskets in your storage units must be part of a strict, regular cleaning schedule. Sanitize spills the moment they happen and wipe down all surfaces daily to kill any lingering bacteria. A clean, organized cooler is a safe cooler.
Choosing the Right Prep Tables for Your Kitchen
Think of your prep tables as the command center where all your food safety plans meet the reality of a busy service. Picking the right one isn't just about finding a flat surface; it's about choosing a workstation that streamlines your flow, champions sanitation, and fits right into your restaurant food storage guidelines. The perfect table can turn a chaotic kitchen into a smooth, safe operation.
When it comes to materials, stainless steel is the undisputed king of the commercial kitchen. Because it’s non-porous, it won’t give bacteria, odors, or stains a place to hide. This makes it incredibly simple to clean and sanitize—a non-negotiable in our line of work. It’s also tough as nails, standing up to heat, corrosion, and the general abuse of a dinner rush.
Understanding Stainless Steel Grades and Types
Not all stainless steel is created equal. The "grade" tells you what it's made of, which directly impacts its durability and how well it resists rust. In professional kitchens, you'll mainly run into two grades:
- 304 Gauge Stainless Steel: This is the top-shelf choice for food prep surfaces. It’s got more chromium and nickel in the mix, giving it superior protection against rust and corrosion, especially from acidic foods and salt.
- 430 Gauge Stainless Steel: This is a more wallet-friendly option that's still durable and perfectly food-safe. It performs well but is a bit more likely to corrode over time than 304 gauge, making it a better fit for things like equipment stands or dry storage areas.
Beyond the grade, standard stainless steel prep tables come in various designs, such as open-base tables for easy access, tables with undershelves for added storage, and models with backsplashes to protect walls.
Specialized Prep Tables With Integrated Refrigeration
These days, prep tables are much more than just a flat top. Many modern units come with built-in refrigeration, which is an absolute game-changer for both speed and food safety. This design keeps perishable ingredients right where you need them, all held at a safe temperature below 41°F.
These units are the bridge between your walk-in cooler and the prep line, slashing the time food spends in the Temperature Danger Zone. To see just how versatile these can be, it's worth taking a closer look at the different types of commercial refrigerated prep tables and figuring out which one best suits your kitchen's rhythm.
Most of these specialized tables are built with specific menus in mind, like sandwiches, salads, and pizzas.
Sandwich and Salad Prep Tables
Picture this: you're building a custom salad with a dozen different ingredients. You need crisp lettuce, fresh tomatoes, cheese, onions, and all your dressings chilled and within arm's reach. That’s exactly what a sandwich/salad prep table is for.
These units cleverly combine a refrigerated base for storing backup ingredients with a refrigerated rail on top holding pans of your most-used items. A full-length cutting board across the front completes the all-in-one workstation.
With this setup, a line cook can fly through orders without ever taking more than a step. Every temperature-sensitive ingredient stays perfectly chilled right up until the moment it hits the plate.
Pizza Prep Tables
Pizza prep tables follow the same idea but are beefed up for the unique needs of a pizzeria. The biggest difference is the refrigerated rail—it’s usually wider and deeper to hold bigger pans of bulky toppings like pepperoni, mushrooms, and bell peppers.
You'll also find that many pizza tables have a marble or stone work surface. This isn't just for looks; the cold stone is perfect for keeping pizza dough from getting warm and sticky as you stretch and top it. It’s the perfect combination of a chilled surface and easy-to-grab, refrigerated toppings that makes for a fast, consistent, and safe assembly line.
Comparison of Commercial Prep Tables
To help you visualize which table might be the best fit for your operation, here's a quick comparison of the most common types.
| Table Type | Primary Use Case | Key Features | Best For |
|---|---|---|---|
| Standard Stainless Steel | General food prep, mixing, chopping, plating, equipment stand | Flat, durable work surface; optional undershelves or backsplashes | All-purpose kitchen tasks, dry prep areas, kitchens with separate reach-in refrigeration. |
| Sandwich/Salad Prep Table | Assembling sandwiches, salads, wraps, and bowls | Refrigerated base, refrigerated top rail for pans, integrated cutting board | Delis, cafes, sandwich shops, and restaurants with extensive salad or sandwich menus. |
| Pizza Prep Table | Assembling pizzas | Refrigerated base, deep refrigerated top rail, often has a marble/stone surface | Pizzerias, Italian restaurants, and any operation that needs an efficient pizza assembly line. |
Ultimately, the right choice comes down to your menu, your kitchen's layout, and how many covers you do a night. Don't forget to look for other key features like undershelves for extra storage, casters to make cleaning easier, and backsplashes to keep your walls clean. When you match the equipment to your specific needs, your prep station becomes a true cornerstone of your kitchen's efficiency and food safety program.
Creating a Consistent Cleaning and Maintenance Schedule
Great food safety isn’t a matter of luck—it’s built on a rock-solid foundation of cleanliness and organization. Think of your storage areas as the heart of your inventory. Keeping them spotless isn't just a good idea; it's an absolute must under any restaurant food storage guidelines. A casual "clean it when it looks dirty" attitude simply won't fly. You need a documented, consistent schedule that everyone follows.
When you put a clear, written cleaning plan in place, you’re building a culture of accountability. It ensures your storage spaces remain a safe home for your ingredients, not a breeding ground for nasty bacteria. This plan should break down tasks into daily, weekly, and monthly duties for every single part of your storage system.
Daily Cleaning Tasks: The Foundation of Safety
It's the small, daily habits that separate a truly safe kitchen from a hazardous one. These are quick but critical tasks that stop small messes from spiraling into major problems. They should be a standard part of your opening and closing routines.
Your daily checklist needs to include:
- Wipe Down All Spills Immediately: Spills should be dealt with the second they happen. This prevents cross-contamination and keeps pests from getting interested.
- Sanitize High-Touch Surfaces: Clean and sanitize the handles on all your refrigerators, freezers, and storage room doors. Everyone touches these.
- Sweep and Mop Floors: Get all the debris and food bits off the floors in every storage area, including inside the walk-ins.
Weekly Deep Cleaning Routines
Weekly tasks dig a little deeper, tackling the grime that builds up over time. It’s smart to schedule these jobs for a specific, slower time of the week. That way, they get the focus they need without getting in the way of service.
A consistent weekly deep clean is your best defense against hidden contaminants. It sends a clear message that cleanliness is a core value, not just a reaction to a mess.
Your key weekly jobs should include:
- Wipe Down and Sanitize Shelving: Empty, clean, and sanitize every shelf in your dry storage, fridges, and freezers.
- Clean Refrigerator and Freezer Interiors: Give the walls, floors, and ceilings inside all your cold storage units a thorough wipe-down.
- Inspect and Clean Door Seals: The gaskets on refrigeration units are notorious for hiding mold. Cleaning them also ensures a proper seal, which saves energy.
Monthly Maintenance and Organizational Checks
Monthly duties are all about the bigger picture—maintenance and organization that keep your entire system humming. These checks help you spot potential equipment problems before they become disasters and give you a chance to reinforce best practices with your team.
Here’s what to focus on every month:
- Deep Clean and Sanitize All Storage Units: This means actually pulling units away from the walls to clean behind and underneath them.
- Check for Pests: Do a thorough inspection for any signs of pest activity. If you see something, deal with it immediately.
- Review Organizational Practices: Make sure everything is still stored at least six inches off the floor and away from the walls. This is crucial for proper airflow and makes cleaning much easier.
A comprehensive schedule also needs to cover the cleaning of all your kitchenware. To get dishes and utensils sanitized to a high standard—which is critical for stopping foodborne illness—it's worth looking into specialized equipment. For instance, high-performance laboratory dishwashers can help ensure you meet rigorous hygiene standards every single time. By turning your cleaning into a system, you build a powerful defense that protects your food, your customers, and your reputation.
Frequently Asked Questions About Food Storage
Navigating restaurant food storage guidelines brings up a lot of the same questions. Getting clear, straightforward answers helps reinforce your team's training and ensures your kitchen stays compliant and safe.
The goal is to turn these principles into ingrained habits for every member of your staff. Let's tackle some of the most common questions head-on.
What Is the Single Biggest Food Storage Mistake
The most common and dangerous mistake is inconsistent temperature control. This includes everything from refrigerators running warm to failing to log temperatures daily, or leaving perishables in the Temperature Danger Zone (41°F to 135°F) during a busy prep session.
This single failure is a primary cause of foodborne illness. The best prevention is a strict routine of checking and logging temperatures at the start and end of every shift and performing regular equipment calibration.
Think of your temperature log as your kitchen's daily health report. It's the first thing an inspector will ask for and your best proof that you are prioritizing food safety. Consistent monitoring is the only way to catch a failing unit before it leads to a disaster.
How Can I Get My Busy Staff to Follow FIFO
For a system like First-In, First-Out (FIFO) to work, it has to be simple and visual. Train staff to always place new deliveries behind existing stock—it’s a simple physical habit. Clear labeling is the key to making it stick.
- Use Large, Clear Labels: Every single item must be labeled with its name and a bold "use-by" date.
- Implement a Color-Coded System: Assign a different color to each day of the week. This makes visual checks incredibly fast.
- Conduct Quick Audits: A brief weekly walkthrough of your storage areas helps reinforce the habit and lets you correct mistakes.
What Are the Rules for Storing Dry Goods
Proper dry storage is crucial for protecting shelf-stable items. The environment should be cool, dry, and well-ventilated, ideally between 50°F and 70°F (10°C and 21°C) and away from direct sunlight.
Most importantly, every item must be stored on shelves at least six inches off the floor. This health code standard is designed to prevent pest contamination and allow for easy cleaning underneath the shelving.
Once opened, products like flour and sugar should be transferred into airtight, food-grade containers. This simple step protects them from humidity, moisture, and pests.
Finding the right equipment is fundamental to upholding these essential food safety standards. At PrepTables.com, we offer a wide range of NSF-certified stainless steel prep tables, refrigerated workstations, and storage solutions designed for the demands of a professional kitchen. Explore our selection to build a safer, more efficient workspace at https://preptables.com.