

A Guide to Food Safety Temperature Control
When it comes to preventing foodborne illness, nothing is more important than food safety temperature control. It all boils down to a simple, powerful idea: keep cold foods cold and hot foods hot. This stops harmful bacteria from multiplying to dangerous levels. For anyone handling or serving food, mastering these principles isn't just a good idea—it's an absolute necessity.
Why Temperature Control Is Your First Line of Defense
Think of temperature as the gatekeeper for your kitchen's safety. When you manage that gate properly, your food stays safe and delicious. But if you walk away and leave it open, you’re inviting invisible threats that can have devastating consequences. That’s the entire game of food safety temperature control right there.
The stakes are unbelievably high. The World Health Organization estimates that nearly 600 million people get sick from contaminated food every year, leading to about 420,000 deaths. These aren't just statistics; they're a stark reminder of why solid temperature management has to be the backbone of any food operation. You can dig deeper into the global food safety statistics to see just how big this problem is.
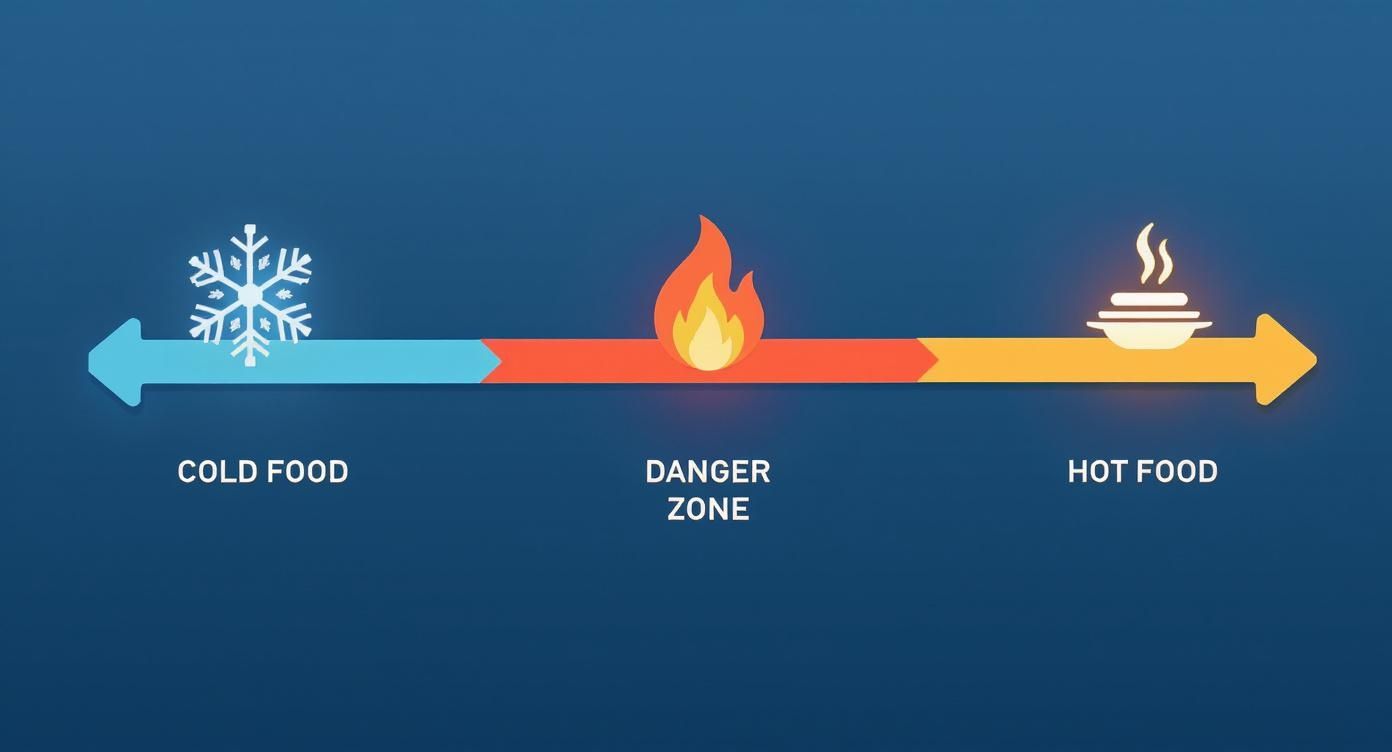
The Temperature Danger Zone Explained
At the heart of it all is a critical range called the Temperature Danger Zone. This is the temperature bracket between 41°F and 135°F (5°C to 57°C).
You can think of this zone as a "bacterial paradise." It’s the perfect environment for pathogens like Salmonella, E. coli, and Listeria to throw a party and double their numbers in as little as 20 minutes.
Any potentially hazardous food—we're talking meat, poultry, dairy, cooked veggies, and seafood—left in this zone for too long becomes a ticking time bomb. The more time food spends in the danger zone, the more opportunity bacteria have to grow to a level that can make someone seriously ill.
The real goal of temperature control is simple: keep food out of the danger zone as much as humanly possible. Every single minute counts.
To give you a clearer picture, here’s a quick breakdown of the critical temperature zones you need to know.
Critical Food Temperature Zones at a Glance
This table sums up the key temperature ranges and what they mean for your food. Think of it as your cheat sheet for keeping things safe.
| Zone Name | Temperature Range (°F) | Temperature Range (°C) | Significance |
|---|---|---|---|
| Freezer Zone | Below 0°F | Below -18°C | Stops bacterial growth completely. Ideal for long-term storage. |
| Cold Zone | 32°F - 41°F | 0°C - 5°C | Slows bacterial growth significantly. Proper refrigeration zone. |
| Danger Zone | 41°F - 135°F | 5°C - 57°C | Rapid bacterial growth. Minimize time in this zone at all costs. |
| Hot Holding Zone | 135°F and above | 57°C and above | Prevents bacterial growth. Required for holding hot foods safely. |
| Cooking Zone | 165°F and above | 74°C and above | Kills most harmful bacteria. Essential for safe cooking. |
Memorize these numbers. They are the foundation of a safe and successful kitchen.
The Three Core Principles of Temperature Safety
To build a solid defense against foodborne pathogens, your entire process needs to be built on three core ideas. These aren't just friendly suggestions; they're the non-negotiable rules of the road.
Here are the three pillars that hold up everything else:
- Keep Cold Food Cold: All refrigerated foods have to be stored at or below 41°F (5°C). This temperature slams the brakes on bacterial growth, keeping your food safe and fresh.
- Keep Hot Food Hot: Any hot food being held for service must stay at or above 135°F (57°C). At this temperature, bacteria can't get a foothold.
- Minimize Time in Between: The journey between cold and hot—like during thawing, cooling, or prep—needs to be as short and quick as possible to limit any time spent in the danger zone.
Master these three concepts, and you’ll create a powerful barrier against contamination. This is about more than just following rules; it's about understanding why every temperature check and every minute of monitoring is a critical step in protecting both your customers and your reputation.
Mastering Temperatures at Every Stage of Food Handling
Think of food safety temperature control not as a single task, but as a continuous watch. It's like a chain of custody for your ingredients, where temperature is the guardian at every single link—from the moment a delivery truck arrives to the second a finished dish hits the table. Every stage has its own unique temperature challenges, and you need specific protocols to keep food out of the dreaded Temperature Danger Zone.
This infographic breaks down the basic flow, showing the clear lines between the cold zone, the danger zone, and the hot zone.
As you can see, the game plan is simple: keep food either safely cold or safely hot. The less time it spends in that hazardous middle ground where bacteria love to multiply, the better.
Receiving: The First Critical Checkpoint
Your defense starts the second a delivery truck pulls up to your loading dock. This is your first, and best, chance to stop a potential hazard before it ever sets foot in your kitchen. Never just assume that items were held at the right temperature during their journey; you have to verify it.
When they arrive, all refrigerated items must be at or below 41°F (5°C). Frozen goods need to be completely solid, with zero signs of thawing and refreezing.
Here’s your game plan for incoming shipments:
- Prioritize the Perishables: Get to the time- and temperature-sensitive items first. Fresh fish, poultry, and dairy need to be inspected and stored immediately.
- Use a Calibrated Thermometer: Don't just guess. Insert a clean, sanitized probe thermometer between two packages to get an accurate reading without having to puncture the packaging itself.
- Look for Red Flags: Be on the lookout for warning signs. If a box of frozen items has large ice crystals or looks wet, reject it. That’s a clear indicator it has thawed and refrozen somewhere along the line—a major temperature abuse problem.
Proper Storage: The FIFO Principle
Once you’ve accepted a delivery, those ingredients need to be stored correctly to maintain their quality and safety. The golden rule here is FIFO, which stands for "First-In, First-Out." It’s a straightforward inventory system that ensures you use older stock before new stock, which cuts down on waste and the risk of spoilage.
TCS (Time/Temperature Control for Safety) foods can be stored for up to seven days, but only if they are held at 41°F (5°C) or lower. Make sure everything is labeled with the delivery date and a clear "use-by" date to stay in control.
A well-organized walk-in isn't just about being neat—it's a critical food safety tool. You need proper airflow around your products to keep temperatures consistent, so don't ever overcrowd your shelves.
Safe Thawing and Preparation
How you thaw food is just as critical as how you store it. Doing it the wrong way can easily push food right into the danger zone, waking up dormant bacteria and letting them multiply. The one thing you should never do is thaw food on a counter at room temperature.
Instead, stick to one of these FDA-approved methods:
- In a Refrigerator: Place the food on the bottom shelf of a cooler that’s set to 41°F (5°C) or below. This prevents any drips from contaminating other foods below it.
- Under Cold Running Water: Submerge the food in a clean sink with cold, potable running water at 70°F (21°C) or lower.
- As Part of the Cooking Process: Some foods, like frozen burger patties or vegetables, are designed to be cooked straight from frozen.
Cooking, Holding, and Cooling
Cooking is your chance to eliminate harmful pathogens. Different foods need to reach different minimum internal temperatures to be considered safe. For example, all poultry must hit 165°F (74°C), while a steak can be safely cooked to a lower temperature. Always, always use a food thermometer to check.
If you aren't serving a dish right away, it has to be hot-held at 135°F (57°C) or higher. If food drops below this temperature, your only options are to reheat it properly or throw it out.
Cooling hot food down for later is one of the riskiest things you can do in a kitchen. You have to get food through the danger zone as fast as possible. The FDA requires a two-stage cooling method:
- Stage 1: Cool food from 135°F (57°C) down to 70°F (21°C) within two hours.
- Stage 2: Then, cool it from 70°F (21°C) down to 41°F (5°C) or lower within the next four hours.
The entire cooling process can’t take more than six hours total. To speed things up, use tools like ice-water baths, ice paddles, or divide large batches into shallow pans. This is how you ensure safety from start to finish.
How HACCP Principles Shape Your Temperature Strategy
Trying to keep up with food safety rules can feel like a tangled mess. The good news? There's a system designed to cut through the confusion: HACCP, which stands for Hazard Analysis and Critical Control Points. Don't think of it as just another rulebook. Instead, see HACCP as a proactive game plan for stopping food safety problems before they even have a chance to start.
It’s a logical, science-based approach that shifts you from a reactive, "fix-it-when-it-breaks" mentality to a preventative one. Regulatory bodies like the FDA trust this framework because it flat-out works. At its core, HACCP is all about pinpointing where things can go wrong in your process and putting solid controls in place to manage those risks.
Solid temperature control is the beating heart of any good HACCP plan. When you understand its principles, you can turn routine temp checks into a powerful strategy that protects both your customers and your business. For a deeper look into the certification process, feel free to explore our guide on what is HACCP certification.
Identifying Hazards and Critical Control Points
The first move in building your HACCP plan is a Hazard Analysis. This simply means walking through every single step of your food's journey—from the delivery truck to the customer's plate—and looking for any potential biological, chemical, or physical hazards. When we're talking about temperature, the main enemy is biological: the growth of nasty bacteria.
Once you know where the risks are, you identify your Critical Control Points (CCPs).
A Critical Control Point is a specific step where you can apply a control to prevent or eliminate a food safety hazard. For temperature, these are the make-or-break moments where precise measurement is non-negotiable.
These are the moments where your temperature control efforts really count. They aren't just random checks; they're targeted actions at the most vulnerable points in your food prep process.
Turning Principles into Action
HACCP is built on seven core principles, but for managing temperature, a few are especially critical. Let’s break down how they look in a real-world kitchen.
-
Establishing Critical Limits (Principle 3): This is where you draw a clear line in the sand. For a CCP like a hot holding station, the critical limit is 135°F (57°C) or above. For a cold prep table, it's 41°F (5°C) or below. These numbers aren't suggestions—they're your hard-and-fast rules.
-
Monitoring Procedures (Principle 4): You can't manage what you don't measure. This principle means you need a system for regularly checking temperatures at each CCP. You have to decide who takes the temperature, how often they do it (say, every two hours), and what tool they use, like a calibrated probe thermometer.
-
Corrective Actions (Principle 5): This is your "what if" plan. What do you do when a line cook finds out the soup on the steam table has dropped to 125°F? A pre-planned corrective action, like reheating the food to 165°F, has to happen immediately to get that food back into the safe zone.
Documentation and Record Keeping
The final piece of a strong, HACCP-based temperature strategy is documentation (Principle 7). Keeping accurate, consistent temperature logs isn't just about ticking a box for the health inspector—it's your proof. These records demonstrate that you have a working system and are actively on top of your food safety.
Your logs should be simple but complete. Make sure they include:
- The food item or equipment being checked
- The date and time
- The exact temperature reading
- The initials of the person who took the reading
- A note of any corrective actions taken
By weaving these HACCP principles into your daily routine, temperature control stops being a chore. It becomes a smart, integrated system that actively defends against foodborne illness, making sure every dish you serve is as safe as it is delicious.
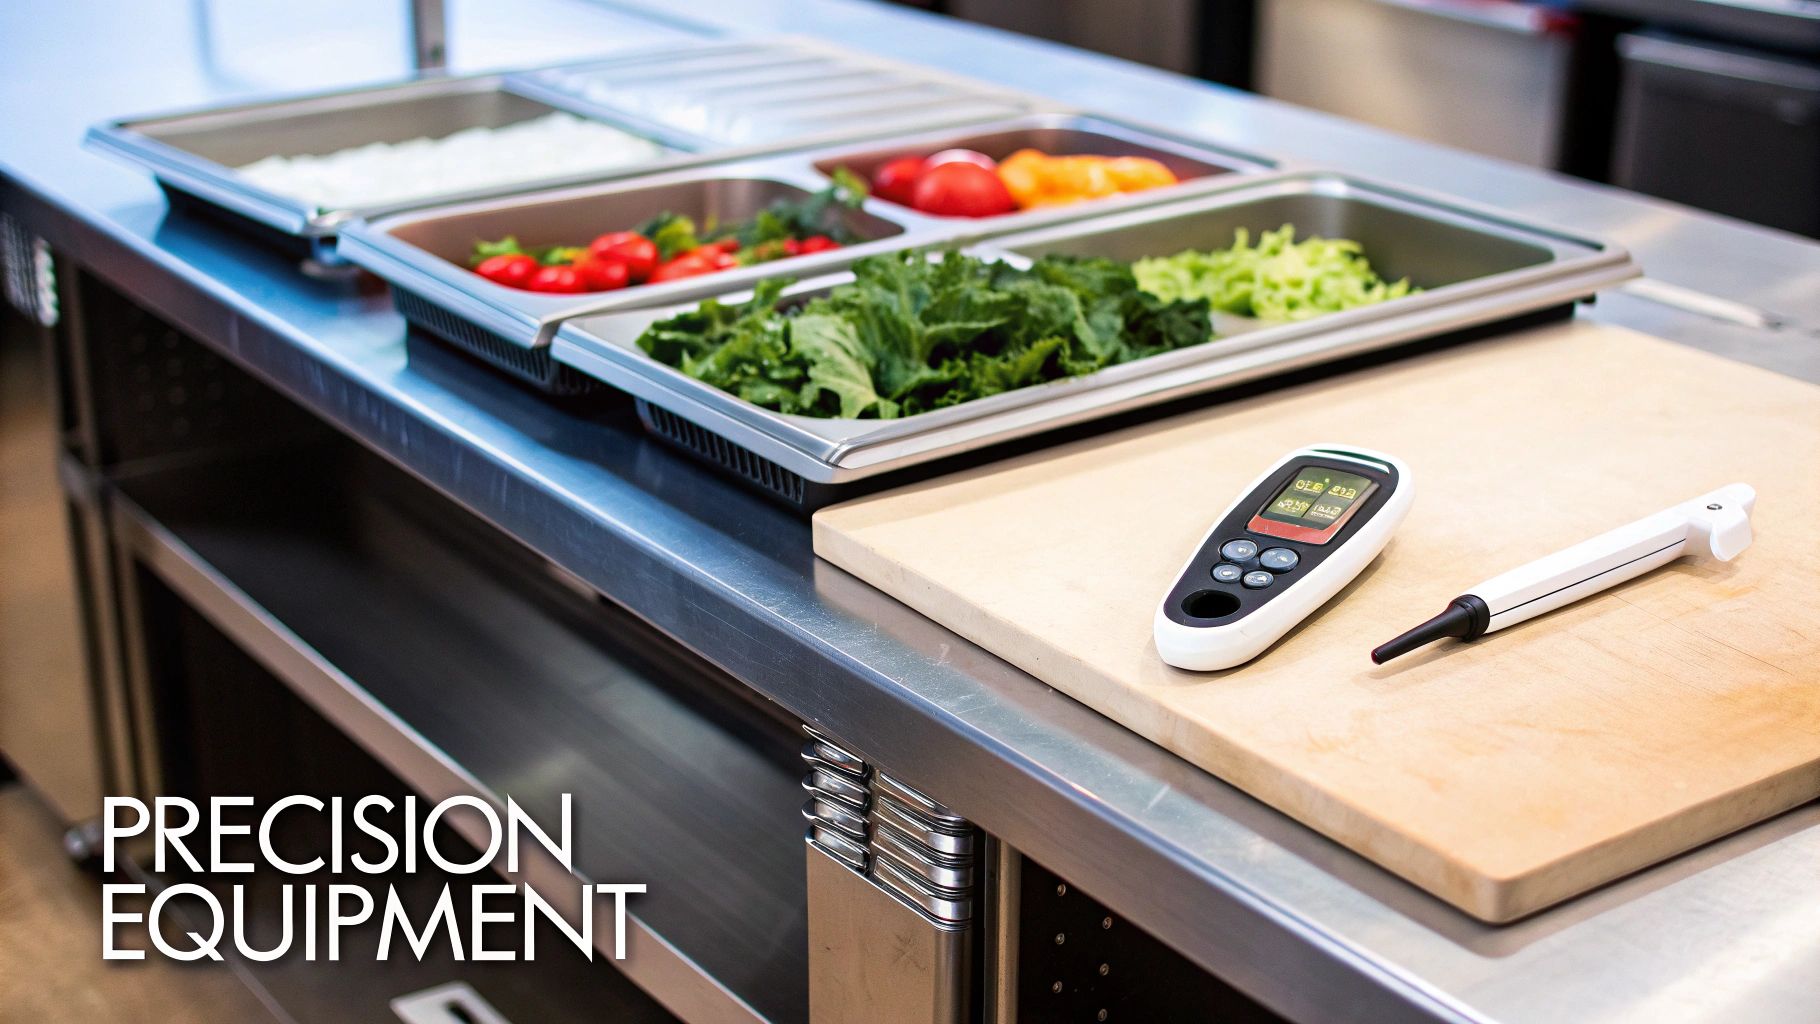
Choosing the Right Equipment for Temperature Precision
Your strategy for food safety temperature control is only as good as the equipment you’re using. Think of it this way: the right tools aren't just a matter of convenience; they're your frontline defense, working around the clock to keep ingredients out of that dreaded Temperature Danger Zone. From your main prep surfaces to specialized refrigeration, every piece of equipment plays a part in keeping your food safe and wholesome.
At the heart of any professional kitchen, you'll find the humble prep table. And when it comes to materials, stainless steel is the undisputed king for a reason. It’s completely non-porous, which means it won’t give bacteria, lingering odors, or stains a place to hide. It's also built to last, shrugging off the corrosion and constant abuse of a busy kitchen.
But here’s something a lot of people miss: not all stainless steel is created equal. Knowing the difference is what separates a good purchase from a great one.
Understanding Stainless Steel Prep Tables
Stainless steel prep tables are the workhorses of a commercial kitchen, but they come in various forms to suit different needs and budgets. The main differences lie in the type and thickness of the steel, as well as the table's overall design.
You’ll mostly see two types of stainless steel out there: 304 and 430 grade.
- 304 Grade: Think of this as the premium, heavy-duty option. It has more chromium and nickel, making it incredibly tough against rust and corrosion. If your table will be in a wet area or constantly in contact with acidic foods like tomatoes or citrus, this is the grade you want.
- 430 Grade: This is a solid, more budget-friendly choice. It’s still durable for general prep work, but it’s more susceptible to corrosion over time, especially if it’s always wet or exposed to salt. For dry storage areas or less intensive tasks, a 430-grade table is a perfectly suitable option.
Beyond the grade, you also need to look at the gauge—a term for the steel's thickness. It’s a bit counterintuitive, but a lower gauge number means thicker, more durable steel. An 18-gauge table is a common workhorse, but for supporting heavy mixers or equipment, investing in a sturdier 14- or 16-gauge table is a smart move.
Specialized Prep Tables for Peak Efficiency
While a standard flat-top table is essential, many kitchens benefit from specialized units that integrate refrigeration directly into the prep line. These are game-changers for food safety and efficiency.
The genius of a refrigerated prep table is how it slashes the time ingredients spend in the Temperature Danger Zone. By building the chilling right into the prep line, you dramatically reduce risk while speeding up service.
This is a huge deal when you’re working with high-risk foods. According to the U.S. Centers for Disease Control and Prevention (CDC), about 1 in 6 Americans gets sick from contaminated food every year. Proper temperature control, like keeping ingredients cold during prep, is one of the most effective ways to fight off the bacteria that cause these illnesses.
Two of the most common types of refrigerated prep tables are sandwich prep tables and pizza prep tables.
Sandwich Prep Tables
Designed for delis, cafes, and sandwich shops, these units are built for speed and organization. They typically feature a narrower cutting board and refrigerated wells designed to hold multiple smaller food pans (like 1/6-size pans). This setup gives chefs instant access to a wide variety of chilled meats, cheeses, vegetables, and condiments, all kept safely below 41°F (5°C). The hinged lids help maintain temperature and protect ingredients when not in use.
Pizza Prep Tables
Pizzerias and high-volume kitchens rely on pizza prep tables. Their standout feature is a deeper, full-length cutting board (often 19 inches or more) that provides a large, continuous workspace for assembling pizzas, calzones, or large flatbreads. Above the workspace is a raised refrigerated rail designed to hold full-sized food pans, perfect for sauces, cheeses, and bulky toppings. This linear, all-in-one design streamlines the pizza-making process from start to finish.
Choosing the right type depends entirely on your menu and workflow. For a deeper dive, it’s worth exploring a more detailed breakdown of commercial refrigerated prep tables to find the perfect fit. Ultimately, an investment in the right prep table is an investment in efficiency, consistency, and top-tier food safety.
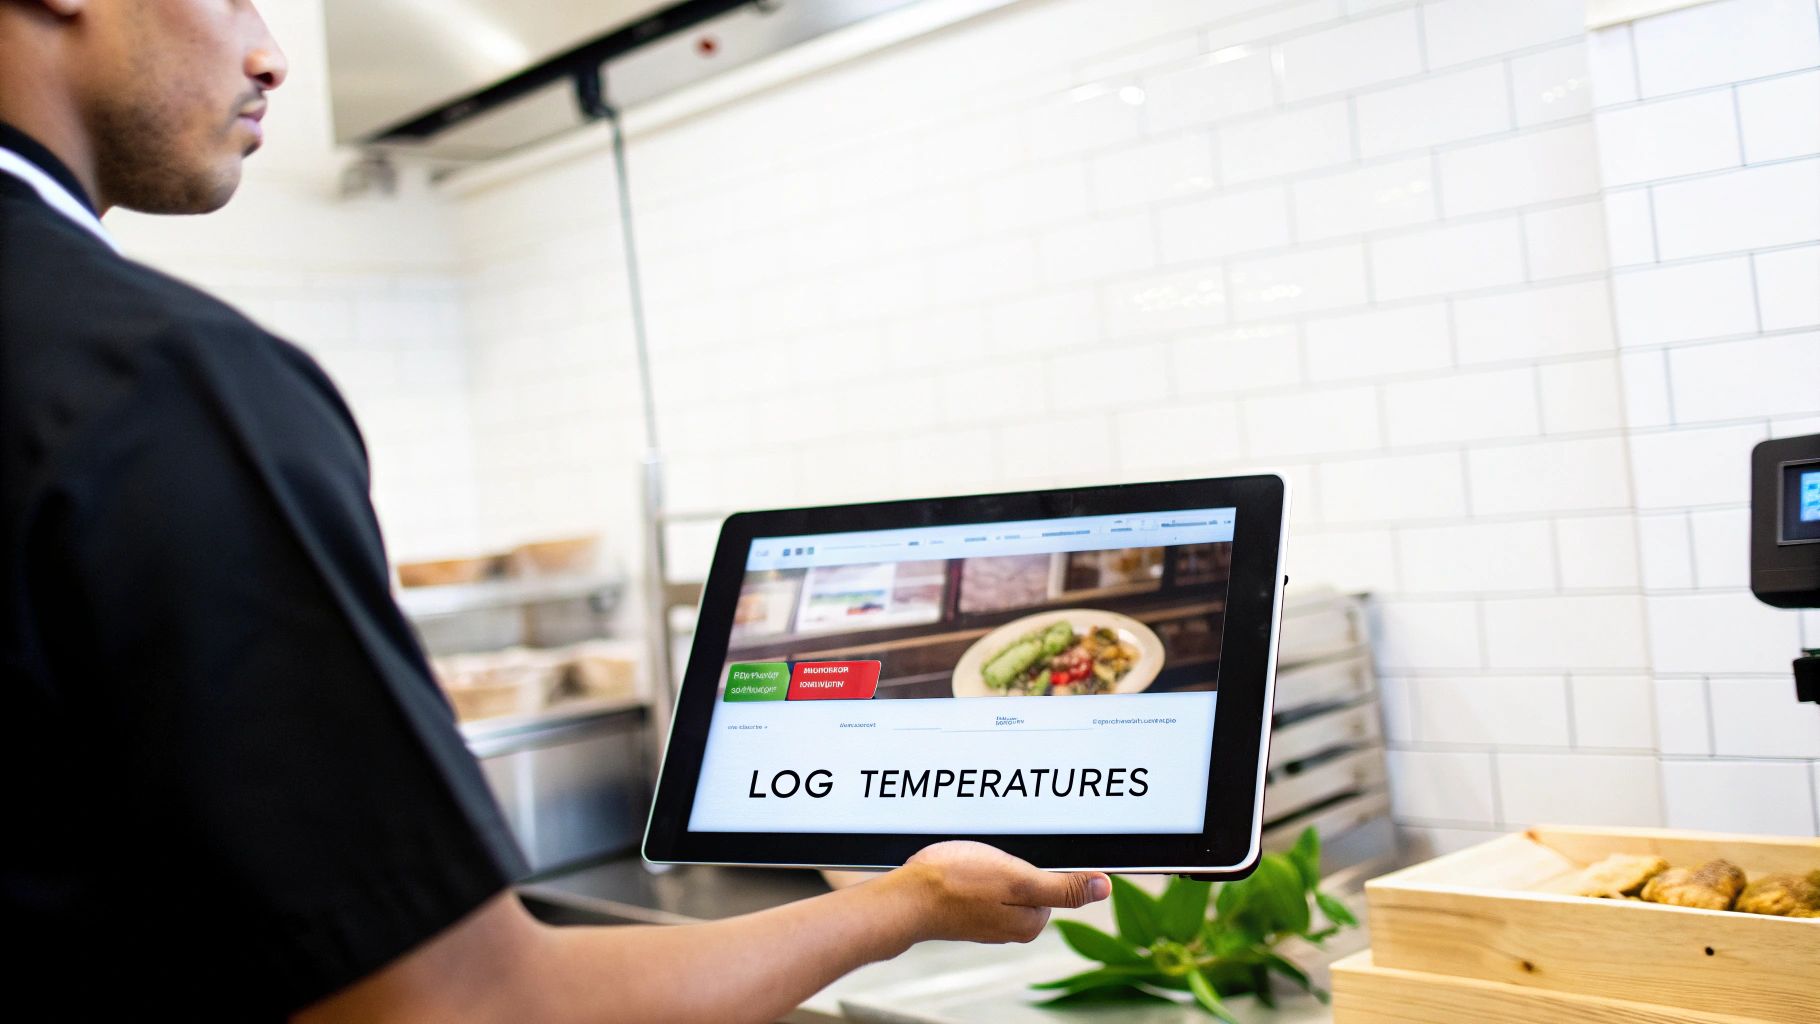
Implementing Effective Monitoring And Record Keeping
Great equipment is just one part of the puzzle. Your commitment to consistent monitoring and detailed record-keeping is what truly brings your food safety temperature control plan to life. Think of it this way: knowledge and tools are only effective when you put them into action every single day. This is where you build the habits that transform your kitchen from simply compliant to genuinely safe.
A solid monitoring system has to start with a clear and predictable schedule. You can’t leave temperature checks to chance or just hope someone remembers. It’s all about creating a routine where your team knows exactly what to check, when to check it, and how to log the information accurately.
This process creates an invaluable data trail. Your temperature logs essentially tell the story of your food’s journey through your kitchen. For a health inspector, these logs are the black-and-white proof that you’re on top of your safety protocols day in and day out.
Establishing A Monitoring Schedule
Consistency is everything. A well-defined schedule gets rid of any guesswork and makes sure every critical piece of equipment gets checked regularly. Best practice suggests logging temperatures at least every four hours, but checking every two hours gives you a much safer buffer to catch and fix problems before food becomes a hazard.
Your monitoring plan should clearly outline:
- What to Check: List every single piece of equipment, from walk-in coolers and freezers to hot-holding cabinets and refrigerated prep tables.
- When to Check: Set specific times for checks, like at the start of a shift, during a mid-day lull, and before closing up.
- Who is Responsible: Assign team members to each task. This creates clear ownership and accountability.
The Power Of Detailed Logs
Your temperature logs are more than just a chore—they’re your primary line of defense. Accurate logs are absolutely essential for showing due diligence and are a core part of any HACCP plan.
A temperature log without notes on corrective actions is only telling half the story. The log has to show not only that you found a problem but also that you immediately fixed it.
For instance, if a refrigerator is reading 45°F, the log needs to note this. But the very next entry must detail the corrective action, like: "Notified manager, adjusted thermostat, and verified temperature returned to 39°F within 30 minutes." This closed-loop process proves your system actually works. This level of detail is also a key part of what is known as cold chain management, making sure food is safe every step of the way.
Embracing Modern Monitoring Solutions
While manual logs definitely work, they are prone to human error. Let's be honest, it happens. Modern technology offers a more reliable alternative with automated monitoring systems. These systems use sensors to track temperatures 24/7, giving you real-time data and instant alerts.
If a freezer door is accidentally left ajar or a cooler’s temperature starts to climb overnight, the system can shoot a notification straight to a manager’s phone. This allows for immediate action, preventing catastrophic food loss and ensuring you’re always compliant. For businesses wanting to automate and simplify their monitoring, looking into IoT and building automation systems for integrated temperature monitoring can take your safety protocols to the next level by providing continuous data and alerts. This approach helps build a culture where every team member is empowered to uphold the highest standards of food safety.
Common Questions About Food Safety Temperatures
Even with the best training, real-world questions about food safety temperature control always pop up. Let's tackle some of the most common challenges you’ll face in the kitchen and reinforce the core concepts that keep your food safe.
What Is the Temperature Danger Zone and Why Is It Important
Think of the "Temperature Danger Zone" as a paradise for bacteria. It’s the temperature range between 41°F and 135°F (5°C to 57°C) where nasty pathogens like Salmonella and Listeria don’t just survive—they thrive, sometimes doubling their numbers in as little as 20 minutes.
Your entire temperature control strategy revolves around one goal: keeping high-risk foods like meat, dairy, and cooked vegetables out of this zone. Cold food needs to stay properly cold (below 41°F), and hot food needs to stay genuinely hot (above 135°F). It's that simple, and that critical.
How Often Should I Check and Log Food Temperatures
At a minimum, you should be checking and logging temperatures every four hours. But best practice? Check every two hours.
That shorter two-hour window gives you time to actually fix a problem. If you discover a fridge is running warm, you have a chance to take corrective action before the food becomes unsafe and has to be thrown out.
Consistent logging isn’t just about ticking a box for the health inspector. It’s your documented proof that you’re actively managing food safety—a cornerstone of any serious HACCP plan.
What Is the Correct Two Stage Cooling Method
Getting hot food cooled down quickly is non-negotiable, and the FDA has a specific two-stage method for it. The whole point is to move food through the danger zone as fast as possible to stop bacteria from taking hold in leftovers or batch-cooked items.
Here’s the breakdown:
- Stage One: Cool the food from 135°F down to 70°F (57°C to 21°C) within two hours. This is the most dangerous part of the cooling process, where bacteria grow fastest.
- Stage Two: Then, cool it from 70°F down to 41°F (21°C to 5°C) or lower within the next four hours.
The entire process must take no longer than six hours, total. To hit these marks, you need to get creative. Use ice baths, stir with ice paddles, or break down large batches into smaller, shallow pans to increase the surface area and speed up cooling.
At PrepTables.com, we provide the professional-grade stainless steel tables and commercial refrigeration you need to maintain precise temperature control. Explore our full selection to build a safer, more efficient kitchen.