

What is a salamander in cooking: A Quick Guide to the Kitchen Broiler
In a professional kitchen, a salamander is a powerful, high-heat overhead broiler used for finishing dishes. Think of it not as your go-to for cooking from scratch, but as a specialist for those critical final touches that take a dish from good to great.
What a Salamander Does in a Commercial Kitchen
If you've ever wondered how restaurants get that perfectly golden-brown, bubbly top on a crock of French onion soup or the crisp, caramelized crust on a crème brûlée, the secret is almost always a salamander broiler. It's built for one main job: delivering intense, direct heat from above.
This focused heat lets chefs execute specific tasks in seconds without overcooking the rest of the dish. Unlike a standard oven broiler, which is usually tucked away and awkward to access, a salamander is mounted right over the cooking line or on a countertop. This placement makes it instantly accessible during the chaos of a busy service.
The open-front design is a game-changer for speed. Chefs can slide plates in and out in a flash, a huge advantage when every second on the ticket time counts.
The Core Purpose of a Salamander
The salamander's history in cooking is all about precision. In the culinary world, it’s a compact, high-powered broiler that melts cheese, browns toppings, or finishes dishes with pinpoint control. The name comes from 17th-century kitchen tools, which were themselves named after the mythical fire-dwelling salamander.
Today's electric or gas models have evolved into indispensable equipment in any serious kitchen. They are all about adding speed and perfecting presentation. You can even explore the salamander broiler market to see how much they've evolved.
To give you a clearer picture, here’s a quick rundown of what a salamander does best and why it's so valuable on the line.
Salamander at a Glance: Key Functions and Benefits
| Primary Function | Example Application | Key Benefit |
|---|---|---|
| Melting | Bubbling Gruyère over French onion soup. | Achieves a perfect, even melt without overheating the soup below. |
| Browning | Creating a golden crust on a potato gratin. | Adds color, texture, and visual appeal in seconds. |
| Caramelizing | Toasting the sugar top on a crème brûlée. | Delivers a crisp, glassy surface without scrambling the custard. |
| Finishing | Giving a final blast of heat to a plated steak. | Ensures the dish arrives at the table piping hot and perfectly presented. |
Ultimately, the salamander gives chefs a level of control that standard equipment just can't offer.
By isolating intense heat to the top surface of the food, a salamander is the difference between an evenly browned, perfectly finished plate and a dish that’s accidentally scorched or overcooked.
How a Salamander Delivers Intense Radiant Heat
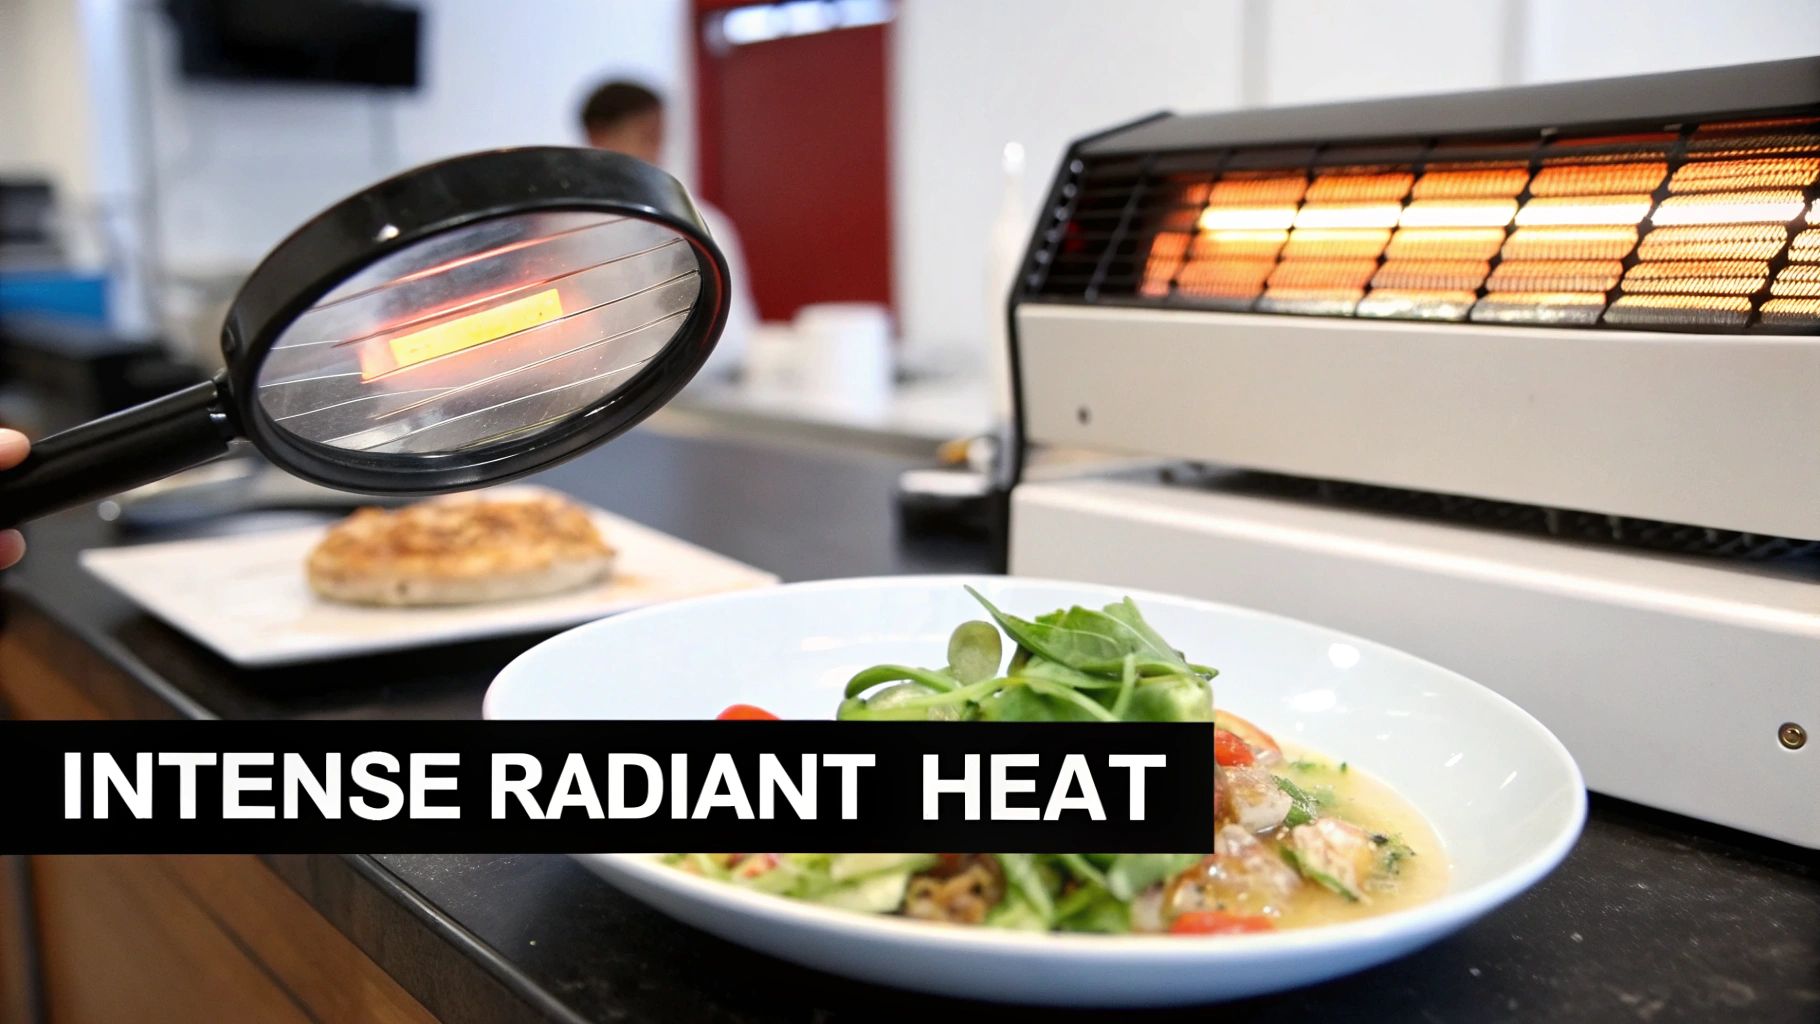
The secret weapon behind a salamander’s incredible finishing power isn’t some kind of kitchen magic—it all comes down to a specific kind of heat transfer. This isn't like the hot, circulating air you find in a convection oven. Instead, a salamander uses radiant heat, which is the exact same energy you feel soaking in the sun or warming your hands by a campfire.
This heat travels in straight-line electromagnetic waves. A salamander’s heating elements, whether they're gas burners or electric coils, are placed right above the food, blasting intense thermal energy straight down. This setup is key, as it means only the top surface of a dish gets cooked, leaving everything underneath untouched.
Think about using a magnifying glass to focus sunlight. The lens gathers the sun’s rays into a single, powerful point hot enough to start a fire. A salamander broiler does something very similar, concentrating a massive amount of radiant energy right onto the food below to get incredibly fast and precise results.
The Power of Radiant and Infrared Heat
While all salamanders rely on radiant heat, the technology generating it can be quite different, which directly affects speed and efficiency. The two main types of heating elements you'll find are traditional radiant and modern infrared.
- Traditional Radiant Elements: These are usually ceramic or metal burners that glow a fierce red-hot. They’re plenty powerful and effective, but they do need a few minutes to get up to temperature, a lot like an old-school electric stovetop coil.
- Infrared (IR) Elements: These are the real superstars when it comes to speed. Infrared tech uses specific light wavelengths to push heat directly into the food itself, skipping the step of heating the air around it.
This direct energy transfer is precisely why infrared salamanders dominate the market. They can be ready to go in as little as 90 seconds, a huge jump from the several minutes standard models need. This rapid heat-up and high-BTU output mean faster recovery when you slide in cold items, which helps slash ticket times in a busy kitchen. Just imagine a deli that pumps out 200 grilled cheeses a day; that kind of speed is a game-changer.
A key takeaway for any kitchen manager is that infrared models eliminate preheating time. This not only speeds up service but also reduces energy consumption over the course of a long shift, as the unit is only at full power when needed.
From Energy Waves to a Perfect Finish
So, what does all this science mean for the food on the plate? When those intense heat waves strike the surface of a dish, they cause the molecules to vibrate like crazy, generating heat. This is what kicks off the Maillard reaction—that wonderful chemical process that gives you the delicious browning on bread or the perfect crust on a steak.
Because a salamander delivers this energy so quickly and from so close, it can create a perfect golden-brown crust, bubbly cheese, or a caramelized sugar top in just moments. This efficiency is why understanding what a salamander is in cooking reveals its place as an essential tool. It works completely differently than other kitchen equipment, like the circulating air used in a commercial convection oven.
Here’s the rewritten section, crafted to sound like an experienced human expert:
Where the Salamander Really Shines in the Kitchen
Alright, we’ve covered the "how" – that intense, top-down radiant heat. Now let's get into the fun part: what a salamander actually does on the line. This is where the science becomes sizzle, turning good dishes into great ones.
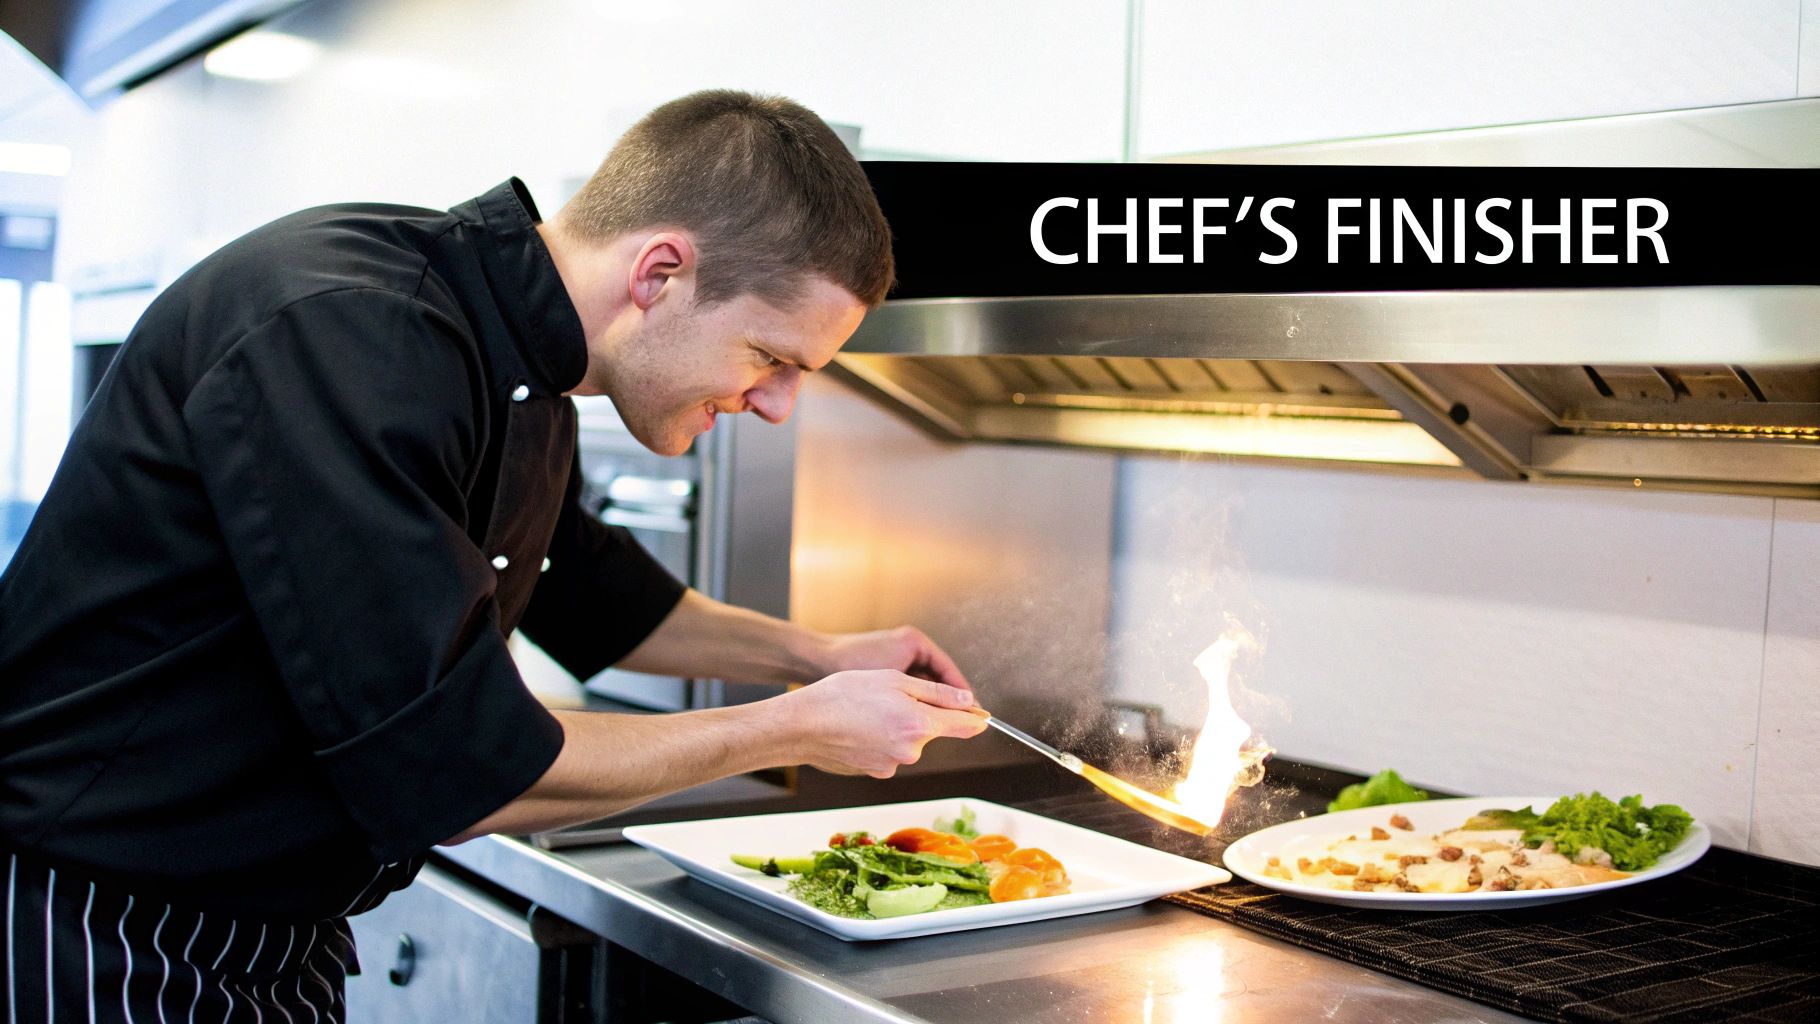
Think of a salamander as the ultimate finishing tool. It’s the master of that final, critical touch. Its real magic lies in its speed and precision, letting you blast a dish with powerful heat for just a few seconds to add texture and color without wrecking a perfectly cooked plate. From apps to desserts, it plays a role all across the menu.
Perfecting Browning and Finishing
One of the most satisfying jobs for a salamander is browning. Picture a beautiful potato gratin or a creamy mac and cheese. A quick trip under the salamander is what gives it that irresistible, golden-brown, bubbly crust. That single element adds a fantastic textural pop against the soft dish underneath.
This finishing touch is a game-changer for so many other dishes, too. A chef can put a final, perfect sear on a sous-vide steak, crisp up the skin on a piece of roasted chicken, or toast the top of a meringue pie in seconds. This last-minute blast of heat sends the plate to the table piping hot and looking incredible.
In a busy kitchen, timing is everything. A salamander gives you the power to put a perfect finish on a dish in seconds, getting it from the line to the customer without missing a beat.
Mastering the Art of Melting
When it comes to melting cheese, nothing touches the precision of a salamander broiler. Because the heat comes from directly above, you can melt the top of a dish perfectly without overcooking what’s underneath.
The classic French onion soup is the perfect example. If you use a standard oven broiler, you risk turning the soup into a boiling mess by the time the Gruyère is properly melted and browned. A salamander, however, targets only the cheese. It creates that iconic, bubbly, golden-brown cap while the onion soup below stays at the perfect temperature.
This same idea works for tons of other menu items:
- Open-faced sandwiches: Nailing that perfect cheese melt on a croque monsieur or a tuna melt.
- Nachos and appetizers: Getting an even, bubbly layer of cheese without drying out the chips.
- Casseroles: Giving lasagna or shepherd's pie a beautiful finish just before it goes out.
Achieving Flawless Caramelization
Caramelization is another area where a salamander is the undisputed champion. To do it right, you need high, direct heat to toast sugar quickly without just burning it—and that’s exactly what a salamander was built for.
The most famous example, of course, is crème brûlée. You sprinkle that thin layer of sugar over the chilled custard, and a few seconds under the salamander’s intense heat creates that signature hard, glassy crust. It perfectly forms that brittle caramel top without heating up and scrambling the delicate custard below. The result is that deeply satisfying "crack" of the spoon breaking through to the cool, creamy dessert—a texture you just can't get any other way.
Choosing The Right Salamander For Your Kitchen
Picking the right salamander for your kitchen isn't just about ticking a box on an equipment list. It's an investment in a tool that will sharpen your menu, speed up your line, and add a final touch of perfection to countless dishes. With all the different heat sources, sizes, and mounting options out there, the best choice really comes down to your kitchen's unique DNA—your space, your workflow, and the kind of food you're passionate about serving.
Making a smart decision starts with getting to know the core differences between the main types of salamanders. The biggest split is the heat source: gas, electric, or infrared. Each one brings its own mix of raw power, fine-tuned precision, and day-to-day efficiency to the table.
This quick decision tree can help you visualize where a salamander fits into the finishing stage of your cooking process for common applications.

As you can see, a salamander is your specialist for those rapid, high-heat finishing moves where precise, top-down heat is everything.
Heat Source: Gas vs. Electric vs. Infrared
The engine of any salamander is its heating element, and your choice here will have a big impact on both performance and your utility bills. Each type has its own sweet spot for different kitchen environments.
Here's a quick look at how the different salamander types stack up against each other, helping you zero in on the best fit for your kitchen's demands.
Comparison of Salamander Broiler Types
| Feature | Gas Salamander | Electric Salamander | Infrared Salamander |
|---|---|---|---|
| Heat-Up Time | Fast | Moderate to Fast | Nearly Instant |
| Power/Intensity | Very High (BTUs) | High and Consistent | Extremely High, Focused |
| Best For | High-volume broiling, searing, rapid browning | Delicate melting, consistent gratin, kitchens without gas lines | Quick-service, energy efficiency, precise finishing |
| Precision | Good, controlled by valve | Excellent, thermostat control | Excellent, instant on/off |
| Energy Efficiency | Moderate, often left on | Good, better insulation | Highest, heats on demand |
| Installation | Requires gas line connection | Simple electrical hookup | Simple electrical hookup |
Choosing between them often comes down to balancing raw power with the need for precision and efficiency.
-
Gas Salamanders: These are the undisputed workhorses for high-volume kitchens. Known for their sheer power, gas models boast the highest BTU output—often 30,000 BTUs or more. This means they heat up fast and stay screaming hot even during a chaotic dinner service. They're perfect for any spot that needs relentless, powerful heat for broiling and browning.
-
Electric Salamanders: A fantastic choice for kitchens where a gas line isn't an option or for operators who want a simpler installation. While they used to be a bit slower to heat up, modern electric units offer incredible temperature precision. This makes them ideal for more delicate jobs, like gently melting cheese on a sandwich or caramelizing the top of a crème brûlée without scorching it.
-
Infrared Salamanders: These models are all about speed and efficiency. Using powerful infrared burners, they can hit cooking temperature in seconds, not minutes. This near-instant heat doesn't just cut down on ticket times; it also slashes energy waste because you don't have to leave the unit running between orders.
Installation Options: Wall-Mounted, Range-Mounted, or Countertop
Where you put your salamander is just as important as how it's powered. The right placement creates a seamless finishing station that becomes a natural part of your kitchen's rhythm.
The best placement creates a "finishing zone" where dishes can move from the range or prep area to the salamander in one smooth motion, minimizing steps for your line cooks and maximizing output.
A well-organized kitchen is built on smart equipment choices. For more ideas on outfitting your space, you can check out our guide on essential commercial kitchen equipment.
Key Features to Consider
Beyond the core specs of heat and placement, you should keep an eye out for features that make the unit easier to use, longer-lasting, and safer for your team.
- Adjustable Cooking Grates: Always look for models with multiple rack positions. This simple feature gives you incredible control, letting you move dishes closer to the heat for a hard sear or further away for a gentle melt.
- Temperature Controls: Simple high/low settings can get the job done, but variable controls give you the finesse to handle a much wider range of menu items with absolute precision.
- Durable Construction: A full stainless steel body isn’t just about looking good. It’s about surviving the daily abuse of a commercial kitchen and making cleanup at the end of the night that much easier.
- NSF Certification: This is non-negotiable. The NSF mark is your guarantee that the equipment meets strict public health standards for sanitation and safety. For any professional kitchen, it's a must-have.
Creating an Efficient Workflow with Prep Tables
A salamander really shines when it’s woven into the natural rhythm of your kitchen. Smart placement can transform it from just another broiler into the core of a high-powered finishing station. The best layouts almost always involve mounting the salamander right above a work surface, creating a seamless path from assembly to that final, perfect finish.
Pairing your salamander with the right stainless steel prep table is the foundation for this setup. These tables are the unsung heroes in any commercial kitchen, providing a durable, hygienic surface for countless tasks. The key is choosing the right type of table for your specific workflow.
Types of Stainless Steel Prep Tables
While a basic flat-top table is a great start, a variety of designs are available to maximize efficiency for different applications.
- Standard Work Tables: These are the versatile workhorses. Available with flat tops, they provide a simple, open surface for general prep. Some models include an undershelf for storing equipment or a backsplash to protect walls from splashes.
- Equipment Stands: Built to be extra sturdy, these tables are designed to hold heavy countertop equipment like mixers or slicers, often featuring a lower height and robust construction.
- Work Tables with Sinks: Integrating one or more sink bowls directly into the work surface, these tables create a complete washing and prep station, saving space and reducing movement in the kitchen.
Specialized Tables for Maximum Efficiency
For specific menu items, specialized prep tables can truly supercharge your workflow. These units integrate features that save precious seconds and streamline the assembly line.
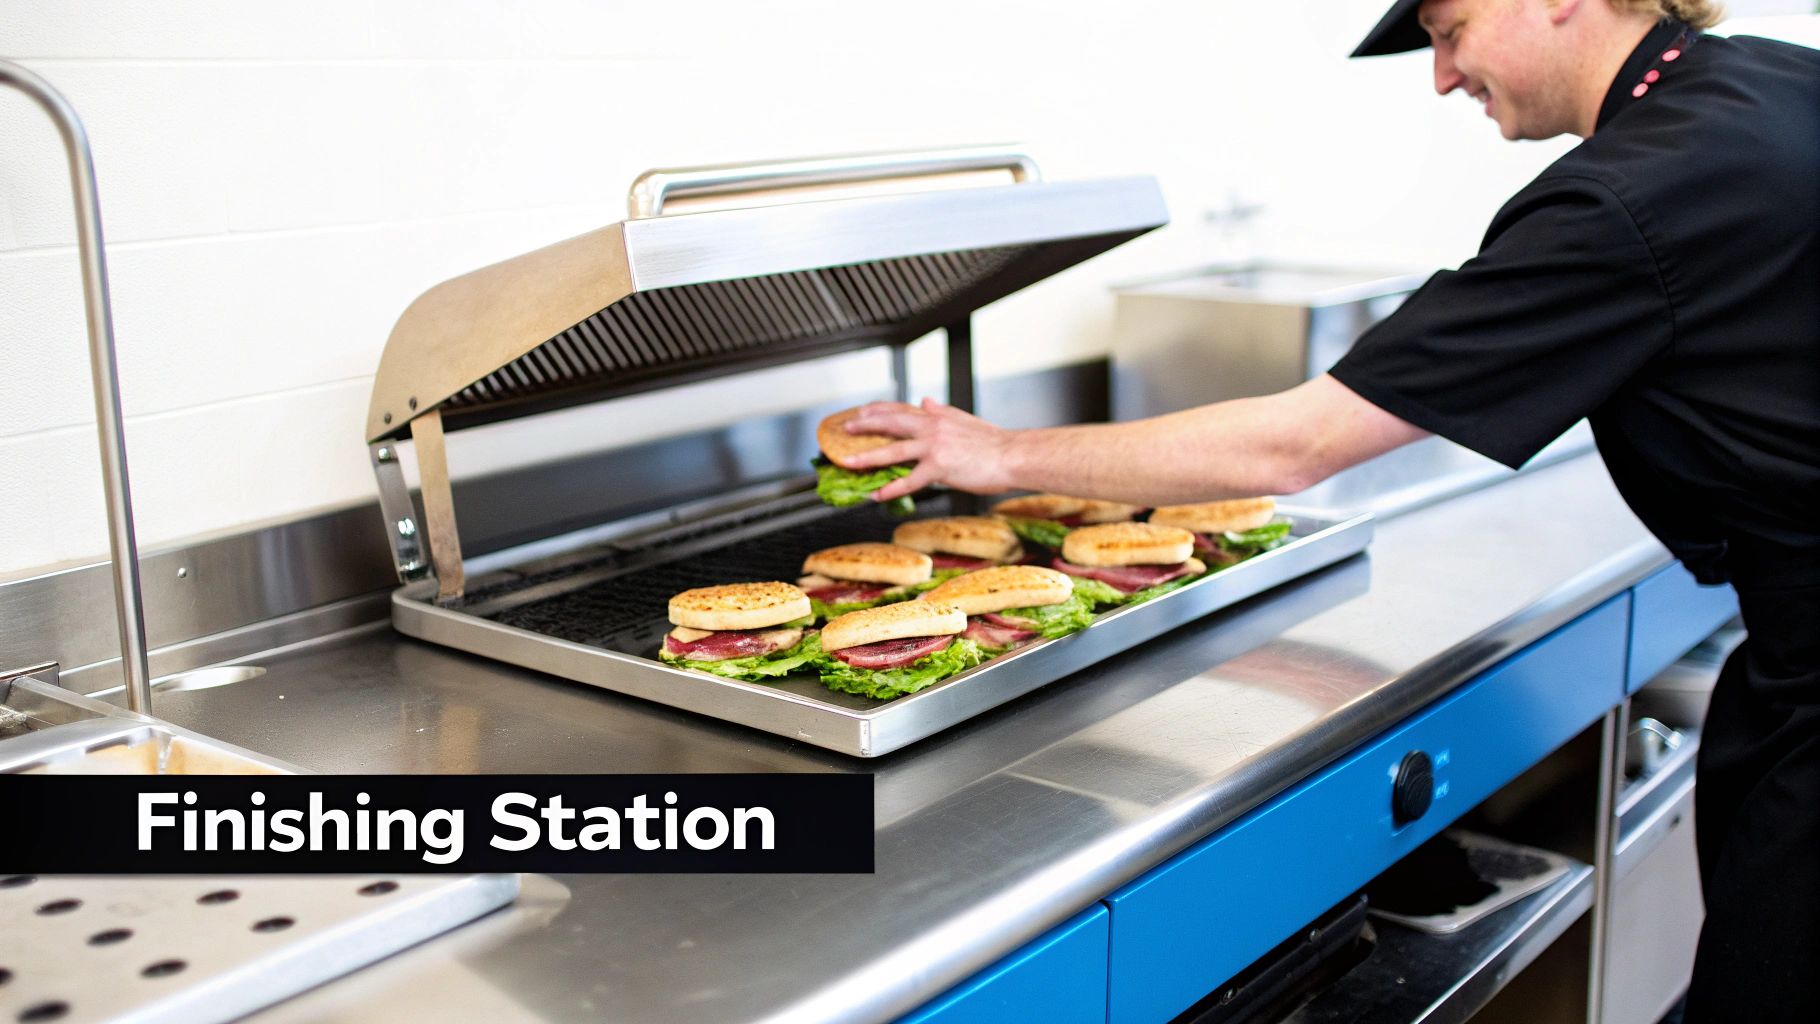
- Sandwich Prep Tables: A must-have for delis and cafes, these refrigerated tables feature built-in, chilled wells on top for holding meats, cheeses, vegetables, and condiments. Below, a refrigerated cabinet provides backup storage. A cook can assemble a sandwich and slide it straight under a nearby salamander to melt cheese, all without taking an extra step.
- Pizza Prep Tables: Similar in concept, these tables combine a wide, flat work surface (often marble, which stays cool for dough) with a refrigerated rail for toppings. This creates an all-in-one station where a pizzaiolo can stretch dough, add sauce, and top the pizza before it goes into the oven. A salamander can then be used for a final browning of cheese or crisping of toppings.
By creating a dedicated station where assembly and finishing happen in the same spot, you eliminate wasted motion. This ergonomic design reduces ticket times, minimizes physical strain on staff, and ultimately boosts your kitchen's overall output.
Designing Your Finishing Station
Picture a busy sandwich spot. A cook builds a hot sub on a refrigerated prep table, then passes it directly under the salamander for that perfect, bubbly cheese melt before it gets wrapped. This straight-line, single-station process is incredibly efficient. A pizzeria can use a similar model, using a dedicated pizza prep table for topping before a quick finish under the broiler.
The trick is to match the broiler with the right surface from a reliable source like PrepTables.com. But an efficient kitchen goes beyond the cooking itself. It also means thinking about smart storage and organization, like choosing the right types of containers for food packaging. When you thoughtfully integrate all your equipment, you streamline every single step, cut down on clutter, and build a more productive, less chaotic kitchen.
Essential Safety and Maintenance Practices
A powerful tool like a salamander comes with serious responsibilities. Keeping safety and maintenance at the forefront isn't just about protecting your investment—it's about protecting your staff and ensuring your kitchen runs like a well-oiled machine. Proper care is what turns a salamander from just another broiler into a reliable workhorse you can count on for years.
The biggest safety concern is managing the intense heat and fumes this equipment kicks out. Every commercial salamander, especially the high-BTU gas models, must be installed under a Type 1 commercial ventilation hood. This is non-negotiable. That hood is critical for pulling heat, smoke, and grease-filled vapors safely out of your kitchen. For a deeper dive, check out our guide on commercial kitchen ventilation requirements.
Clearance is another huge factor. You absolutely must leave enough space between the unit and anything combustible, like walls, shelves, or even stacks of order tickets, to prevent a fire. Safety also extends to your smallwares; never put anything under the heat unless you're certain it's an oven safe pan built to handle extreme temperatures.
A Simple Cleaning and Maintenance Schedule
A salamander that's kept clean simply performs better and lasts longer. The best approach is to build a simple cleaning routine into your kitchen's daily and weekly closing tasks. This keeps it in prime condition and ready for any health inspection.
Daily Cleaning Tasks:
- Empty the crumb tray: At the end of every service, pull out the crumb and grease tray. A quick wash with soap and water is all it takes to stop nasty buildup and lower your fire risk.
- Wipe down exterior surfaces: Grab a soft cloth and a food-safe cleaner made for stainless steel. Give the outside of the unit a good wipe-down to get rid of any splatters from the day.
Weekly Deep-Cleaning:
- Scrub the cooking grates: Pull the grates out and let them soak in a good degreasing solution. After they've soaked, scrub them clean to remove any carbon buildup that could ruin the taste of your food.
- Clean the interior: Once the unit has cooled down completely, give the inside walls a thorough wipe-down to remove any grease that has accumulated.
A clean salamander is a safe and efficient salamander. Regular upkeep not only ensures it meets NSF standards but also guarantees that every dish you finish is perfect, without any lingering flavors from past services. Following these steps will keep your equipment running reliably for years.
Answering Your Questions About Salamander Broilers
To wrap things up, here are some quick answers to the questions we hear most from chefs about what a salamander is and where it fits in a commercial kitchen.
Can a Salamander Replace My Standard Broiler or Oven?
No, a salamander is really a specialist—think of it as a finishing tool. It’s built for one thing: delivering intense, top-down heat for very short periods. It's perfect for getting that golden-brown crust on a gratin or melting cheese perfectly over French onion soup.
It isn't designed for long-duration cooking like baking or roasting, so it won't replace your convection oven. It also doesn't take the place of the primary broiler you'd find in a commercial range, which handles the heavy-lifting of cooking steaks or fish from raw.
What Kind of Ventilation Does a Salamander Need?
This is a big one. Nearly all commercial salamanders, and especially any gas model, must be installed under a Type 1 commercial ventilation hood. There are no exceptions here.
This is critical for safely pulling out all the heat, smoke, and grease that comes off the unit. It's a major safety and code requirement, so you'll absolutely want to check your local regulations before installation.
Is an Infrared Salamander Really Worth the Extra Cost?
For a lot of busy kitchens, the answer is a definite yes. The main advantage of an infrared salamander is speed. They heat up almost instantly, which means no more waiting around for the unit to preheat. That time savings adds up fast.
By eliminating that preheating time, you're not just saving on energy bills, you're getting plates out of the window faster. In a high-volume environment, that speed translates directly to faster ticket times and higher output during a busy service.
Ready to create the perfect finishing station? Explore the durable, NSF-certified stainless steel work tables at PrepTables.com to build a kitchen workflow that boosts speed and efficiency. Visit us today at https://preptables.com to find the ideal foundation for your salamander broiler.