

A Practical Guide to Under Cabinet Fridge Dimensions
Getting the dimensions right for an under-cabinet fridge is about so much more than just sliding a box into a hole. It's really the bedrock of an efficient commercial kitchen. The right size creates a smooth workflow, gets rid of dangerous bottlenecks, and makes the most of every last square inch you've got.
Why Fridge Dimensions Make or Break Kitchen Workflow

In a pro kitchen, every single step counts. A fridge that's the wrong size can completely throw off this delicate dance, leading to problems that drain your time and money. Picture a unit that sticks out just a few inches too far, blocking a busy walkway. Or one that's too short, leaving an awkward, unhygienic gap under the counter. These aren't just small annoyances—they're real drags on your operation.
Refrigeration that fits perfectly is the heart of a great kitchen layout. It’s a key piece of that classic "work triangle" between storage, prep, and cooking. Nailing the under cabinet fridge dimensions from the get-go helps you build a cohesive and truly productive space.
The Foundation of an Efficient Prep Station
Think of your under-cabinet fridge not as a separate appliance, but as a core part of the entire workstation. Its size has a direct impact on how comfortable and useful the whole prep area is. When a fridge fits snugly under a prep table, it creates a streamlined station where chefs can grab chilled ingredients without taking a single extra step.
This kind of integration is a massive boost for productivity. A well-designed station means less physical strain on your crew and faster service, which is absolutely critical during a dinner rush. The whole point is to create a space where everything is just an arm's reach away, and that all starts with dimensions that line up perfectly with your counters. Our guide on commercial kitchen layout planning dives deeper into designing these kinds of efficient spaces.
From Blueprint to Reality
Picking the right appliance is a big deal. It's part of a larger shift in professional kitchens toward smarter, more compact solutions. The global market for undercounter refrigerators was valued at $3.2 billion and is expected to hit $5.7 billion by 2033, all because of this growing demand for space-saving gear. You can find out more about this market growth and what it means for kitchen design.
An under-cabinet refrigerator isn’t just a box that keeps things cold. It’s a strategic tool that, when sized correctly, unlocks a kitchen's true potential for speed, safety, and profitability.
At the end of the day, this guide is your blueprint for making a smart choice. We're going to break down everything from standard sizes and how to measure properly to ADA rules and fitting your fridge with other specialized equipment. By understanding why dimensions are so critical, you can sidestep expensive installation mistakes and build a kitchen that's truly designed for top performance.
Decoding Standard Commercial Fridge Dimensions
Walking into the world of commercial refrigeration can feel like learning a new language, with all its specs and model numbers. But when it comes to under cabinet fridge dimensions, things are actually pretty straightforward. The industry sticks to a set of standard sizes designed to slot right into most professional kitchen layouts.
Getting a handle on these common measurements is the first step to choosing a unit that works for your space, not against it. These standards exist for a simple reason: efficiency. Manufacturers build fridges to match common counter heights and depths, making kitchen design—and eventual equipment replacement—a whole lot simpler. Let's break down the numbers you'll actually see for width, depth, and height.
Common Widths for Every Kitchen Station
The width is probably the most important dimension of an under-cabinet fridge. It tells you how much you can store and what job it's best suited for in your kitchen. Each standard size is basically tailored for a specific task.
- 24 to 36 Inches: Think of these as the workhorses for smaller, dedicated stations. A 24-inch unit is perfect for a compact bar area to hold garnishes and mixers. A 36-inch model gives you just enough room for a low-volume sandwich or salad prep spot.
- 48 to 60 Inches: This is the sweet spot for a lot of medium-sized restaurants. A 48-inch or 60-inch fridge offers plenty of storage for a busy prep line, keeping all your essential ingredients for multiple dishes right where you need them.
- 72 Inches and Up: These big units are for high-volume operations, plain and simple. They serve as the backbone of the main prep line, giving chefs maximum capacity to store bulk ingredients directly under their primary workspace. This is absolutely critical during a hectic dinner rush.
This kind of standardization isn't just a commercial thing. The residential market is seeing a huge boom in under-counter refrigerators, with widths like 15, 24, or 34 inches made to fit standard home cabinetry. You can explore more about these residential trends and see how the demand for built-in appliances is growing everywhere.
For a quick overview, here's a look at the most common dimensions you'll find.
Common Commercial Under Cabinet Fridge Dimensions
| Fridge Type | Common Widths (Inches) | Standard Depth (Inches) | Standard Height (Inches) |
|---|---|---|---|
| Compact/Bar Units | 24 - 36 | 24 - 32 | 34 - 36 |
| Standard Prep Line Units | 48 - 60 | 30 - 32 | 34 - 36 |
| High-Volume Units | 72+ | 30 - 32 | 34 - 36 |
| Counter-Depth Models | 24 - 72+ | 24 - 27 | 34 - 36 |
This table gives you a solid starting point for figuring out what will fit your physical space and operational needs.
Depth Differences: Standard vs. Counter-Depth
After you've picked a width, the depth is your next big decision. This measurement determines how the fridge will line up with your countertops and, more importantly, your walkways. You've got two main options.
Standard Depth (30-32 inches): These models are all about maximizing storage space inside. They're the go-to choice for kitchens where capacity is king, letting you cram more ingredients into the same footprint.
Counter-Depth (24-27 inches): These are designed for a clean, flush look. They sit perfectly even with the edge of standard countertops, creating a seamless, built-in appearance. You sacrifice a little bit of internal volume, but you gain a huge benefit: the unit won't stick out into busy kitchen traffic lanes. That’s a massive plus for safety and workflow, especially in tighter kitchens.
The Universal Standard Height
Finally, we get to the easiest part: height. This is the most consistent dimension you'll find. Nearly every commercial under-cabinet fridge is built to a standard counter height of 34 to 36 inches.
This isn't just a random number. That height range is all about ergonomics, making sure chefs and kitchen staff have a comfortable and efficient working height. It lets the top of the refrigerator line up perfectly with the prep tables next to it, creating one long, level workspace.
Most units also come with adjustable legs or casters. This gives you an inch or two of wiggle room to level the unit on uneven floors or match it perfectly to slight variations in your counter height. It’s how you get that seamless, gap-free fit that's so important for both looks and kitchen hygiene.
How to Measure for a Perfect Fit Every Time
Getting the under cabinet fridge dimensions wrong is the most common mistake I see, and it's a simple error that creates massive headaches down the road. It’s like buying a custom suit without bothering to get measured first—the result is always awkward, ill-fitting, and a total waste of money.
This quick guide will walk you through measuring your space with the precision needed for a seamless, professional-looking installation.
This simple diagram breaks down the core measurement process into three essential steps.
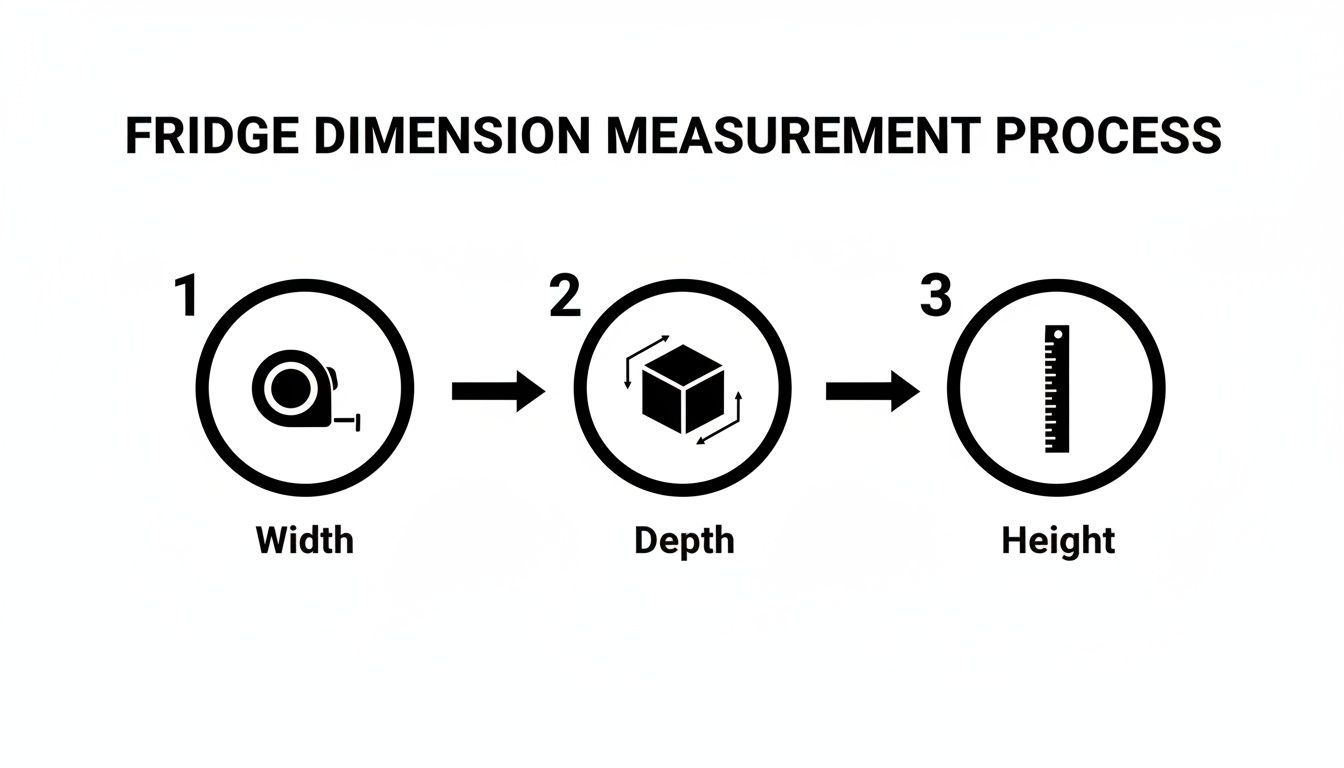
As you can see, checking the width, depth, and height in a few key spots is all it takes to guarantee a flawless fit.
The Foolproof Measurement Checklist
Here's a hard-earned piece of advice: cabinets are rarely perfectly square, and kitchen floors are almost never level. That’s why you absolutely have to measure the opening in multiple places. This catches any weird quirks that could completely derail your installation.
Grab your tape measure and let's get to it.
- Measure the Width: Check the width of your cabinet opening at the top, the middle, and the bottom. Write down the narrowest of those three numbers. That's your absolute maximum width.
- Measure the Height: Now, do the same for the height. Measure from the floor to the bottom of the countertop on the left, in the center, and on the right. Again, record the shortest measurement you get.
- Measure the Depth: Finally, measure the depth from the back wall to the front edge of the cabinets next to the opening. Do this on both the left and right sides, and jot down the shallower of the two.
Always, always, always use the smallest measurement for each dimension. This is your safety net. It guarantees the unit will slide in without a fight and saves you from that gut-wrenching moment when you realize your brand-new fridge is a quarter-inch too big.
When you're planning a kitchen remodel, figuring out how to integrate appliances like these is a crucial piece of the puzzle. It's all about making sure the details fit into the bigger picture.
Why Ventilation Is Non-Negotiable
Getting the physical fit right is only half the battle. Just as critical is leaving enough room for ventilation—the breathing space your fridge needs to work properly and not die an early death. Forgetting this is like asking a marathon runner to sprint while holding their breath. It’s going to end badly.
A refrigerator’s compressor works hard to keep things cool, and that process generates a lot of heat. That heat has to go somewhere. If you wedge the unit into a tight space with no airflow, the heat gets trapped, and the compressor is forced to work overtime, 24/7.
This constant strain kicks off a whole chain of problems:
- Higher Energy Bills: An overworked compressor is an energy hog, and you'll see it on your utility bills.
- Premature Equipment Failure: You're literally running the heart of the machine into the ground. This stress drastically shortens its lifespan, often leading to a costly replacement years before it should have been needed.
- Inconsistent Cooling: A struggling unit can't hold a stable temperature, which is a major food safety risk.
Understanding Clearance Requirements
So, how much "breathing room" is actually enough? The first place to look is always the manufacturer's spec sheet for your specific model. But if you're just planning, here are some solid rules of thumb that apply to most units.
Rear-Breathing Models: These are the most common type and demand the most clearance.
- Back: You need a minimum of 1-2 inches of open space behind the unit. This is non-negotiable for letting heat escape from the coils.
- Sides: Give it at least 1/4 to 1/2 inch on each side. This allows cool air to be drawn in and circulate.
- Top: Plan for about 1/2 inch of clearance above the fridge to keep heat from getting trapped under the counter.
Front-Breathing Models: These are the pros' choice for true built-in applications. They pull in cool air and push out hot air through vents on the front grille. This design means they often need little to no clearance on the sides or back. They're usually a bit pricier, but the flexibility they offer in tight spaces is often worth every penny.
Integrating Refrigeration with Prep Tables
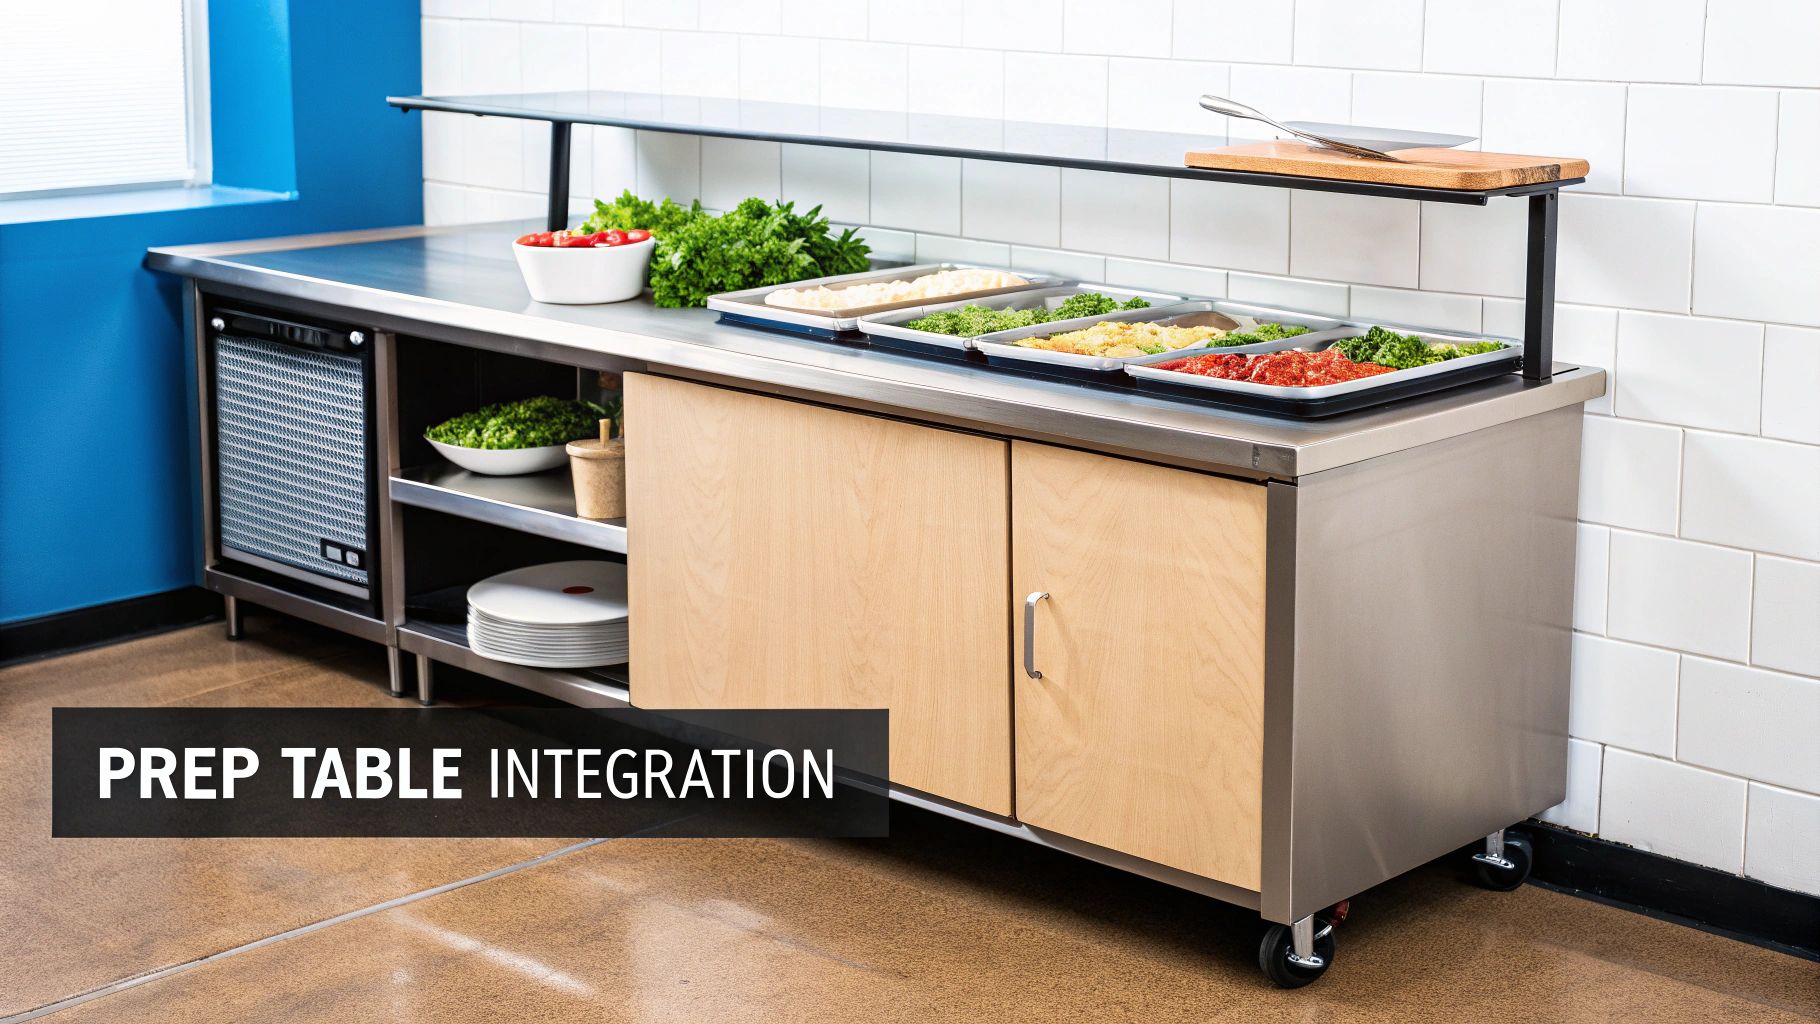
This is where getting your under cabinet fridge dimensions just right really pays off. A standalone under-counter unit is handy, but when it’s built directly into a workstation, it turns a simple prep area into a high-performance engine for your entire kitchen. This integration is the secret weapon for peak efficiency in fast-paced spots like delis, pizzerias, and busy restaurants.
These all-in-one units, known as refrigerated prep tables, are much more than just a fridge with a countertop. They are purpose-built systems designed to make every step of food assembly faster and smoother. By combining cold storage, a tough workspace, and immediate access to ingredients, they cut out wasted steps and keep the orders flying out the door.
Types of Stainless Steel Prep Tables
While the concept is simple—combining workspace and refrigeration—prep tables come in specialized varieties tailored to specific kitchen tasks. Each type has dimensional and design features optimized for a particular workflow, from delis to pizzerias.
- Sandwich/Salad Prep Tables: These are the versatile workhorses of the prep table world. They feature a refrigerated rail on top designed to hold an array of standard food pans, keeping fresh vegetables, sliced meats, and dressings chilled and within arm's reach. They are defined by their integrated full-length cutting board, creating a seamless assembly line.
- Pizza Prep Tables: Built for the high demands of a pizzeria, these tables feature an extra-deep cutting surface (often 19 inches or more) to accommodate large pizza doughs. The refrigerated ingredient rail is typically raised and angled toward the chef for better visibility and access to a wide variety of toppings.
- Mega Top Prep Tables: A variation on the sandwich/salad table, Mega Tops feature a deeper refrigerated rail that can hold more pans—usually an extra row. This provides a greater variety of ingredients right at the prep station, ideal for kitchens with complex menus.
- Worktop Refrigerators: These offer the simplest integration. They are essentially under-cabinet refrigerators with a durable, flat stainless steel top. Lacking a refrigerated rail, they provide a large, uninterrupted workspace for general prep while keeping bulk ingredients chilled below.
Our complete guide to commercial refrigerated prep tables dives deeper into how these different units can supercharge your kitchen's output.
The Critical Role of Stainless Steel
The metal used to build these tables is just as important as their size. In any commercial kitchen, stainless steel is the undisputed king. It’s tough, hygienic, and resists corrosion. But not all stainless steel is the same, and knowing the difference is key to making a smart buy.
You’ll usually see two main grades:
- 304 Stainless Steel: This is the premium, food-grade option. It has more chromium and nickel, giving it superior protection against rust and corrosion from salts, acids, and harsh cleaning chemicals. It's the best choice for high-contact surfaces like tabletops and ingredient rails.
- 430 Stainless Steel: A more budget-friendly choice, 430 grade is still durable but has less nickel, making it a bit more vulnerable to corrosion over time. It’s often used for the sides, back, and other non-contact parts to keep costs down without sacrificing safety.
For any prep table, a 304-grade stainless steel top is the gold standard. It guarantees the surface touching your food is non-porous, easy to sanitize, and tough enough to handle the daily abuse from utensils and cutting boards. It protects both your customers and your investment.
Diving into ADA and NSF Compliance
When you're outfitting a commercial kitchen, picking the right gear goes way beyond just performance and price. You're also dealing with a web of strict legal and safety standards. For under cabinet fridge dimensions, two acronyms you absolutely have to know are ADA and NSF. Getting these right ensures your kitchen is safe, accessible for your entire crew, and ready to pass any health inspection.
Think of these standards as the official rulebook for professional kitchen equipment. They might seem like just a bunch of technical jargon, but they have a massive impact on the design, build, and even the final dimensions of the refrigerators you can legally and safely install. Trying to sidestep them isn't really an option—it's a fast track to operational headaches and potential legal trouble down the road.
ADA Compliance for Accessibility
The Americans with Disabilities Act (ADA) lays out very clear guidelines to make sure workspaces are accessible to everyone, including employees with disabilities. When it comes to under cabinet fridges, this translates to very specific requirements for their size and how they operate. An ADA-compliant unit isn't just a "nice-to-have"; it's a legal requirement if you want to create a fair and inclusive workplace.
Here's what you need to look for:
- Counter Height: The fridge has to slide neatly under a countertop that is no more than 34 inches high from the floor. This is critical for wheelchair accessibility.
- Forward Reach: At least 50% of the refrigerated storage area needs to be easily accessible from a forward-reaching position.
- Accessible Controls: All the controls—thermostats, power buttons, you name it—must be designed for one-handed operation and require very little force to use.
Following these rules means every member of your team can do their job without hitting a physical barrier. The smartest move is to choose ADA-compliant models right from the start to build a kitchen that’s both functional and equitable.
NSF Certification for Food Safety
While the ADA is all about accessibility, NSF (National Sanitation Foundation) certification is squarely focused on food safety. When you see that little NSF seal on an under cabinet fridge, it’s a solid guarantee that the unit was designed and built to prevent foodborne illnesses. For pretty much any commercial kitchen that gets a visit from the health inspector, this certification is non-negotiable.
It's important to know that NSF standards don't really dictate the external dimensions. Instead, they heavily influence the fridge's internal design and the materials used. The unit has to be a breeze to clean, be built from non-porous materials, and hold safe food temperatures without breaking a sweat.
This means you’ll find practical design features in an NSF-certified unit, like coved (curved) corners that stop bacteria from building up and food-grade stainless steel that won't corrode. To get a deeper understanding, you can check out our detailed guide on what NSF certification is and why it's so vital for your kitchen gear.
Beyond the specific rules for appliances, it's also wise to have a basic grasp of the broader electrical codes that govern a commercial kitchen build-out. For instance, looking into Australia's general electrical wiring standards can give you an appreciation for the many layers of regulation involved in keeping a kitchen safe. At the end of the day, picking equipment that ticks both the ADA and NSF boxes ensures your kitchen isn't just efficient, but also legally compliant and safe for your staff and customers alike.
Solving Common Sizing and Installation Problems
Even with the best-laid plans, things can go sideways. You’ve measured the space, double-checked the spec sheet, but when that brand new under-cabinet fridge arrives, it’s just not fitting. Before you panic, take a breath. Most of these common sizing and installation issues have surprisingly simple fixes that don’t involve tearing out your cabinetry.
Usually, the problem comes down to a tiny but critical mismatch—a floor that isn't quite level or a cabinet opening that’s off by a fraction of an inch. The secret is knowing how to tackle these headaches with the tools and features you already have. Let’s walk through the most common snags and how to sort them out.
Adjusting for Height and Uneven Floors
One of the most frequent problems is a unit that’s just a hair too tall for the opening, or one that rocks back and forth on an uneven floor. The first place to look for a fix is the unit's feet or casters.
Almost every commercial refrigerator is built with adjustable legs. These typically give you 1 to 2 inches of play, letting you raise or lower each corner on its own. This is your go-to solution for leveling the unit on a sloped floor, which is absolutely vital for making sure the doors seal properly and the compressor runs right.
If you’re still having trouble with the height, think about your mobility choice.
- Legs vs. Casters: Wheels, or casters, naturally add more height than standard legs. If you're close, swapping them for a set of low-profile legs might give you that crucial half-inch you need to slide the unit home.
- Minor Cabinet Modifications: If you’re just shy of fitting, a light sanding on the underside of the countertop might do the trick. Just remember, this should always be your last resort.
The fix for a fit problem is often hiding in the details. Before you start thinking about a costly return, check every small adjustment you can make on the unit itself. A few twists of a wrench on an adjustable leg can be the difference-maker.
Front-Breathing vs. Rear-Breathing Models
Another common headache is a unit that juts out too far from the wall or can’t be installed flush with other equipment. This issue is almost always about one thing: ventilation. Where your fridge "breathes" is what determines where you can place it.
Rear-breathing models are the most common type you'll see. They work by pulling cool air from the front or sides and pushing hot air out the back. Because of this design, you must leave 1-2 inches of open space behind the unit so the heat can escape. If you shove it right up against a wall, you’ll trap that heat, forcing the compressor to overheat and eventually fail.
Front-breathing models, however, are specifically designed for those tight, built-in spots. The entire ventilation system—intake and exhaust—is located right on the front grille. This clever engineering means they often need zero clearance on the back and sides, which lets you achieve that perfect, seamless look. They might cost a bit more upfront, but in a crowded kitchen where your under-cabinet fridge dimensions are tight, that placement flexibility is priceless.
Common Fit Problems and Their Solutions
Even when you think you've covered all the bases, a small oversight can lead to a big installation headache. Here’s a quick troubleshooting guide for the most common dimensional mismatches and how to handle them.
| Problem | Potential Cause | Recommended Solution(s) |
|---|---|---|
| Unit is too tall | Casters are installed instead of legs; adjustable legs are extended too far; cabinet opening is smaller than measured. | Screw the adjustable legs all the way in. Swap casters for low-profile legs. If it’s a tiny difference, consider a minor cabinet modification (last resort). |
| Unit rocks or is unstable | The floor is uneven or sloped. | Use a level and adjust the unit's legs individually until it is stable and level. This is crucial for proper operation. |
| Unit sticks out too far | It’s a rear-breathing model needing clearance; the power cord/plug is obstructing it; the water or drain line is in the way. | Ensure there are 1-2 inches of space behind a rear-breathing unit. Use a right-angle plug adapter. Reroute utility lines if possible. |
| Doors won't open fully | The unit is too close to a wall, another piece of equipment, or the cabinet frame. | Check the manufacturer's specs for door swing clearance. Pull the unit forward slightly or relocate it to allow the doors to open at least 90 degrees. |
| Unit overheats or cycles constantly | Ventilation is blocked (either rear or front grille); insufficient clearance was left around the unit. | For rear-breathing models, pull the unit away from the wall. For front-breathing models, make sure the front grille is completely clear of debris or obstructions. |
Remember, most fit issues can be resolved with small adjustments. Working through these steps methodically can save you the time and expense of returning a unit that was nearly perfect for your space.
Your Top Questions About Fridge Dimensions, Answered
Let's cut right to it. Here are the quick, straightforward answers to the questions we hear most from chefs and kitchen managers trying to spec out a new under-cabinet fridge. Think of this as your final check to clear up any doubts before you pull the trigger.
How Much Breathing Room Does My Under-Cabinet Fridge Really Need?
You should always, always check the manufacturer's spec sheet first. But if you need a reliable rule of thumb, plan for 1-2 inches of clearance on the sides and back for any rear-breathing model. That gap is non-negotiable; it’s how the coils get rid of heat.
Now, front-breathing units are the MVP for tight kitchens. Since they pull air in and push it out through the front grille, they often need little to no space on the sides or back. This lets you get that clean, truly built-in look without choking the compressor.
Blocking the airflow is the single fastest way to kill a refrigerator. You'll overwork the compressor, your energy bills will spike, and the unit's lifespan will plummet.
Can I Just Use a Residential Mini Fridge in My Commercial Kitchen?
This is a tempting shortcut that almost always ends in a costly mistake. Please don't do it. A residential fridge is simply not engineered to survive the heat, humidity, and constant door-slamming of a professional kitchen.
They don't have the heavy-duty compressors or the durable, food-grade stainless steel construction required for the job. Most importantly, they lack the NSF certification that health inspectors require. Using one isn't just a performance issue—it's a direct path to a serious health code violation.
Does the Listed Height on the Spec Sheet Include the Casters or Legs?
Almost always, yes. When a manufacturer lists the overall height, that number typically includes the standard-issue legs or casters that come in the box.
The good news is that most of these are adjustable, usually giving you about an inch of wiggle room to raise or lower the unit. If you’re working with a super tight, unforgiving space, double-check that adjustment range. You can also look into low-profile casters; sometimes, they can shave off just enough height to turn an impossible fit into a perfect one.
For durable, NSF-certified refrigeration and prep equipment designed for the rigors of a professional kitchen, explore the extensive selection at PrepTables.com. Find the perfect fit for your workflow and ensure your kitchen operates at peak efficiency. Visit us at https://preptables.com.