

Your Guide to Refrigerator Condenser Cleaner
A good refrigerator condenser cleaner can definitely cut through the tough grease and grime, but the real win is just keeping those coils clean in the first place. Honestly, it’s one of the simplest things you can do to make your fridge run better, trim your energy bills, and help the whole appliance last longer.
Why Cleaning Condenser Coils Actually Matters
Before you start pulling the fridge out from the wall, let’s talk about why this is a job worth doing. Your refrigerator’s condenser coils are the unsung heroes of the whole cooling process. Their job is to get rid of the heat that’s been pulled from inside the fridge.
But when they get covered in a blanket of dust, pet hair, and kitchen gunk, your fridge has to work way, way harder to keep things cool.
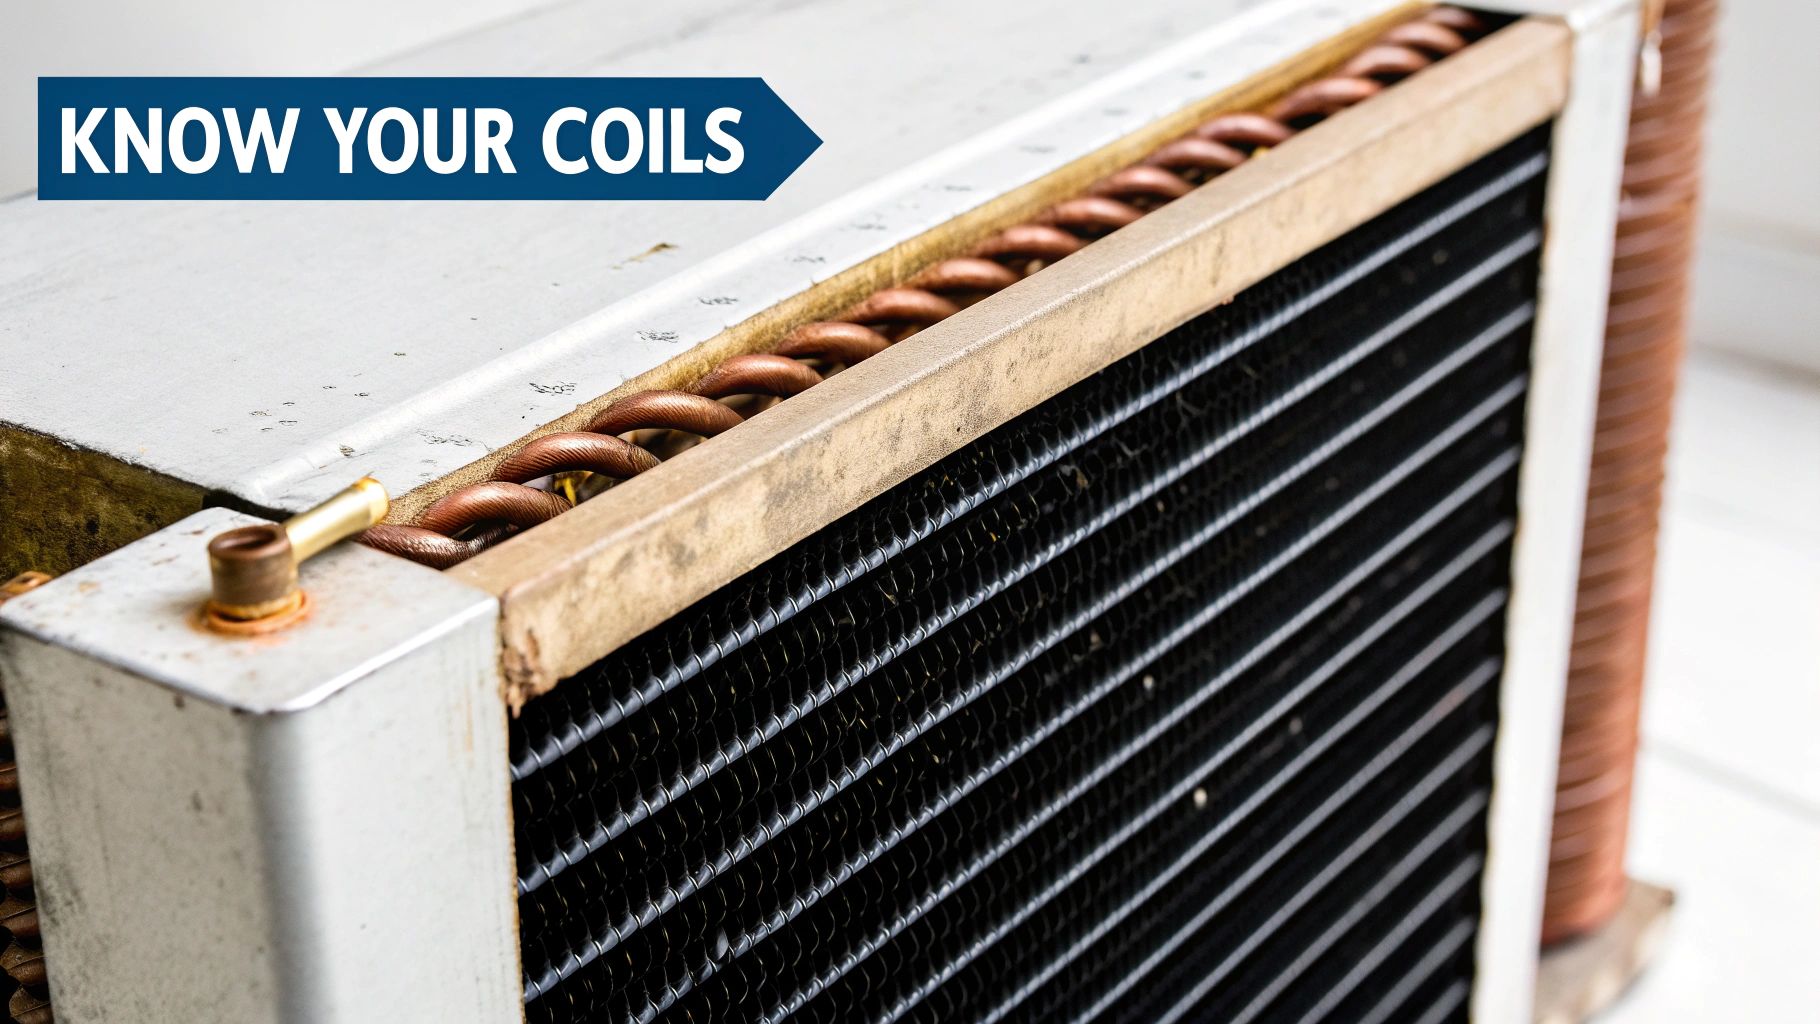
This isn’t just a small hiccup; that extra strain has some real consequences. Think of it like trying to run a race wearing a heavy winter coat—your system is going to overheat and wear itself out fast.
The True Cost of Neglect
Letting those coils get dirty leads to a few problems you’ll definitely notice, especially in your wallet. The first thing that happens is a spike in your energy use. Clean coils transfer heat much more efficiently, which can make a noticeable dent in your electricity bill. For anyone trying to be more energy-conscious, this is low-hanging fruit. You can find some great expert tips for energy-efficient refrigeration that build on this very idea.
Besides the higher bills, a struggling fridge will give you other clues that it's not happy:
- Constant Humming: The compressor has to run longer and more often to compensate, creating that annoying, non-stop hum from the kitchen.
- Reduced Cooling Power: You might notice your food isn't staying as cold as it should, which can lead to spoilage.
- Shorter Lifespan: All that constant strain wears out the compressor and other parts, leading to breakdowns and expensive repairs—or worse, a full replacement. If you want to learn more about this crucial part, our guide on how to check a refrigerator compressor is a great resource.
Think of coil cleaning less like a chore and more like a smart investment in your home. It’s a 15-minute job a couple of times a year that prevents serious strain on your appliance and keeps it running the way it was designed to.
At the end of the day, a clean condenser means a healthier, more efficient, and longer-lasting refrigerator. It's as simple as that.
Choosing the Right Cleaner and Tools for the Job
Picking the right refrigerator condenser cleaner can seem tricky, but it’s usually simpler than you think. The real decision comes down to what you're up against—is it just a light coating of dust, or are you dealing with the heavy, greasy buildup that’s so common in busy kitchens? Your main goal is to find a cleaner that gets the job done without being too harsh on the delicate metal fins of the coils.
Many people immediately grab a commercial aerosol spray made just for this task. These are formulated to cut through grease and grime without leaving behind a sticky film, which is a big advantage. On the other hand, you can often get the job done without any chemicals at all. For most homes, a good vacuuming and a thorough brushing are more than enough to handle the usual dust and pet hair.
Picking Your Cleaning Agent
When you're browsing the cleaning aisle, you'll see a lot of options. The global refrigerator cleaner market is huge, with around 200 million units sold every year. While chemical-based cleaners account for about 85% of that market, there's a definite trend toward more natural, eco-friendly solutions.
If you’d rather go the DIY route, a simple mix of warm water with a drop of dish soap can tackle light grease—just be sure you wipe it off completely. And if you're sprucing up the outside of your fridge, especially a commercial model, our guide on how to clean stainless steel has some specialized tips.
The best cleaner is often the gentlest one that actually works. Always start with a dry brush and vacuum first. Only reach for a chemical cleaner if you're facing stubborn, greasy residue that a good scrubbing can't handle.
Choosing the right cleaning agent is crucial for both effectiveness and the longevity of your condenser coils. Below is a quick comparison to help you decide.
Comparison of Condenser Cleaning Agents
| Cleaner Type | Pros | Cons | Best For |
|---|---|---|---|
| Dry Brush & Vacuum | No chemicals, no residue, safe for all coils. | May not remove heavy grease or caked-on grime. | Routine maintenance, light dust, and pet hair. |
| Commercial Aerosol | Powerful grease-cutting action, fast-acting. | Can be harsh, requires good ventilation. | Heavy grease and oil buildup in commercial kitchens. |
| Mild Soap & Water | Gentle, inexpensive, readily available. | Requires rinsing/wiping, can leave residue if not removed. | Lightly greasy coils where a dry brush isn't enough. |
| Eco-Friendly Cleaners | Biodegradable, less harsh fumes. | May be less powerful than chemical-based options. | Environmentally conscious cleaning for moderate buildup. |
Ultimately, the best choice depends on your specific situation. Start with the simplest method and only escalate if needed.
Assembling Your Essential Toolkit
Having the right tools on hand makes this job faster, safer, and much more effective. You don’t need a bunch of expensive equipment, just a few key items designed for the task.
Here’s a quick rundown of what you should grab before you get started:
- Long-Bristled Condenser Coil Brush: This is your most valuable tool. Its long, flexible design lets it snake between the narrow fins to break up trapped gunk that a vacuum can't reach on its own.
- Vacuum with Attachments: The crevice tool or a soft brush attachment is perfect for this. The goal is to gently suck away all the loosened dust without bending those delicate aluminum fins.
- Protective Gear: A simple pair of gloves will protect your hands from surprisingly sharp edges, and a dust mask is always a good idea to avoid breathing in years of accumulated dust.
- Flashlight: The coils are almost always tucked away in dark, tight spaces. A good flashlight helps you see exactly what you’re doing and ensures you don’t miss any spots.
How to Safely Clean Your Condenser Coils
Alright, let's get our hands dirty. With the right approach, cleaning your refrigerator's condenser coils is a simple job that pays big dividends in efficiency. This is where we get into the nuts and bolts of the process, keeping things safe and effective. Think of it as a quick tune-up for one of the most important appliances in your home.
Our main goal here is to get rid of that blanket of dust and gunk that’s making your fridge work overtime. Before we start, make sure you have your tools handy: a condenser brush, a vacuum with a soft brush attachment, a flashlight, and a good pair of gloves.
Prioritizing Safety Before You Start
First things first: safety is non-negotiable. Before you even think about touching the coils, you have to cut the power to the fridge. The best way is to unplug it straight from the wall. If you can't get to the plug, head to your circuit breaker and flip the switch for the kitchen.
Never, ever try to clean the coils while the refrigerator is plugged in. It's a simple step that eliminates any risk of electric shock and keeps both you and your appliance safe.
It's also a good idea to make sure the area is well-ventilated. You'd be surprised how much dust has been hiding back there for months, or even years. Popping on a simple dust mask will make the job a lot more comfortable.
The Cleaning Process From Start to Finish
Once the power is off and your tools are ready, it's go-time. On most newer fridges, the condenser coils are at the bottom, tucked behind a base grille. This grille usually just snaps off. You might need to give it a firm but gentle push at the top while pulling the bottom out toward you. Just be careful not to crack the plastic.
With the grille off, you’ll see the coils—they usually look like a web of thin, black tubes with delicate metal fins. Your first move is to grab the vacuum. Using a soft brush or crevice tool attachment, suck up all the loose dust bunnies, pet hair, and whatever else has collected on the coils and the floor around them.
Get as much as you can with the vacuum on this first pass. It clears out the easy stuff and sets you up for a more thorough clean.
Using a Condenser Brush for a Deep Clean
After the initial vacuuming, it’s time to bring in the specialist: the condenser coil brush. This is what you'll use to break free all the stubborn, caked-on grime the vacuum couldn't handle. Gently work the brush in and around the coil fins. Slide it back and forth to loosen everything up.
Be mindful of those little aluminum fins; they bend pretty easily. A slow, steady hand is much better than using brute force. If you happen to bend a couple, it's not the end of the world, but straight fins mean better airflow. For a really detailed walkthrough, this easy DIY guide for cleaning condenser coils is another great resource to have open.
Once you're done brushing, go over the whole area one last time with the vacuum to pick up all the debris you just knocked loose.
This infographic lays out a simple maintenance schedule to help you stay on top of things.
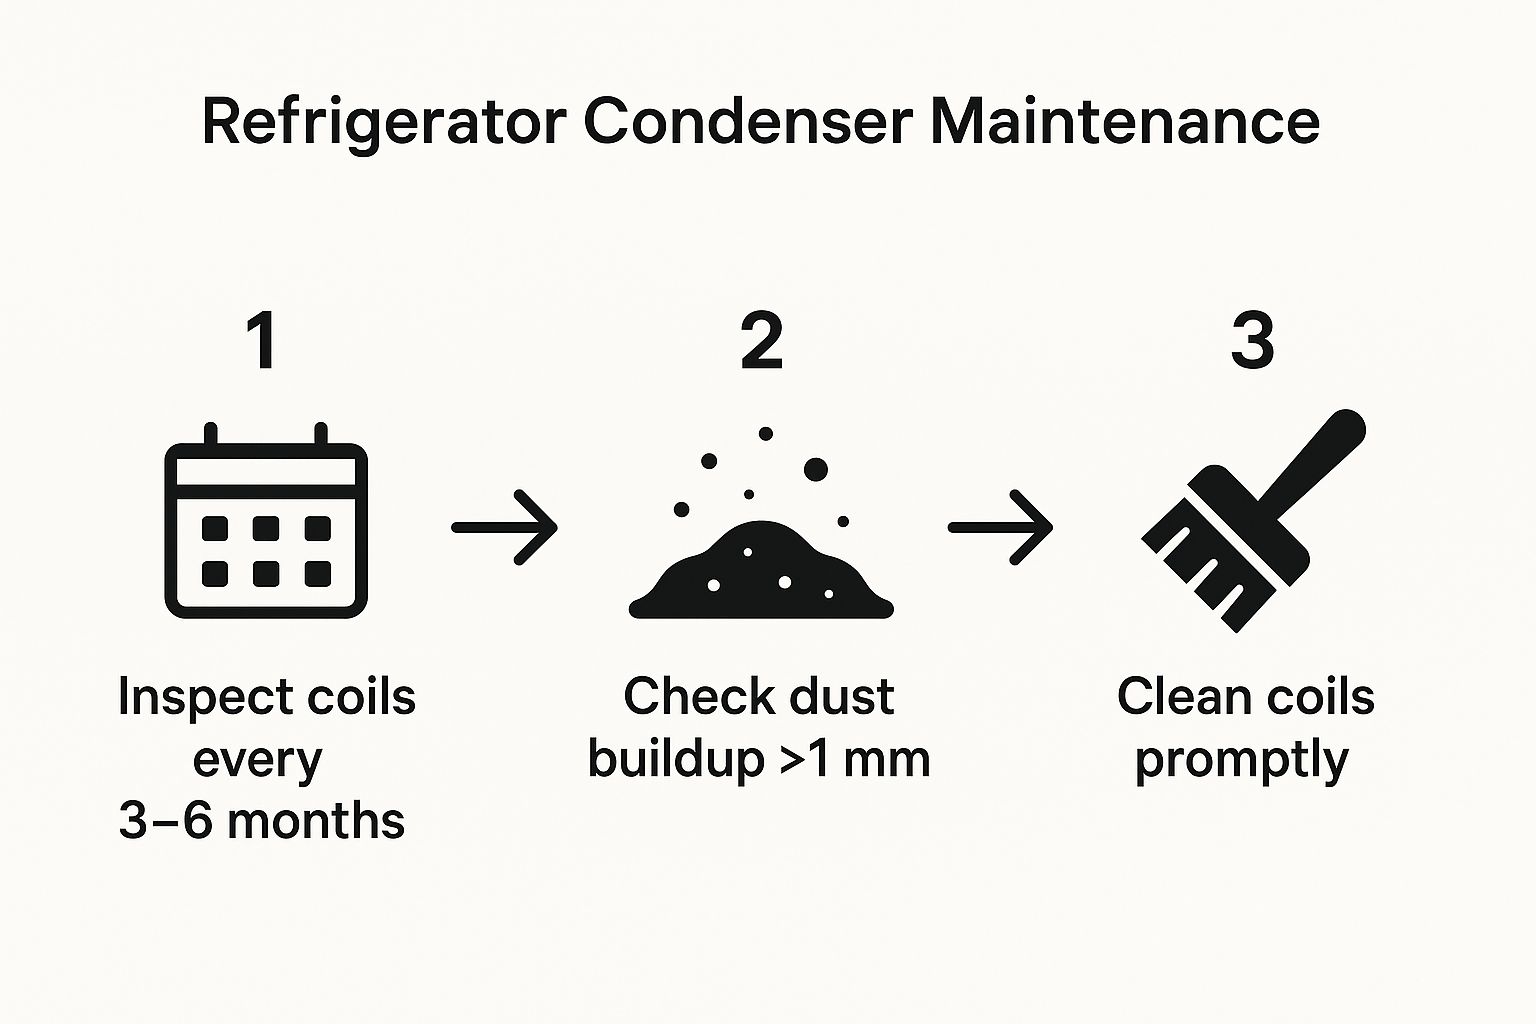
Having a visual reminder like this really helps reinforce the habit of regular checks, letting you catch dust buildup before it turns into a real performance killer.
Applying a Refrigerator Condenser Cleaner
Honestly, most of the time, a good dry cleaning with a brush and vacuum is all that’s needed. But if you’re dealing with greasy kitchen residue coating the coils, you might need to bring in a specialized refrigerator condenser cleaner.
Pro Tip: Only use a cleaner that's actually made for condenser coils. Regular household sprays can leave a sticky film that just attracts more dust, or worse, contain chemicals that could damage the metal components.
If you do go the spray route, use it sparingly and follow the directions on the can. You’ll probably need to wipe down any excess with a clean cloth. Once the coils are clean and dry, just snap the grille back on, plug the fridge in, and you’re all set.
Finding the Coils on Your Refrigerator Model
You can't clean what you can't find. Honestly, one of the biggest hurdles people face with this simple maintenance task is just figuring out where the condenser coils are hiding on their specific refrigerator. Their placement has changed a lot over the years, so knowing what to look for saves you a ton of time and frustration.
Before you start pulling your fridge away from the wall, just know that every model is a little different. The good news is that most modern refrigerators stick to one of a few common designs. This will take the guesswork out of the equation before you even grab a refrigerator condenser cleaner.

Common Locations for Condenser Coils
Most refrigerators sold today will have their coils in one of three main spots. Once you get familiar with these, you'll be able to spot your setup in no time.
- At the Bottom Front: This is the most popular design for modern, freestanding refrigerators. You’ll find the coils tucked behind a plastic grille at the very bottom of the unit. Just snap that grille off, and they’ll be right there.
- On the Back: A lot of older or more basic models have large, exposed coils that look like a black grid covering most of the back panel. This design is less common now, but it's super easy to spot and even easier to clean.
- Underneath the Unit: Some built-in or compact models have their coils located underneath the main body of the appliance. You'll typically get to them through a removable grille at the front, but the coils themselves are set farther back.
As a side note, the market for appliance cleaners is really growing. This is largely thanks to the popularity of stainless steel refrigerators, which need special cleaners to avoid surface damage. This trend is pushing companies to innovate. Plus, with more people buying online, it's easier than ever for consumers to find a wide variety of these products, which is boosting sales. You can discover more insights on the refrigerator cleaner market on datainsightsmarket.com.
The Deal with 'No-Clean' Condensers
You might have heard the term 'no-clean' or static condensers and thought you were off the hook. While it's true these models don't have the classic fin-and-tube coils that need a good brushing, they aren't entirely maintenance-free.
These systems work by encasing the coils right inside the refrigerator walls. Instead of using a fan to cool them down, they dissipate heat naturally through the outer casing of the fridge. So while you won't be cleaning coils directly, you absolutely still need to make sure there's proper airflow around the whole appliance.
A common mistake I see is people pushing these refrigerators right up against the wall or boxing them in with cabinets. They need at least one to two inches of clearance on all sides to let that heat escape. If they can't breathe, they can still overheat and run inefficiently.
So, you can put the coil brush away, but a quick check of the surrounding airspace every so often is still a smart move. It'll keep your appliance running smoothly for years. As always, your owner's manual will have the final say on what your specific model needs.
Building a Simple Appliance Maintenance Routine
Cleaning your refrigerator's condenser coils isn't something you do once and then forget about. It’s a small but crucial piece of your overall appliance care strategy. Honestly, turning this into a regular habit is the single best way to keep your fridge running efficiently and head off those frustrating, expensive breakdowns.
Think of it this way: a simple, repeatable routine is your best defense against surprisingly high energy bills and the cost of a repair visit.
Setting a Realistic Cleaning Schedule
So, how often should you actually be cleaning these coils? There's no single magic number. The right frequency really comes down to what's going on inside your home.
For a lot of households, a thorough cleaning once a year is perfectly fine. But some situations stir up a lot more dust and debris, which means your fridge's cooling system needs a bit more attention.
Here are a few real-world scenarios to help you figure out the best schedule for your place:
- Got pets? If you have dogs or cats, you know the fur gets everywhere—and that includes your condenser coils. For pet owners, I always recommend cleaning them every three to six months to stop clogs before they start.
- Living in a dusty area? Maybe you're near a construction site, live on a dirt road, or just in a climate that kicks up a lot of dust. Your coils are going to get dirty much faster. A quick check every six months is a really smart move.
- Is your kitchen the heart of the home? When you have a kitchen that sees a lot of action and heavy cooking, a greasy film can start to build up on the coils. Checking them every six months will help you catch it before it becomes a real problem.
To give you a clearer picture, here’s a quick guide to help you decide on a schedule that makes sense for you.
Recommended Condenser Cleaning Frequency
| Household Condition | Recommended Frequency |
|---|---|
| Homes without pets, in a low-dust area | Once a year |
| Homes with 1-2 shedding pets | Every 6 months |
| Homes with multiple shedding pets | Every 3-4 months |
| Dusty environments (e.g., near construction) | Every 6 months |
| Kitchens with heavy daily cooking (grease buildup) | Every 6-9 months |
Ultimately, the best approach is to be proactive. Just set a recurring reminder on your phone or calendar for every six months. It takes less than a minute to pop off the grille and shine a flashlight back there. If you see a fuzzy blanket of dust, you know it's time to clean.
Your Quick Appliance Maintenance Checklist
To really make this habit stick, try bundling your coil cleaning with a few other quick maintenance tasks. You've already got the vacuum out and you're in that "appliance care" mindset, so why not knock out a few other things at once?
This kind of integrated approach to commercial kitchen equipment maintenance is what keeps everything humming along smoothly.
While you’re already working on the fridge, just add these simple tasks to your list:
- Wipe Down Door Gaskets: Grab a damp cloth with a little mild soap and clean the rubber seals around the doors. A good seal keeps the cold air in, which means your compressor doesn't have to work so hard.
- Check the Icemaker Line: Just give the water line a quick look for any kinks or signs of a leak. A tiny drip can turn into major water damage if you don't catch it early.
- Clean the Drip Pan: If you can get to it, slide out the drip pan from under the fridge. A quick wash with soap and water will stop any weird odors or bacteria from growing.
- Test the Temperature: Pop a thermometer inside the fridge and freezer to make sure they're holding the right temperatures. You're looking for around 37°F for the fridge and 0°F for the freezer.
By grouping these jobs together, what started as a single chore becomes a full maintenance routine. It takes less than 30 minutes but pays off in the long run by keeping your appliances in great shape.
Common Questions About Refrigerator Coil Cleaning
Even with a solid plan, it's normal for questions to pop up when you're elbows-deep in a maintenance task. Let's tackle some of the most common ones we hear about cleaning refrigerator coils. Getting these answers straight will help you do the job right and feel confident about it.

A lot of people are tempted to just grab whatever cleaner they have under the sink. It seems like a quick shortcut, but it's one you really want to avoid.
Can I Use a Generic Household Cleaner on My Coils?
It's best to steer clear of those all-purpose sprays. Many contain harsh chemicals that can actually corrode the delicate metal fins. Even worse, some leave behind a sticky residue that acts like a magnet for new dust and grime, making your problem worse down the road.
Your safest bet is to use a product made specifically as a refrigerator condenser cleaner. If you'd rather go chemical-free, a vacuum with a soft brush attachment and a good coil brush will do a fantastic job on their own.
What Should I Do If I Accidentally Bend the Fins?
First off, don't panic. This happens all the time. The thin aluminum fins on the condenser coils are incredibly fragile and bend with the slightest pressure. It's not a disaster, but since bent fins can block airflow, they do reduce your fridge's efficiency.
Thankfully, the fix is easy. You can pick up an inexpensive tool called a "fin comb" online or at most appliance parts stores. It’s designed to slide right between the fins and gently straighten them back into place. Just take your time and work slowly to avoid doing more damage.
A few slightly bent fins won't tank your refrigerator's performance, but a large flattened section can make a noticeable difference. Taking a few minutes to straighten them is a smart move for maintaining optimal airflow.
Do I Still Need to Clean 'No-Clean' Condensers?
This is a great question. While refrigerators with "no-clean" or static condensers don't have exposed coils that you need to brush, they aren't totally maintenance-free. These systems work by dissipating heat through the refrigerator's outer walls.
For that to happen effectively, they need good airflow around the entire unit.
- Make sure you have at least a few inches of clearance between the refrigerator and the walls or surrounding cabinets.
- If your model has components underneath, you should still vacuum the front grille every so often to keep dust from blocking air circulation near the compressor.
Is It Okay to Use Compressed Air?
We strongly advise against this. The high pressure from a can of compressed air can easily bend or damage those fragile fins. Beyond that, it doesn't actually remove the dust—it just blasts it all over your kitchen, creating a bigger mess and kicking allergens into the air you breathe. A vacuum is a much cleaner, safer, and more effective way to get the gunk out.
At PrepTables.com, we understand that a well-maintained kitchen is an efficient kitchen. Explore our full range of professional-grade commercial refrigeration and stainless steel prep tables to keep your operations running smoothly. Find the perfect equipment for your needs at https://preptables.com.