

How to Fix Your Ice Maker Water Leak Fast
That moment of panic when you spot a puddle creeping out from under your refrigerator is something no one wants to experience. But before you jump to the worst-case scenario, know that an ice maker water leak is usually a fixable problem. Your first moves are the most important—they're all about safety and damage control.
Shutting down the power and water immediately is non-negotiable. This isn't just about stopping the leak; it's about creating a safe zone so you can figure out what’s wrong without risking electrical shock or turning a small mess into a major renovation project.
Your Immediate Action Plan for an Ice Maker Leak
Seeing water on the kitchen floor is a gut-punch, for sure. But a calm, methodical approach can make all the difference, turning a potential catastrophe into a manageable task. The real priority isn't just stopping the flow of water; it's about making the area safe for you and your home. Getting these first steps right sets you up to diagnose the problem without any extra drama.
Before you even start hunting for the source of the leak, your focus has to be on containment and safety. You can't troubleshoot anything with live electricity and running water in the mix.
When you're faced with a sudden leak, a clear plan prevents panic and minimizes damage. The following checklist outlines the critical first steps to ensure your safety and protect your property.
Immediate Action Checklist for an Ice Maker Leak
| Priority | Action Step | Reason |
|---|---|---|
| 1 (Highest) | Cut Power at the Breaker | Go to your home's circuit breaker and switch off the power to the kitchen. This is the safest way to eliminate the risk of electrical shock, especially if water is near the outlet. |
| 2 | Shut Off the Water Supply | Find the dedicated shutoff valve for the ice maker. It’s usually a small valve on the wall behind the fridge or under the sink. Turn the valve clockwise to close it completely. |
| 3 | Unplug the Refrigerator | Only after the power is off at the breaker, you can safely unplug the appliance from the wall. Never attempt this while standing in water. |
| 4 | Contain and Clean the Water | Use towels or a wet-dry vac to soak up all the standing water. Getting the area dry quickly is key to preventing further damage. |
Following these steps in order creates a secure environment, allowing you to move on to diagnosing the problem without worrying about immediate hazards.
Securing the Appliance and Area
First things first, head to your home's circuit breaker and kill the power to the kitchen. Don't even think about unplugging the fridge if there's water anywhere near the outlet—it's just not worth the risk.
With the power off, you can now stop the water. Look for the ice maker's shutoff valve. It's typically a small valve behind the fridge or under the sink, connected to that thin water line. A clockwise turn should shut it right off.
Key Takeaway: Always cut the power at the breaker before you touch the water valve or the plug. This sequence is your best defense against electrical shock, the biggest immediate danger you're facing.
Initial Cleanup and Assessment
Once everything is powered down and the water is off, it’s time to deal with the puddle. Grab some towels or a wet vacuum and get all that standing water up. Addressing the water damage right away is just as important as fixing the leak itself; you can find solid advice on emergency water cleanup to help prevent mold and protect your floors.
You’re not alone in this, by the way. Ice maker leaks are surprisingly common, making up about 35% of all appliance-related water damage claims in North America. A seemingly small drip can waste one or two gallons of water a day, with repairs often landing somewhere between $150 and $400. You can dig into more of these ice maker leak insights from Whirlpool.com to understand the impact.
With the area now safe and dry, you're ready to carefully pull the refrigerator away from the wall and start your inspection.
Finding the True Source of the Leak
Alright, you've stopped the immediate flood and cleaned up the mess. Now, it's time to put on your detective hat. An ice maker leak rarely happens for no reason, and tracking it down means working through the usual suspects one by one.
We're going to start with the easiest, most common problems first and work our way to the more complex stuff inside the machine. This way, you won't waste time tearing things apart if the culprit is just a loose fitting. Let's systematically check each potential failure point to pinpoint exactly what’s gone wrong.
This quick decision tree can help you visualize where to start your hunt.
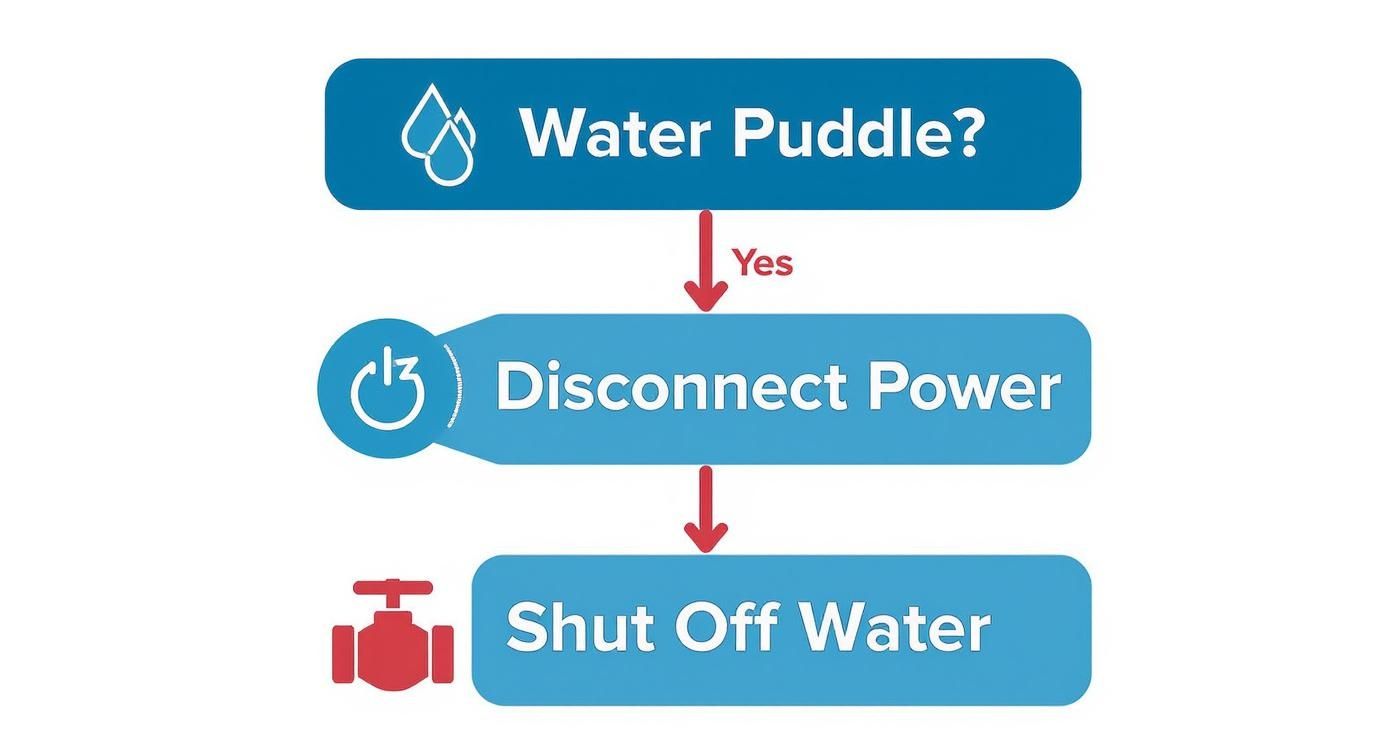
As you can see, safety is non-negotiable. Before you do anything else, make sure that power and water are completely shut off.
Inspecting the External Water Supply Line
The search for your ice maker leak begins behind the fridge. That skinny little tube running from the wall to your appliance, the water supply line, is far and away the most common offender. These lines, especially plastic ones, can get brittle, crack, or get kinked over the years.
Carefully run your hand along the entire length of the tube. You're feeling for any dampness, obvious cracks, or spots that feel suspiciously weak. Pay extra attention to where the line connects to the wall and to the back of the fridge. A fitting that has worked itself loose is a classic cause of a slow drip that grows into a puddle.
If you find the problem here, consider yourself lucky. This is usually the simplest and cheapest fix you can ask for.
Checking the Water Inlet Valve
If the supply line is bone dry and looks solid, your next stop is the water inlet valve. This is the part where that supply line physically connects to the refrigerator. It's a small, electronically controlled valve that opens and closes to feed water to the ice maker.
Sometimes, a tiny piece of sediment from the house's plumbing can get lodged in the valve, keeping it from sealing completely. This lets water constantly trickle through, which eventually overflows the ice mold. You might also find the connection itself is loose, causing a drip right where the line screws onto the valve.
A dead giveaway for a bad inlet valve is a slow, steady drip of water into the ice mold long after the fill cycle is supposed to be over. That constant trickle is the classic signature of a valve stuck partially open.
Examining Internal Ice Maker Components
If everything on the outside checks out, it’s time to open the freezer and take a hard look at the ice maker assembly itself. A leak can start from a few different places in here, and it’s not always because a part is broken.
First, check the fill tube—the small spout that shoots water into the ice mold. It's surprisingly common for this tube to get clogged with ice. When the next fill cycle kicks in, the water has nowhere to go but out, spilling into your ice bin or down to the freezer floor.
Next, give the ice mold itself a close inspection. Look for any hairline cracks in the plastic tray. It’s not as common, but a crack will definitely let water seep out before it can freeze.
- Is the Fridge Level? This sounds basic, but is your refrigerator perfectly level? If it’s tilted forward even a tiny bit, the ice mold won’t fill properly, causing water to spill over the front edge every single time.
- Check for Ice Jams: Look for any stray ice cubes stuck in the ejector arm or the sweeping mechanism. A jam can interrupt the cycle and trigger an overflow when the next batch of water comes in.
- Watch the Fill Level: If you can, watch a fill cycle in action. Does the water level look too high? An overfill will spill out of the mold every time. This usually points back to an adjustment issue or a faulty water inlet valve letting in too much water.
These internal checks often turn up problems with alignment or simple blockages, not necessarily busted hardware. While these are typical issues for home units, commercial ice machines have their own set of similar, but often more intense, challenges. In fact, leaking water lines are a major headache in commercial kitchens, accounting for 20-30% of service calls and sometimes slashing ice production by up to 25%. Fixing those often takes real plumbing expertise. Our guide on commercial ice machine maintenance dives deeper into what business owners need to know.
Practical Fixes for Common Ice Maker Leaks
Alright, you've figured out where the water is coming from. Now it's time to roll up your sleeves and get it fixed. A leaking ice maker might seem like a major headache, but you'd be surprised how many of the common causes are a pretty simple DIY job. All you need are a few basic tools and a bit of patience.
This is where we get hands-on. We’ll walk through swapping out that flimsy plastic supply line for something tougher and show you how to replace a finicky water inlet valve. Each fix is broken down into simple, manageable steps. I’ll give you the tool list, safety checks, and some insider tips to make sure you get it right on the first try, saving you a hefty bill from a repair technician.
Before we dive into the specific repairs, here’s a quick-glance table to help you match your symptoms to the right solution. This can save you a ton of time.
Common Ice Maker Leak Causes and Fixes
| Symptom | Likely Cause | DIY Repair Action | Difficulty Level |
|---|---|---|---|
| Puddle behind the fridge, visible crack or drip in the line | Cracked/damaged water supply line | Upgrade to a braided steel line | Easy |
| Slow, constant drip from the back of the fridge, ice maker overfilling | Faulty water inlet valve | Replace the entire valve assembly | Moderate |
| Water leaking inside the freezer, ice buildup around the fill port | Frozen or misaligned fill tube | Thaw with a hairdryer and realign | Easy |
| Ice bin overflowing with ice, water spilling from the bin | Ice maker not shutting off | Check shut-off arm; may need a new control module | Moderate to Hard |
This table should give you a solid starting point. Now, let’s get into the specifics for the most common fixes.
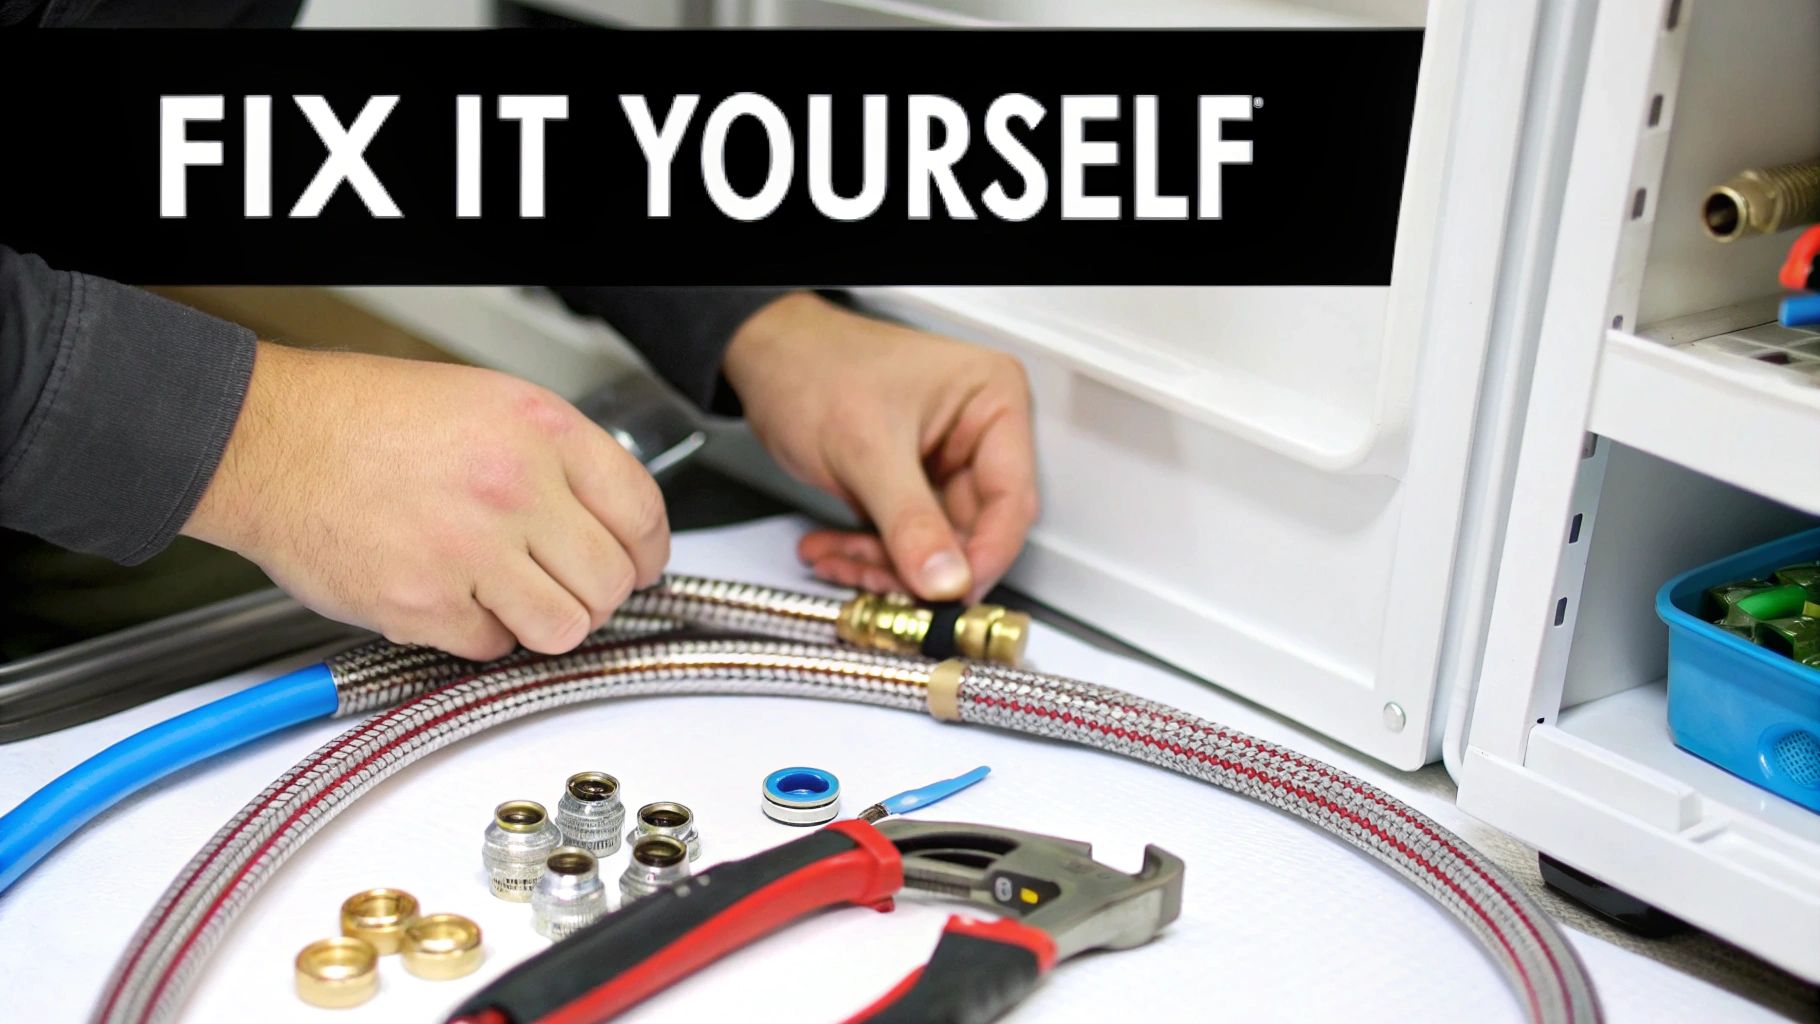
Upgrading a Cracked Water Supply Line
That thin plastic tube snaking from your wall to your fridge? It’s easily the #1 culprit for an ice maker water leak. They get brittle over time and are just waiting to crack. The best move, both for a fix and for prevention, is to upgrade to a braided steel line.
First things first: safety. Head to your circuit breaker and kill the power to the fridge. Then, find the water supply valve (usually under the sink or behind the fridge) and shut it off completely.
Tools and Parts Needed
- An adjustable wrench or pliers
- A new braided steel refrigerator water line (measure first!)
- A bucket and a few old towels
- Plumber's tape (optional, but a good idea)
Toss your towels and bucket under the water connection at the wall to catch any drips. Use your wrench to carefully loosen the compression nut holding the old line to the shutoff valve. Once it’s off the wall, do the same on the back of the fridge where it connects to the water inlet valve.
With the old line gone, you're ready for the new one. I like to wrap the male threads on both connection points with a thin layer of plumber's tape for a better seal. Hand-tighten the new braided line onto both ends first, then give each a gentle quarter-turn with the wrench to snug it up. Don't go crazy here—overtightening can wreck the fittings.
Pro Tip: When tightening a compression fitting, "snug" is the goal. If you overtighten it, you can warp the seal inside and actually cause a leak. Think firm, not Herculean.
Replacing a Faulty Water Inlet Valve
If you traced the leak to a constant drip from the valve itself or noticed it wasn't shutting off properly, it's time to replace it. The water inlet valve is the gatekeeper; when it fails, it often gets stuck open, leading to overfilling or a steady leak.
Tools and Parts Needed
- Nut driver or a small socket set
- Pliers or an adjustable wrench
- The correct OEM water inlet valve for your refrigerator model
- Towels
Again, make sure the power and water are off. The valve is usually on the lower back of the fridge, hidden by a small access panel. Unscrew that panel to expose the valve, which will have the water line and an electrical harness attached.
First, disconnect the water line from the old valve. Next, gently pull the electrical harness off its terminals—it should slide right off. Finally, take out the mounting screws that hold the valve to the fridge frame, and the old part will come right out.
Pop the new valve into position and secure it with the mounting screws. Reconnect the electrical harness and the main water supply line. Now for the moment of truth: turn the water back on slowly at the wall and watch your new connections like a hawk to make sure there are zero drips.
Thawing and Realigning the Fill Tube
A frozen fill tube is another common gremlin. When ice clogs this tube, the water that's supposed to fill your ice mold has nowhere to go but out, spilling all over the inside of your freezer.
Tools and Parts Needed
- A hairdryer
- A thin, flexible tool (a pipe cleaner or even a long zip tie works)
- A few towels
Start by pulling out the ice bin so you can get a good look at the ice maker assembly. Find the fill tube—it’s the little plastic nozzle that shoots water into the ice mold. If you see an ice dam around its opening, you've found your problem.
Grab a hairdryer and use a low heat setting to gently melt the ice blockage. Keep the hairdryer moving so you don't overheat and warp any of the plastic parts. Once the main blockage is gone, use a pipe cleaner to clear any leftover slush from inside the tube.
While you're in there, double-check that the tube is aimed correctly. Sometimes they get bumped and end up missing the ice mold. It should point directly into the center of the mold. If it’s off-kilter, you can usually nudge it back into the right spot.
For a wider view on tackling other types of water issues you might run into around the house, check out this comprehensive guide to repairing household water leakage. It’s a great resource for general plumbing know-how.
After you've finished any of these repairs, the final step is always the same. Slowly turn the water supply back on, then restore power to the fridge. Keep a close eye on your work for the next couple of hours to be absolutely sure no new leaks pop up.
Proactive Maintenance to Prevent Future Leaks
You've fixed the immediate problem, which is great. But the real win is making sure you never have to deal with a surprise puddle on your kitchen floor again. Shifting to a little proactive maintenance can save you from future headaches and expensive repairs. A simple routine is all it takes to keep your ice maker humming along and extend its life for years.
Think of it as a quick check-up every few months. These small habits are your best defense against another ice maker water leak.
Create a Simple Inspection Routine
The easiest way to stop a leak is to spot the trouble before it even starts. A quick, semi-regular look at the key parts is your best defense.
Start with the water supply line behind the fridge. Just run your hand along its entire length. You're feeling for any spots that seem brittle, have kinks, or feel damp. Even the tiniest imperfection in a plastic line can turn into a crack over time.
Next, get into the habit of changing your refrigerator's water filter on schedule. When a filter gets clogged, it can cause pressure to spike in the system. That extra strain can push fittings and valves to their breaking point. Most manufacturers suggest a new filter every six months.
- Quarterly Water Line Check: Feel along the water line every few months, paying extra attention to where it connects at both ends.
- Bi-Annual Filter Swap: Put a reminder in your calendar to swap the water filter twice a year. This keeps water pressure normal and your water clean.
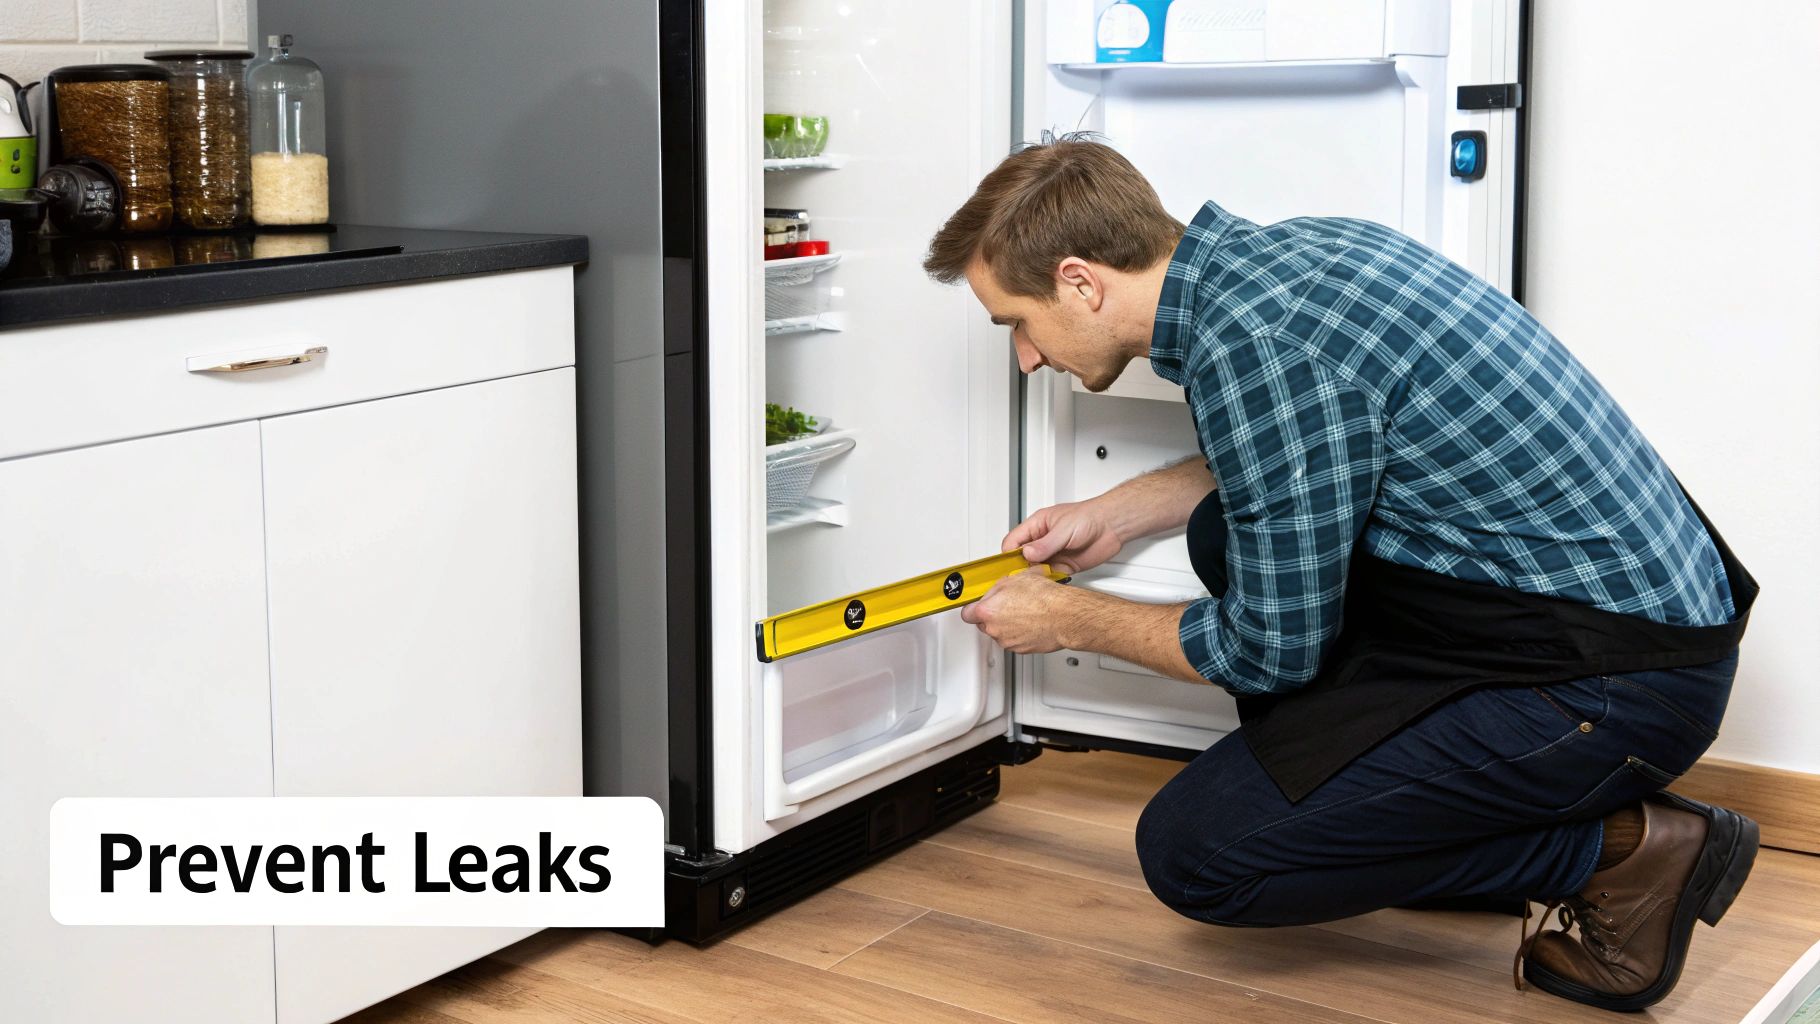
- Annual Level Check: Grab a small level once a year and make sure your refrigerator is perfectly balanced. If it’s tilted, the ice mold can fill unevenly and spill over.
These small tasks take almost no time but pay off big by preventing the most common culprits behind a leak.
An ice maker water leak isn't just a mess; it's a potential health hazard. Leaks can let contaminants into the system, creating a perfect breeding ground for bacteria and viruses that end up in your ice.
This isn't just about property damage—there are real public health risks. Norovirus outbreaks have been traced back to contaminated ice from machines with defective or leaky valves. One UK study revealed that people who consumed ice from a compromised source had a 6.5 times higher risk of infection. This shows a direct line between a faulty part and your family's health.
Keep Key Components Clean
Believe it or not, a little cleaning goes a long way in preventing leaks. Two spots, in particular, need your attention: the condenser coils and the ice maker assembly itself.
The condenser coils, usually on the back or bottom of your fridge, are how the appliance gets rid of heat. When they get covered in dust and pet hair, the compressor has to work overtime. That extra stress is felt by every component, including the delicate parts inside your ice maker. A quick vacuuming of the coils every six months makes a world of difference.
Likewise, keeping the ice maker clean prevents mineral scale from building up and causing blockages. You can get the full rundown on best practices in our guide on proper ice machine cleaning procedures.
By working these simple checks and cleaning habits into your routine, you can dramatically cut the risk of ever finding another ice maker leak.
Knowing When to Call an Appliance Professional
Look, a DIY fix for a leaky ice maker is often totally doable. But there's a fine line between a successful repair and turning a small puddle into a major kitchen flood. Part of being a smart homeowner is knowing when to put down the wrench and call in a pro. It can save you a ton of money and headaches in the long run.
Some problems just aren't a simple part swap. You have to be able to spot the red flags that point to a bigger, more complicated failure—the kind that can be dangerous or just plain tricky to fix without the right tools and training.
Identifying Complex Mechanical and Electrical Failures
The first major sign you’re in over your head is if you think the leak is coming from a crack in the ice maker mold assembly. That's the tray where the water actually freezes. A tiny hairline crack might not seem like a big deal, but it usually means the material is worn out and the entire unit needs to be replaced. That’s a job that can get complicated fast.
Another one is a faulty electronic control board. Let's say your ice maker is overflowing, but you've already checked the water inlet valve and it seems to be working fine. The next culprit is often the control board, which might be sending the wrong signals. Messing with your appliance's electronics without knowing exactly what you're doing is a surefire way to cause even more damage.
Key Insight: If you see an oily residue mixed with the water and notice a chemical smell, stop immediately. That’s not water; it’s a refrigerant leak from the sealed system. This is hazardous stuff, and you absolutely need a licensed technician to handle it.
And of course, if you’ve tried all the common fixes and that leak just won't quit, it's a clear sign the problem is deeper than you can see. A pro has diagnostic gear that can pinpoint hidden issues you’d never find on your own.
When the Problem Is Beyond the Appliance
Sometimes, the ice maker isn't even the real problem. The issue might actually be with your home’s plumbing. If your water pressure is too high or fluctuates wildly—a phenomenon called water hammer—it can beat up the appliance's internal valves and fittings over time.
- Signs of a Plumbing Issue: Do you hear a loud banging sound in your pipes when a toilet flushes or the washing machine runs? That’s a classic sign of a water pressure problem.
- Leak at the Wall Valve: If the shutoff valve behind your fridge is dripping, that's a job for a plumber, not an appliance tech.
- Consistent Clogs: If the fill tube on your ice maker keeps freezing up no matter what you do, it could be that your water pressure is too low to push the water through cleanly.
In these situations, an appliance repair person can fix the symptom, but only a plumber can fix the root cause. This kind of big-picture thinking is a huge part of effective commercial kitchen equipment maintenance, and it’s just as important in your home kitchen.
When you do make that call for service, give the technician a good head start. Have your refrigerator's model number ready, and tell them exactly what you're seeing and what you've already tried to fix. This helps them show up with the right parts and get straight to the real problem, which saves everyone time and money.
Frequently Asked Questions About Ice Maker Leaks
When your ice maker starts leaving puddles on the floor, you're bound to have questions. It’s one of those annoying but common kitchen problems, and getting straight answers can help you tackle it without the stress. We've compiled the most common questions we hear to give you the confidence to find the right fix.
Why Did My Ice Maker Suddenly Start Leaking?
A sudden leak almost always feels like it came out of nowhere, but there's usually a specific part that just gave up. More often than not, it's a simple failure from age and wear.
A classic culprit is the plastic water supply line. After years of subtle temperature changes and vibrations from the fridge's compressor, the plastic gets brittle and can spring a leak in an instant. Another common one is a stuck water inlet valve. All it takes is a tiny bit of mineral scale to jam it partially open, causing a slow, steady drip that eventually overflows everything.
- Age-Related Failure: Plastic lines and rubber seals simply don't last forever. They eventually get brittle and crack, often without any warning.
- Pressure Spikes: A sudden jump in your home's water pressure can be the final straw for an older valve or fitting, causing it to fail.
- Ice Blockages: Sometimes a clog forms in the fill tube, which forces water to back up and spill out during the next cycle.
Is It Expensive to Fix an Ice Maker Leak?
The cost really depends on what broke, but you’d be surprised how many of these fixes are cheap if you're willing to handle it yourself. A little bit of troubleshooting here can literally save you hundreds of dollars.
For example, a new braided steel supply line—which is a great upgrade from the standard plastic ones—will probably only set you back $15 to $25 at the hardware store. If it turns out to be the water inlet valve, a new part is usually in the $50 to $100 range. For many people, both of these are totally doable jobs that take less than an hour.
Of course, calling a professional technician will cost more. You can expect a service call for an ice maker leak to run anywhere from $150 to $400, once you factor in labor and parts. That’s why trying the simple fixes first is always a smart move.
Can I Still Use the Ice if My Ice Maker Is Leaking?
The safest answer is a hard no. Once you spot a leak, it's best to turn off the ice maker and toss out any ice that's already in the bin.
It all comes down to contamination. That leaking water could be pooling with dust and whatever else is behind your fridge before getting splashed back into the ice bin. Even worse, a break in the water line itself could introduce bacteria directly into the water used to make your ice. It’s just not worth the risk.
After you’ve completely fixed the leak and given the ice bin a good cleaning, you can turn it back on. As an extra precaution, I always recommend throwing out the first couple of batches it makes to flush the lines out.
How Often Should I Check My Ice Maker for Leaks?
A little proactive maintenance is your best defense against finding another puddle. You don't need to be a plumber to do a quick inspection every few months.
An easy routine is to just pull your fridge away from the wall twice a year—maybe when you're doing some spring and fall cleaning. It’s the perfect time to vacuum the dust off the condenser coils anyway. While you’re back there, take a look at the water line and its connections. Feel the line itself to check if it’s brittle or damp. This simple check can help you spot a potential ice maker water leak before it happens, saving you a massive headache.
Whether you’re repairing an old ice maker or upgrading your entire kitchen, having the right equipment makes all the difference. At PrepTables.com, we offer a wide range of commercial-grade refrigeration and ice machines built for durability and performance. Explore our collection to find the perfect solution for your needs at https://preptables.com.