

Choosing the condensing unit for walk in cooler: Size, Types, and Tips
Choosing the right condensing unit for a walk in cooler is easily the most critical part of the setup. Get it right, and you’re looking at years of reliable, efficient cooling. Get it wrong, and you're in for a world of headaches, from spoiled inventory to sky-high energy bills. It's all about matching the unit’s power to what your kitchen actually demands.
Sizing Your Condensing Unit for Peak Performance
Picking a condensing unit isn't like grabbing an appliance off the shelf. This is a very specific calculation based on your kitchen's unique environment. If the unit is too small, it'll run non-stop, fighting a losing battle against the heat until it burns itself out. Go too big, and the unit will short-cycle—kicking on and off constantly. That's not just inefficient; it puts a ton of wear on the compressor. The sweet spot is right in the middle.
To find that sweet spot, you have to calculate your total cooling needs, measured in British Thermal Units (BTUs). This goes way beyond just the size of your walk-in. You need to account for all the real-world factors that add heat to the space, which the condensing unit will have to remove.
Key Factors in Your Sizing Calculation
There are three main things that go into an accurate BTU calculation: the box itself, what you're putting in it, and the environment around it.
- Box Size and Insulation: The volume of your walk-in (length x width x height) is the starting line. But just as important is the R-value of the insulation. A box with great insulation (R-25 or higher) is a fortress against heat, drastically reducing the work your refrigeration system has to do.
- Product Load: What are you cooling, and how much of it? Every time you load warm product, the system has to work hard to bring it down to temperature. Think about the weight you add each day and its starting temperature. Cooling 500 lbs of fresh produce from 75°F is a much bigger job than just storing pre-chilled items.
- Ambient Heat and Usage: The world outside your cooler has a huge impact. A unit in a scorching 100°F kitchen works a lot harder than one tucked away in a cool 70°F basement. You also have to factor in heat from lights, fan motors, and even people moving in and out. And how often does that door swing open? Every time it does, warm air rushes in, adding to the total heat load.
This visual guide breaks down the core elements of the sizing process.
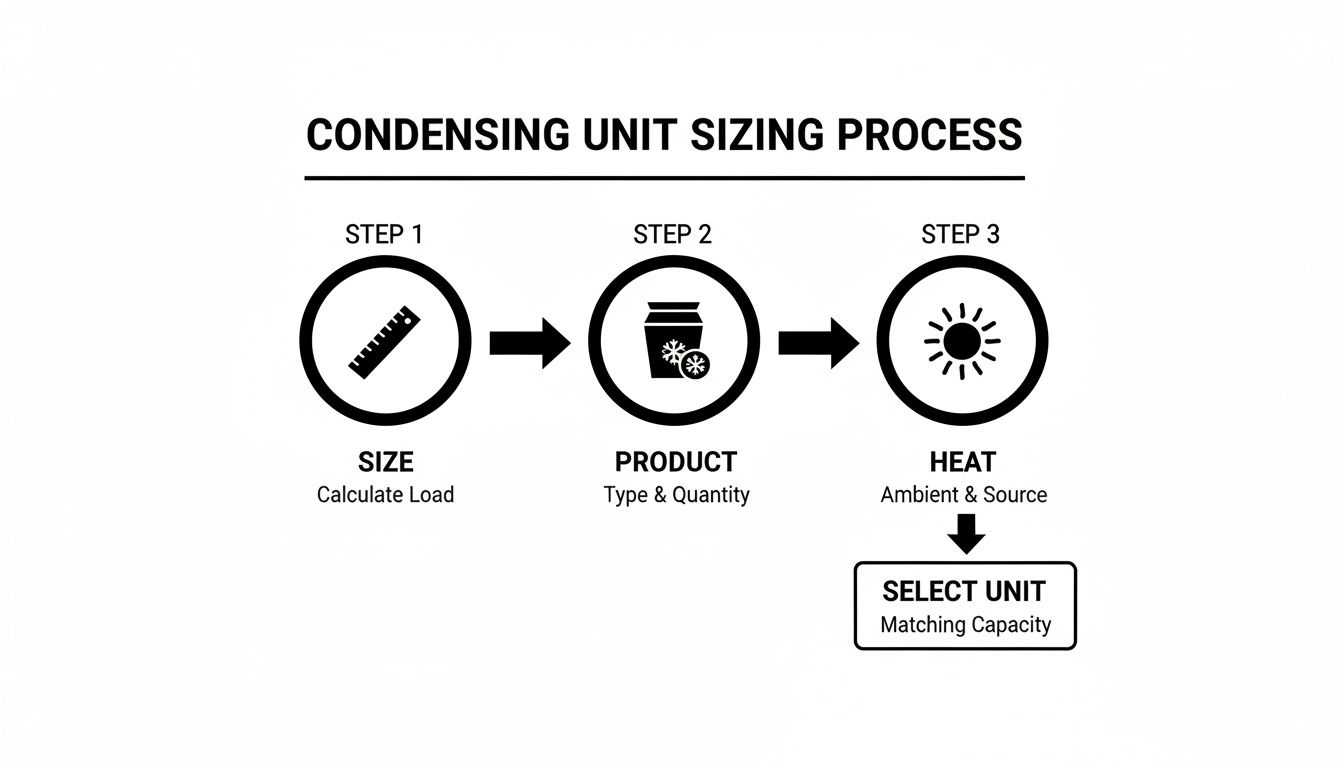
As you can see, proper sizing is a multi-step analysis, not just a quick measurement of your cooler's dimensions.
A Real-World Sizing Example
Let's picture a busy restaurant downtown with an 8'x10' walk-in cooler. It's located right in the kitchen, where the ambient temperature easily hits 95°F during a hectic service.
Every day, they bring in 300 pounds of fresh vegetables (at about 70°F) and another 100 pounds of prepped sauces that are still warm (around 150°F). During the dinner rush, the staff is in and out of that cooler at least 20 times an hour. All of these things—the hot kitchen, the warm product, the constant door openings—create a massive heat load that a standard, undersized unit simply couldn't touch.
A common mistake is to only size a condensing unit based on the cooler's dimensions. Forgetting to account for product load and ambient heat can lead to a system that fails precisely when you need it most—during a summer heatwave or a busy service.
The demand for solid cooling solutions is only getting bigger. The global condensing unit market is on track to hit USD 57.1 billion by 2027, and that growth is driven by food pros who can't afford equipment failure. Air-cooled units are especially popular, making up a huge chunk of commercial installs in North America because they're simpler and more affordable to set up.
For restaurant owners, this means you can get durable systems that handle high BTU loads and hold a steady 35°F, even in the most demanding kitchens.
Getting the size right is about future-proofing your business. The right unit will power through the toughest conditions, protecting your inventory and your profits. Nail these calculations from the start, and you're making a smart investment in reliability. For a deeper look into commercial cooling, check out our guide on finding the best commercial refrigerators for your operation.
Remote vs. Self-Contained Units: A Head-to-Head Comparison
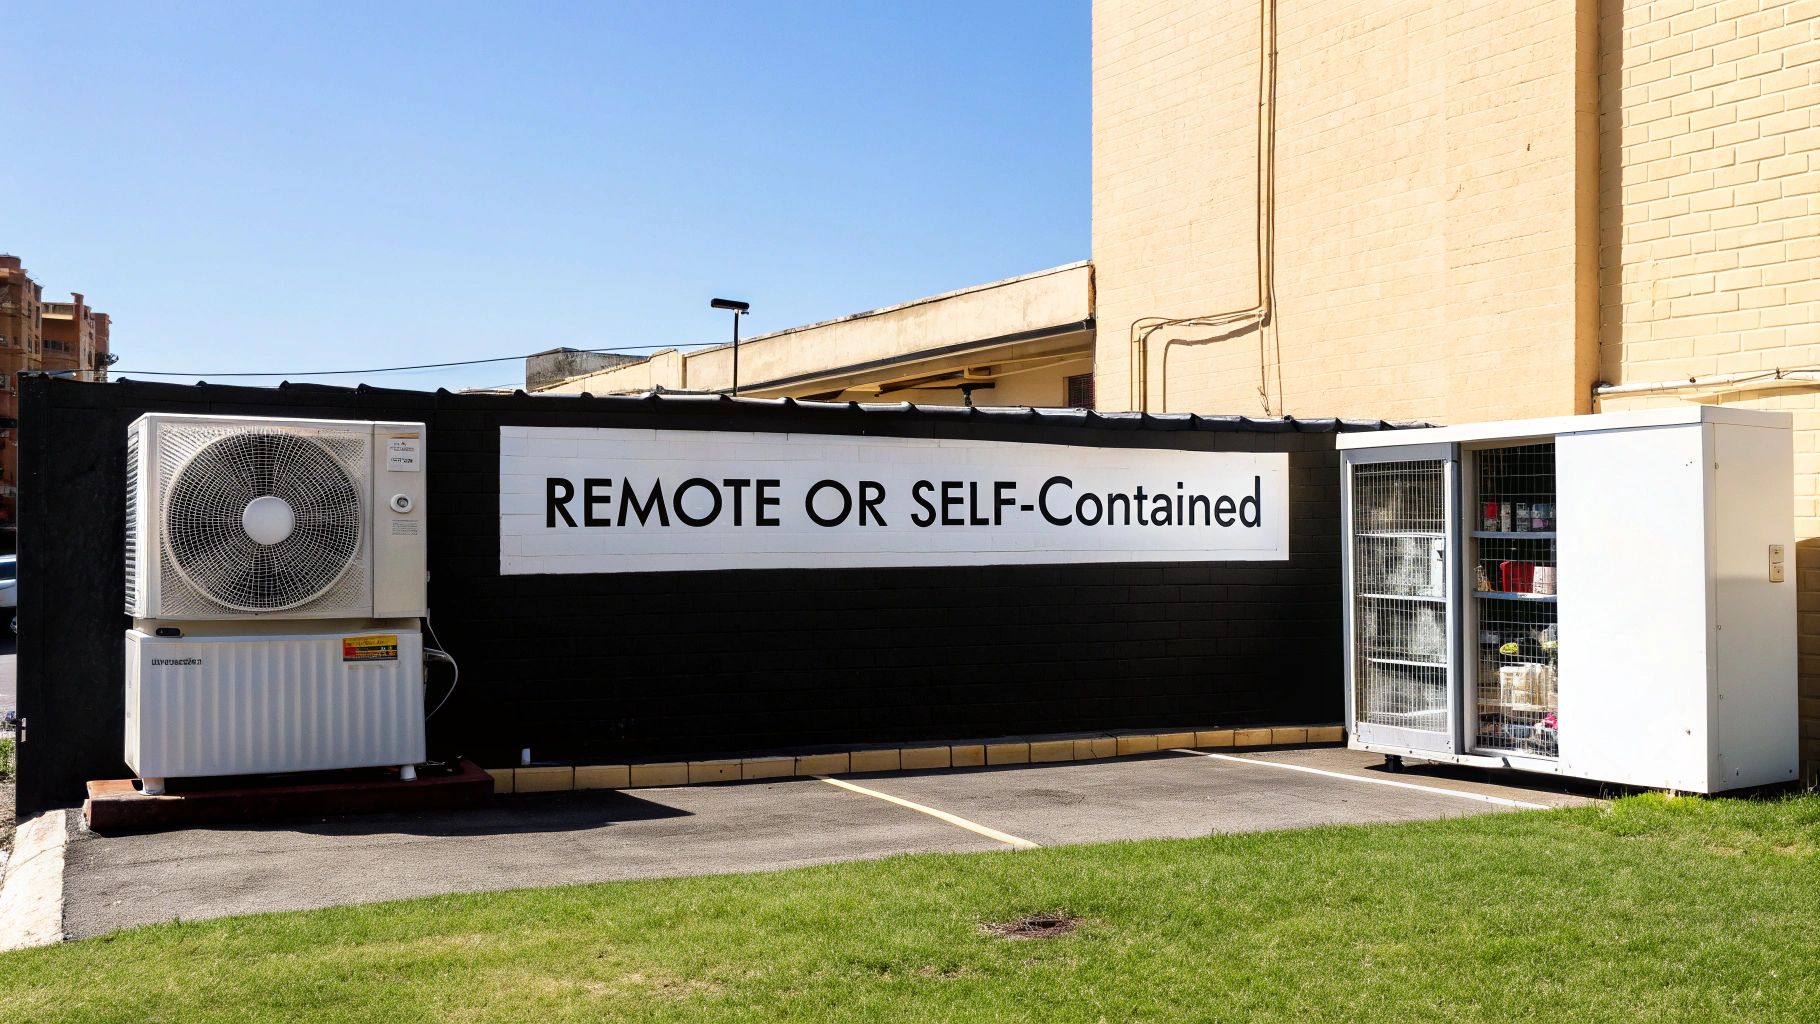
Once you’ve nailed down the right size for your walk-in cooler, you’re staring down another huge decision: remote or self-contained? This isn’t just a technical choice—it will fundamentally change your kitchen's environment, your monthly energy bills, and how you handle maintenance for years to come.
A self-contained unit is the all-in-one solution. Think of it like a window air conditioner; the compressor, condenser, and evaporator are all bundled into a single package. In contrast, a remote unit works more like a central air system in a house, splitting the components up for better performance and a more comfortable indoor space.
The Case for Self-Contained Simplicity
Self-contained units are the "plug-and-play" option in the refrigeration world. They usually sit right on top of or next to the walk-in, making them a breeze to install. For a small business where every square foot counts and you need to get up and running fast, this is a major win.
Imagine a little urban deli or a food truck. You don't have a back room or rooftop to spare for a big, noisy machine. A self-contained system offers a compact footprint and lower upfront installation costs since you don't need a technician to run long, complicated refrigerant lines.
But that convenience has its trade-offs. Because everything is in one spot, the unit dumps all its heat and noise right into the surrounding area. In a busy kitchen, this can crank up the ambient temperature and create a loud, stressful environment for your staff.
Why Remote Units Dominate Commercial Kitchens
Remote systems take the opposite approach. The evaporator coil—the part that gets cold—stays inside the walk-in. The noisy, heat-generating condensing unit gets placed "remotely." This usually means outdoors on a concrete pad, up on the roof, or in a dedicated mechanical room.
This design delivers two game-changing benefits for most commercial kitchens:
- Heat Is Gone: It kicks all that waste heat outside, keeping your kitchen cooler and lightening the load on your main HVAC system. That translates directly to energy savings.
- Peace and Quiet: Moving the compressor and fan outside makes your indoor workspace dramatically quieter. This is huge for staff comfort and communication, and it's an absolute must for any restaurant with an open-kitchen concept.
The real win with a remote condensing unit for a walk in cooler isn't just about cooling power—it's about creating a better place to work. A cooler, quieter kitchen means a more focused and productive team, which always shows up in the quality of your service.
The market data backs this up. For commercial walk-in coolers, remote condensing units are the clear favorite, holding a commanding 48% market share. Their popularity comes from delivering serious, scalable cooling without adding heat and noise where you work. For bigger operations like catering companies or bustling restaurants, the ability to expand without a massive overhaul is a huge selling point. You can dig deeper into these trends in the latest industry research from Future Market Insights.
A Side-by-Side Breakdown
To help you see things more clearly, let's put these two systems head-to-head on the factors that matter most for your business.
Comparing Remote and Self-Contained Condensing Units
Here’s a practical breakdown to help you decide which condensing unit type best fits your business needs, budget, and operational environment.
| Factor | Remote Condensing Unit | Self-Contained Condensing Unit |
|---|---|---|
| Initial Cost | Higher. You're paying for more complex installation and a technician's time to run refrigerant lines. | Lower. The installation is much simpler, often a "drop-in" style that's quick and easy. |
| Kitchen Environment | A huge improvement. It's significantly quieter and cooler since heat and noise are exhausted outdoors. | Adds a lot of heat and noise right into your workspace. |
| Energy Efficiency | Generally more efficient. The unit rejects heat into cooler outdoor air, so it doesn't have to work as hard. | Can be less efficient because it’s fighting against the warmer air inside your kitchen. |
| Installation | More complex. This is a job for a pro, involving refrigerant lines and electrical work. | Simple and fast. It often comes pre-charged and ready for a quick hookup. |
| Best For | Restaurants, grocery stores, hotels—any business where keeping indoor heat and noise down is a priority. | Small cafes, delis, convenience stores, or any spot with limited space for a remote installation. |
In the end, it all comes down to what your operation needs. While the upfront cost of a remote condensing unit for a walk in cooler is higher, the long-term payoff in energy savings and a better work environment often delivers a far greater return on investment for most growing businesses.
Pairing Components for a Balanced Refrigeration System
A powerful condensing unit is just one piece of the puzzle. For your walk-in cooler to run right, the condensing unit for walk in cooler, evaporator coil, and refrigerant have to work together like a perfectly balanced team. If the key players aren't compatible, the whole system is set up for failure.
Mismatched components are a recipe for disaster. It's something we see all the time. If your condensing unit is too beefy for the evaporator coil, it can turn that coil into a solid block of ice, choking off airflow and bringing your cooling to a dead stop.
On the flip side, an undersized unit trying to keep up with a large evaporator will just run and run, eventually burning out the compressor. Getting the balance right isn't just a suggestion; it's a hard requirement for a long-lasting, efficient system.
The Critical Role of the Evaporator Coil
The evaporator is the workhorse inside your walk-in, pulling the heat out of the air. It works in tandem with the condensing unit, which dumps that heat outside. For this heat exchange to happen efficiently, their capacities have to be closely matched.
A properly paired system keeps the refrigerant flowing at the right rate and pressure. This balance is what stops common refrigeration nightmares from happening, like:
- Coil Freeze-Ups: This happens when the condensing unit is too aggressive, pulling heat so fast that moisture on the coil flash-freezes into ice.
- Compressor Burnout: A sure sign the unit is overworked, often because it’s trying to support an evaporator that’s way too big for it.
- Inefficient Cooling: The system constantly struggles to hold temperature, leading to spoiled products and eye-watering energy bills.
Understanding Temperature Differential (TD)
One of the most crucial—and most often overlooked—factors in pairing a system is the Temperature Differential (TD). This is simply the difference between the air temperature inside the cooler and the temperature of the evaporator coil itself. This one number has a huge impact on the humidity inside your walk-in.
Why should you care? Because different products need different environments.
A low TD (around 10°F) keeps humidity high. This is perfect for preserving the freshness of delicate, unwrapped produce like leafy greens or flowers. A higher TD (around 15°F) creates a much drier space, which is exactly what you want for storing packaged goods like beverages and sealed food containers.
Getting the TD right is critical for product quality. Mismatching it can mean wilted vegetables or soggy, condensation-soaked boxes. Both will cost you money.
Navigating Modern Refrigerant Regulations
The final piece of this puzzle is the refrigerant—the lifeblood of your system. In recent years, environmental regulations have completely changed the game. Older refrigerants like R-22 have been phased out because they were bad for the ozone layer.
Today’s systems typically use more eco-friendly options, like R-404A or newer alternatives with even less environmental impact, such as R-448A. When you're choosing a condensing unit, you have to make sure it's designed and rated for the specific refrigerant your technician is going to use. Using the wrong type can wreck the compressor and instantly void your warranty. Always double-check the manufacturer’s spec sheets for both the condensing unit and the evaporator to confirm they're compatible.
Finally, take a hard look at your electrical setup. For larger or more demanding walk-in coolers, you might need a three phase power installation to handle the electrical load. Bringing in an electrician early in the process ensures you have the power you need when the equipment shows up, saving you from expensive delays down the road.
Setting Your Professional Installation Up for Success
Even when you hire a qualified technician for the heavy lifting, your own preparation is what makes or breaks the installation of your condensing unit for walk in cooler. Think of yourself as the project manager. A little bit of planning on your part can prevent expensive delays and give your new system a strong start.
The whole process kicks off the moment you order the equipment. A smooth installation is all about coordination, and your job is to clear the path—both literally and figuratively—for the install team.
Site and Electrical Readiness
Before your technician even shows up, the installation site needs to be 100% ready. The most common holdup we see in the field is an electrical supply that doesn't match what the unit needs. Always double-check the manufacturer's spec sheet for the right voltage and amperage.
Get an electrician in to confirm you have the proper dedicated circuit. Finding out at the last minute that you need a panel upgrade or have to pull new wiring can push your project back by days, if not weeks.
A successful installation day is an uneventful one. The best way to get there is to have your electrician sign off on the power source and have the entire installation area cleared before the refrigeration tech is scheduled to arrive.
It's just as important to make sure the spot you've picked for the condensing unit has proper airflow. A unit that's crammed into a tight space without enough ventilation will constantly run hot, leading to a much shorter lifespan. As a rule of thumb, ensure there's plenty of clearance on all sides—18-24 inches is a safe bet, but always check the manual.
Planning the Refrigerant Line Path
The route the refrigerant lines take from the condensing unit to the evaporator coil inside your walk-in is more critical than most people think. The main goal is to keep this run as short and direct as you possibly can. Longer lines can cause a drop in pressure, which forces the whole system to work harder and slashes its efficiency.
Walk the planned route with your installer beforehand. Keep an eye out for any obstacles like support beams, walls, or other equipment that could force complicated bends or a longer-than-ideal run. A smart, well-planned path doesn't just improve performance; it also makes future service calls a lot easier.
Here are a few key points to go over with your technician:
- Total Line Length: Shorter is always better. Aim for the most direct path to keep the system efficient.
- Vertical Rise: If the condenser is going on the roof, make sure the unit is rated to handle that vertical lift of refrigerant.
- Protection: Lines running outside or through high-traffic areas need to be properly insulated and shielded from damage.
- Access: Make sure service valves and connection points are easy to get to for future maintenance.
Making sure the job complies with NFPA 70E electrical safety standards is also non-negotiable. This preparation protects both your expensive new equipment and the people working on it.
Scheduling and Coordination
Finally, a little strategic scheduling can save you a world of operational headaches. Installing a new refrigeration system is disruptive. It’s noisy, and your walk-in will be completely out of commission for several hours at a minimum.
Try to plan the installation during your slowest business hours or, even better, on a day you're closed. This minimizes the impact on your customers and staff. Work with your technician to nail down a clear timeline so you know exactly when the old system gets shut down and when the new one should be up and running. This lets you manage your inventory without costly spoilage.
For a detailed look at the entire process, our comprehensive guide offers a complete walk in cooler installation checklist to make sure you don't miss a single step.
Proactive Maintenance That Prevents Costly Downtime
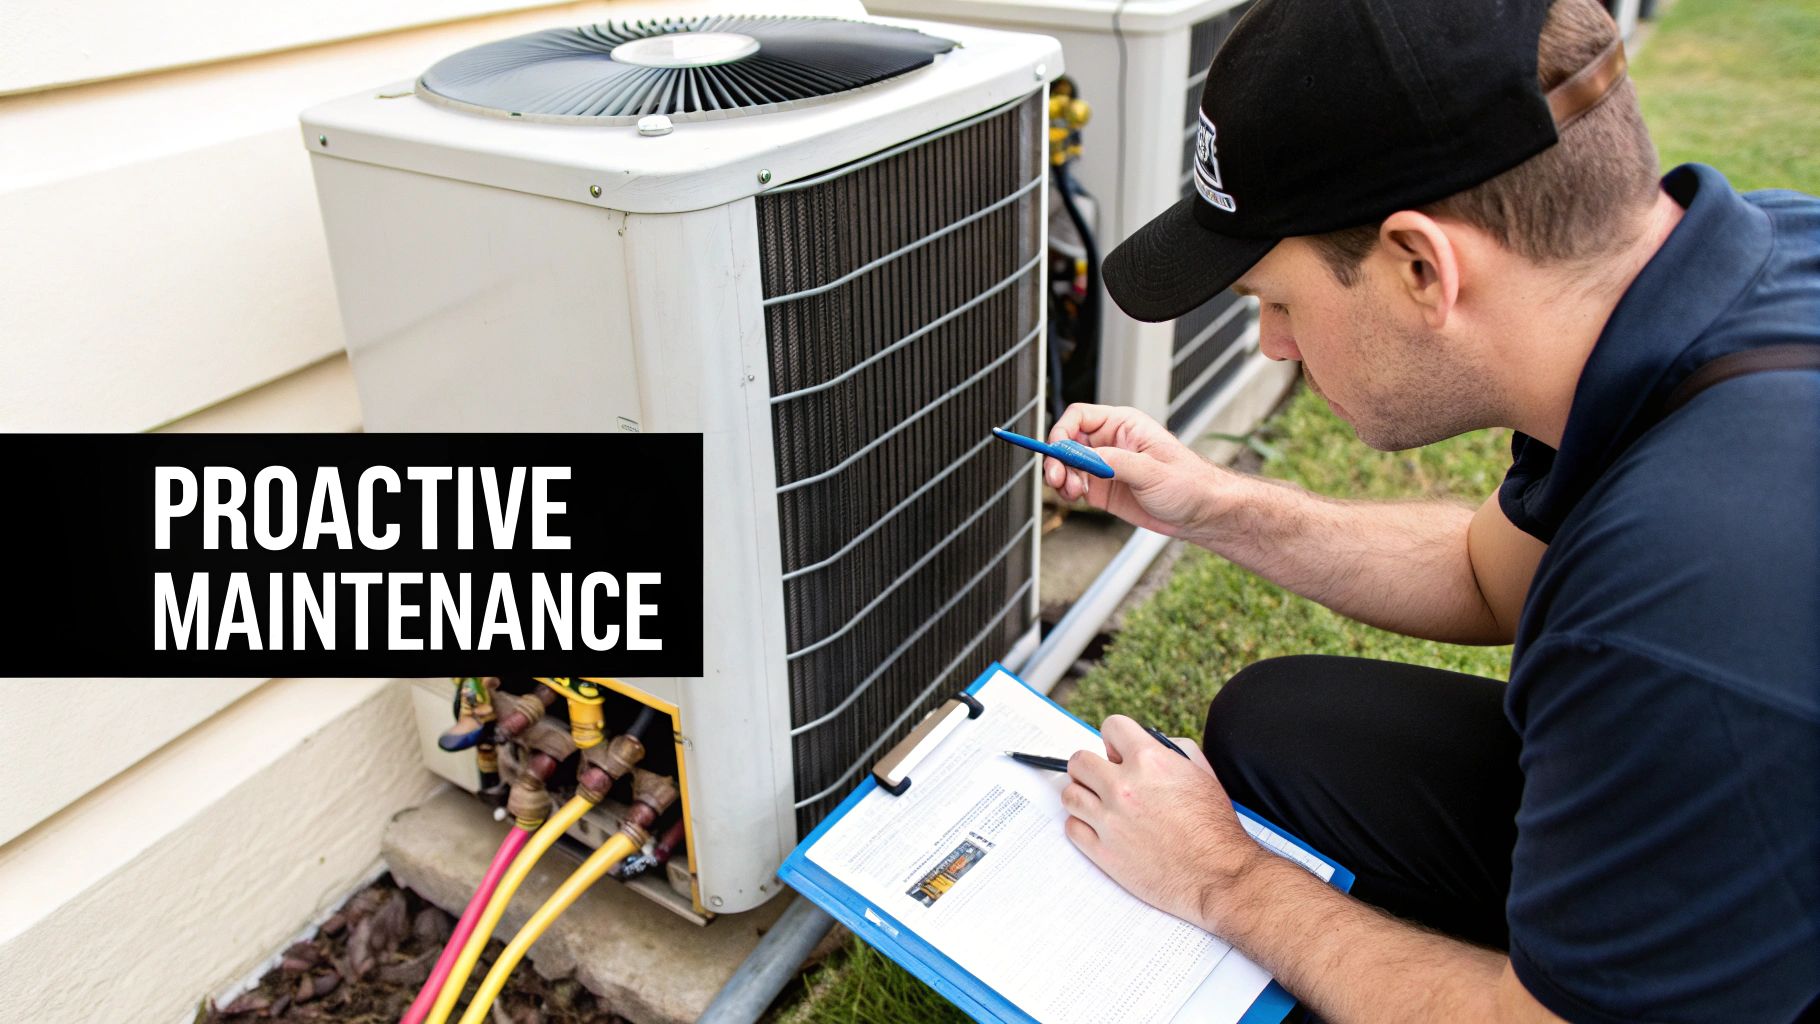
Your condensing unit for a walk in cooler is a serious investment. Like any mission-critical piece of equipment, it needs consistent care to keep doing its job. Simply ignoring maintenance is the fastest way to find yourself dealing with a sudden breakdown, loads of spoiled product, and a hefty bill for an emergency service call.
Being proactive, on the other hand, can add years to your unit's life and save you a small fortune down the road.
The best part? You don't have to be a refrigeration guru to make a real impact. A few simple monthly habits, combined with a more detailed annual check-up from a pro, will protect your investment and keep your cooler running smoothly and efficiently.
Your Monthly Maintenance Checklist
These are the quick, high-impact tasks you can—and absolutely should—handle yourself every month. They take almost no time but serve as your frontline defense against the most common culprits of refrigeration failure.
- Clean the Condenser Coils: In a busy kitchen environment, condenser coil fins are a magnet for grease, dust, and general grime. All that buildup insulates the coils, forcing the unit to work much harder to release heat. This drives up your energy bills and puts a ton of strain on the compressor. A quick monthly cleaning with a soft brush and a quality coil cleaner can boost efficiency by up to 30%.
- Check and Clear Drain Lines: Your evaporator coil creates condensation, which is supposed to flow away through a drain line. When that line gets clogged with gunk, water backs up. It can either freeze into a solid block of ice on your coil or spill out onto the floor, creating a major slip hazard. A quick check each month to make sure water is flowing freely is a must.
- Inspect Door Gaskets: The rubber seals around your walk-in door are vital for keeping the cold air in and warm air out. Give them a quick look for any cracks, tears, or spots where they've become brittle. A bad gasket is a huge source of energy loss and forces your entire system to run constantly.
Neglecting simple maintenance like cleaning condenser coils is like forcing a marathon runner to breathe through a straw. The system will struggle, overheat, and eventually fail—all because of something that could have been fixed in 15 minutes.
For a more detailed walkthrough, you can learn more about the best practices for using a refrigerator condenser cleaner to keep your unit in prime condition.
When to Call a Professional Technician
While your monthly checks are critical, some jobs just require the specialized tools and hands-on experience of a qualified refrigeration technician. Scheduling a professional service call once a year, preferably just before the summer heat kicks in, is one of the smartest things you can do.
During an annual tune-up, a tech will handle the vital services that go beyond basic cleaning:
- Verify Refrigerant Charge: They'll hook up gauges to check the refrigerant levels and pressures, ensuring the system is perfectly balanced for peak performance.
- Inspect Electrical Connections: A pro will tighten all electrical connections and look for signs of wear or corrosion on wires and contactors, heading off potential electrical failures.
- Test Defrost Cycles: On freezer units, they’ll confirm the defrost heaters and timers are working correctly to stop ice from building up on the evaporator.
- Check Fan Motors and Blades: They will lubricate motors where needed and inspect fan blades for any damage, ensuring you're getting proper airflow across the coils.
This professional check-up is all about catching small problems before they have a chance to become catastrophic failures.
Quick Troubleshooting Guide
Even with perfect maintenance, you might still hit a snag now and then. Being able to spot the likely cause can help you figure out if it's a quick fix you can handle or if it's time to get a pro on the phone.
Troubleshooting Common Condensing Unit Problems
This quick-reference guide can help you identify and resolve frequent issues with your walk-in cooler's condensing unit before they turn into major problems.
| Symptom | Likely Cause | Your Next Step |
|---|---|---|
| Unit Runs Constantly | Dirty condenser coils, low refrigerant, or a torn door gasket letting warm air in. | Clean the coils thoroughly. If the issue persists, call a technician to check the refrigerant. |
| Unit is Short-Cycling | Poor airflow around the condensing unit or an oversized system. | Ensure there is at least 18-24 inches of clearance around the outdoor unit. |
| Strange Noises | A rattling sound could be a loose panel. A grinding or squealing noise often points to a failing fan motor. | Tighten any loose screws on the unit's housing. For motor noises, call for service immediately. |
| Ice on Evaporator Coil | Clogged drain line, failing defrost system (in freezers), or low refrigerant. | Check and clear the drain line. If the problem continues, professional service is needed. |
Staying on top of these simple maintenance and troubleshooting steps puts you in control. You can protect your equipment, sidestep costly downtime, and ensure your condensing unit for walk in cooler gives you reliable service for years to come.
Answering Your Top Questions
Getting into the nitty-gritty of commercial refrigeration can feel overwhelming. When you’re trying to pick out the right condensing unit for a walk in cooler, you need clear, straightforward answers to make a smart investment. Let's tackle some of the most common questions business owners run into.
How Much Does a New Condensing Unit Cost?
This is usually the first question on everyone's mind. The total cost really breaks down into two parts: the price of the unit itself and the cost of getting it installed by a pro.
A new condensing unit could be anywhere from $2,000 for a smaller, self-contained system to well over $10,000 for a heavy-duty remote unit built for a massive walk-in. Then you have installation, which typically adds another $1,500 to $5,000. That price can swing depending on how complex the job is—think long refrigerant lines or tricky electrical work.
My advice? Always get quotes from a few different qualified technicians. It’s the only way to get a real sense of what your specific project will cost.
Should I Repair My Condensing Unit or Just Replace It?
This is a classic dilemma. The decision to repair or replace a failing unit really boils down to its age and how much the repair is going to set you back.
I always tell people to use the 50% rule. If a repair is going to cost more than half the price of a brand-new, energy-efficient unit, it’s almost always smarter to replace it.
Here’s what to think about:
- How Old Is It? Most commercial condensing units last about 10-15 years. If yours is getting close to that age, a replacement is probably the better long-term bet.
- How Often Is It Breaking Down? If you feel like you're calling a service tech every other month, all those "small" repair bills are adding up fast. A new unit comes with a warranty and, more importantly, peace of mind.
- Is It Efficient? Today's units are miles ahead in energy efficiency. Upgrading can seriously cut down your monthly utility bills, helping the new equipment pay for itself over time.
What’s the Deal With the SEER Rating?
You'll see "SEER" mentioned a lot. It stands for Seasonal Energy Efficiency Ratio, and it’s basically a scorecard for how much cooling you get for every bit of energy the unit uses. The higher the SEER rating, the more efficient the unit.
Sure, a high-SEER unit might have a higher price tag upfront, but it's going to save you money every single month on your power bill. For a business where the refrigeration is running 24/7, even a small jump in efficiency can mean thousands of dollars in savings over the unit's life.
Think of a higher SEER rating as an investment in lower operating costs. The initial sticker price is just part of the story; the real cost of ownership includes the energy it consumes for the next decade.
Can I Use One Condensing Unit for Multiple Coolers?
You can, and it's done with something called a multiplex system. This is where one powerful condensing unit (or a whole rack of compressors) serves multiple refrigerated spaces, like both your walk-in cooler and your walk-in freezer.
You see these a lot in big operations like grocery stores or food distribution centers. It centralizes the equipment, which can make maintenance easier and boost overall efficiency. But—and this is a big but—these systems are incredibly complex to design and install. You absolutely need a specialized technician to get the balance right.
For most restaurants or smaller businesses, sticking with a dedicated condensing unit for each walk-in is the most practical and reliable way to go.
What are the different types of stainless steel prep tables?
While not directly related to condensing units, stainless steel prep tables are another cornerstone of an efficient commercial kitchen. They come in various forms, each designed for specific tasks. Work tables are the most basic, offering a flat, durable surface for general prep. Tables with backsplashes help contain messes and protect walls. For storage, you can find models with undershelves or enclosed cabinets. Specialized options include sandwich prep tables and pizza prep tables, which combine a refrigerated base for ingredients with a cutting board work surface, streamlining the assembly process for high-volume service. The right table depends entirely on your kitchen's workflow and menu.
At PrepTables.com, we know that the right equipment is the heart of any successful kitchen. From high-performance refrigeration to tough-as-nails stainless steel work surfaces, we have the tools you need to run a safe and efficient operation. Explore our full range of commercial kitchen solutions and build a workspace that truly works for you. Find your perfect kitchen setup at PrepTables.com.