

Industrial Immersion Blender Ultimate Guide
Picture this: a single tool that lets you puree a massive pot of soup right on the stove, whip up a velvety sauce without ever touching a countertop blender, and emulsify dressings in mere seconds. That’s the magic of an industrial immersion blender, a true workhorse in any professional kitchen. This powerhouse is all about efficiency and consistency, handling jobs that would otherwise mean more appliances, more transfers, and a mountain of cleanup.
The Powerhouse in Your Commercial Kitchen
Think of an industrial immersion blender as the ultimate multi-tool for a chef. Instead of the risky business of pouring hot, heavy liquids from a stockpot into a traditional blender (and then back again), this handheld beast goes directly to the source. That simple change saves precious minutes, slashes the risk of spills and burns, and dramatically cuts down on dirty dishes. In a fast-paced kitchen, those little efficiencies add up fast.
The benefits are crystal clear in the real world. A catering company can blend 50 gallons of tomato soup directly in the kettle, guaranteeing a perfectly smooth texture from the first bowl to the last. A busy bistro can whip up a flawless hollandaise or aioli on the fly, keeping quality high even during the dinner rush. The ability to blend, puree, and emulsify in just about any container is what makes this tool so essential to a modern kitchen workflow.
Before we dive deeper, let's break down the core value of these tools.
Industrial Immersion Blender At a Glance
This table sums up why an industrial immersion blender is such a game-changer in a professional setting.
| Key Benefit | Description | Primary Application Example |
|---|---|---|
| Workflow Efficiency | Blends directly in the cooking vessel, eliminating the need to transfer ingredients. | Pureeing a large batch of butternut squash soup directly in the stockpot. |
| Reduced Labor & Risk | Saves time and physical effort while minimizing potential for spills and burns. | Making a 20-quart batch of mayonnaise without lifting heavy bowls. |
| Space Saving | A single handheld tool replaces bulky countertop blenders. | Creating emulsions for dressings in a small kitchen with limited counter space. |
| Batch Consistency | Ensures a uniform texture throughout very large quantities of product. | Blending a large kettle of tomato sauce for consistent quality across all servings. |
As you can see, the main advantage is bringing the action to the food, not the other way around.
Making the Right Choice
Picking the right immersion blender boils down to your kitchen’s unique needs. You need to think about the volume of food you’re pushing out, the kinds of ingredients you work with day-to-day, and, of course, your budget.
This decision tree is a great visual guide to help you narrow down the options. It walks you through the key factors—motor power, batch volume, and budget—to point you toward a light-duty, standard, or heavy-duty model.
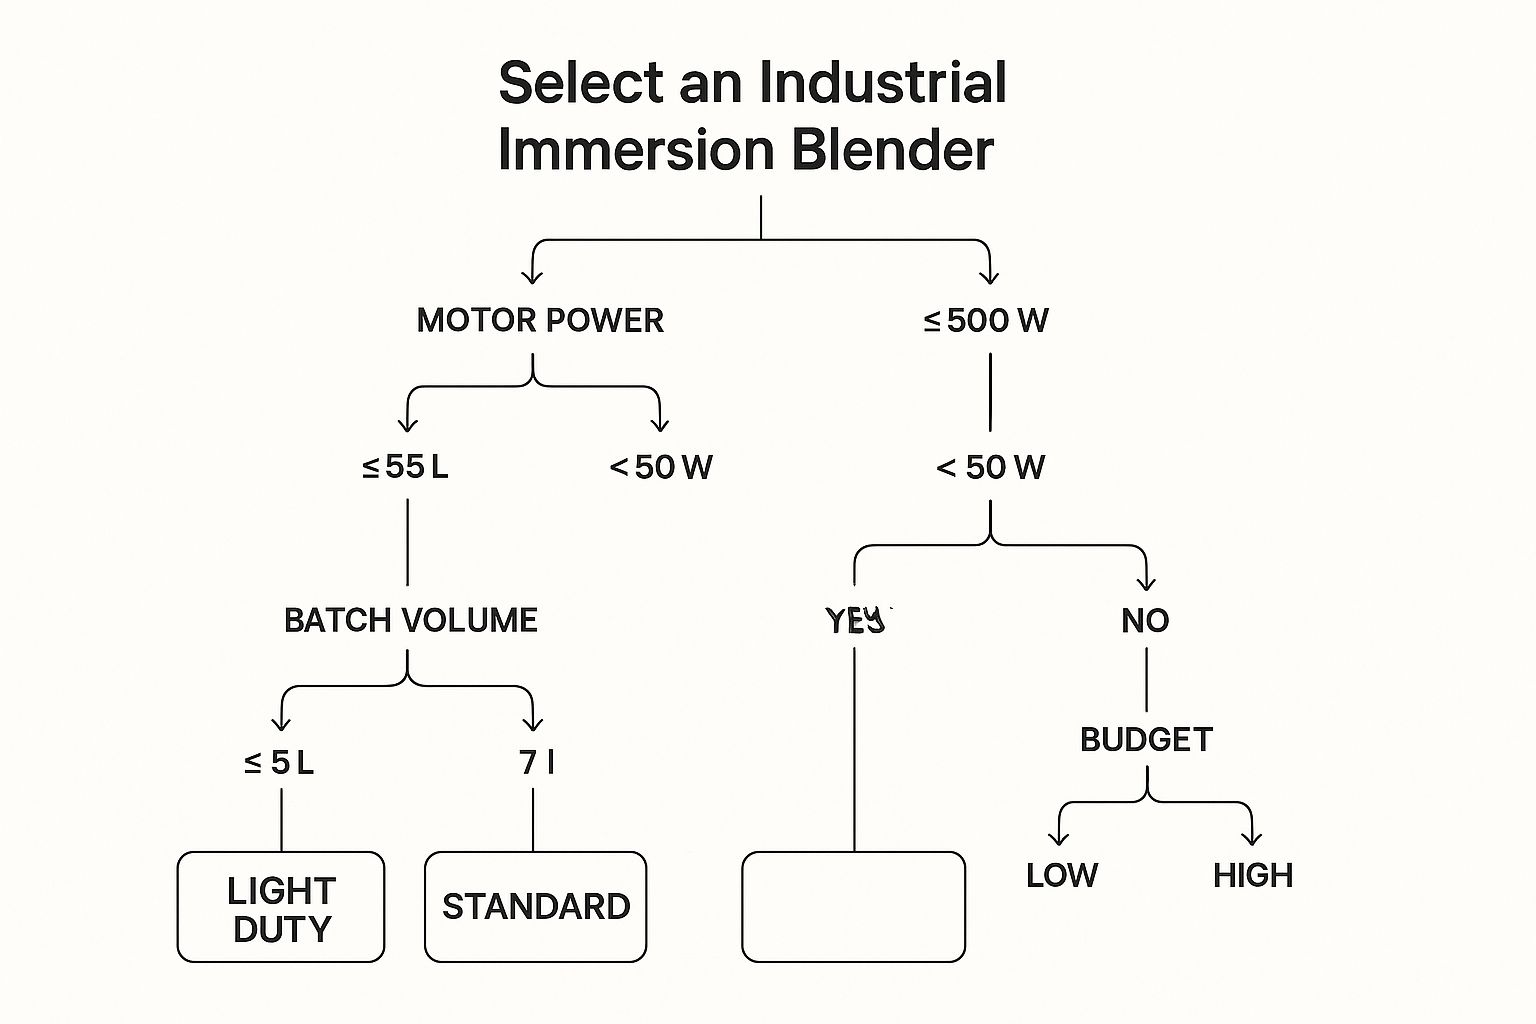
As the chart shows, a high-volume kitchen that processes huge batches needs a heavy-duty blender with a seriously powerful motor. On the other hand, smaller operations can get fantastic results with a more budget-friendly, light-duty option without overspending.
Key Takeaway: The primary value of an industrial immersion blender lies in its ability to bring the blending action to the ingredients, not the other way around. This fundamental shift saves time, labor, and cleanup.
This push for powerful and efficient kitchen tools is clearly reflected in market trends. The global blender market, which was valued at USD 2.69 billion in 2023, is expected to climb to USD 4.1 billion by 2032. This growth is fueled by the demand for tools that make it easier and faster to create healthy, natural foods—a niche the industrial immersion blender fills perfectly in commercial kitchens. If you're interested in the numbers, you can explore the full blender market analysis to get a better sense of these industry trends.
How to Choose Your Industrial Immersion Blender
Picking out the right industrial immersion blender isn't just another kitchen purchase. It's a strategic move that directly impacts your kitchen's speed and consistency. A blender that’s a hero in a small café making daily soups will quickly burn out in a high-volume catering kitchen. Let’s break down what you actually need to look for.
Your decision really comes down to four key things: the length of the shaft, how powerful the motor is, the speed options, and how well the thing is built. Nail these, and you've got a reliable workhorse. Get it wrong, and you're in for a lot of frustration.
Shaft Length Matters More Than You Think
The shaft—that long wand that goes into the pot—is where all the action happens. You need to match its length to the pots and containers you use every day. Think of it like trying to use a tiny socket wrench on a huge bolt; it's just not going to work well.
A small bistro making sauces in 5-gallon pots will do just fine with a standard 12- to 14-inch shaft. But for a massive production kitchen or catering company blending in 50-gallon stockpots, you’ll need a much longer shaft, often 21 inches or more. This lets you reach the bottom to create that perfect, smooth vortex without anyone having to dangerously tilt a scalding hot pot.
Pro Tip: Before you buy anything, measure the depth of your most-used pots. Choose a shaft that's a few inches longer. This lets you fully submerge the blade guard, which is absolutely critical for preventing splashes and serious burns.
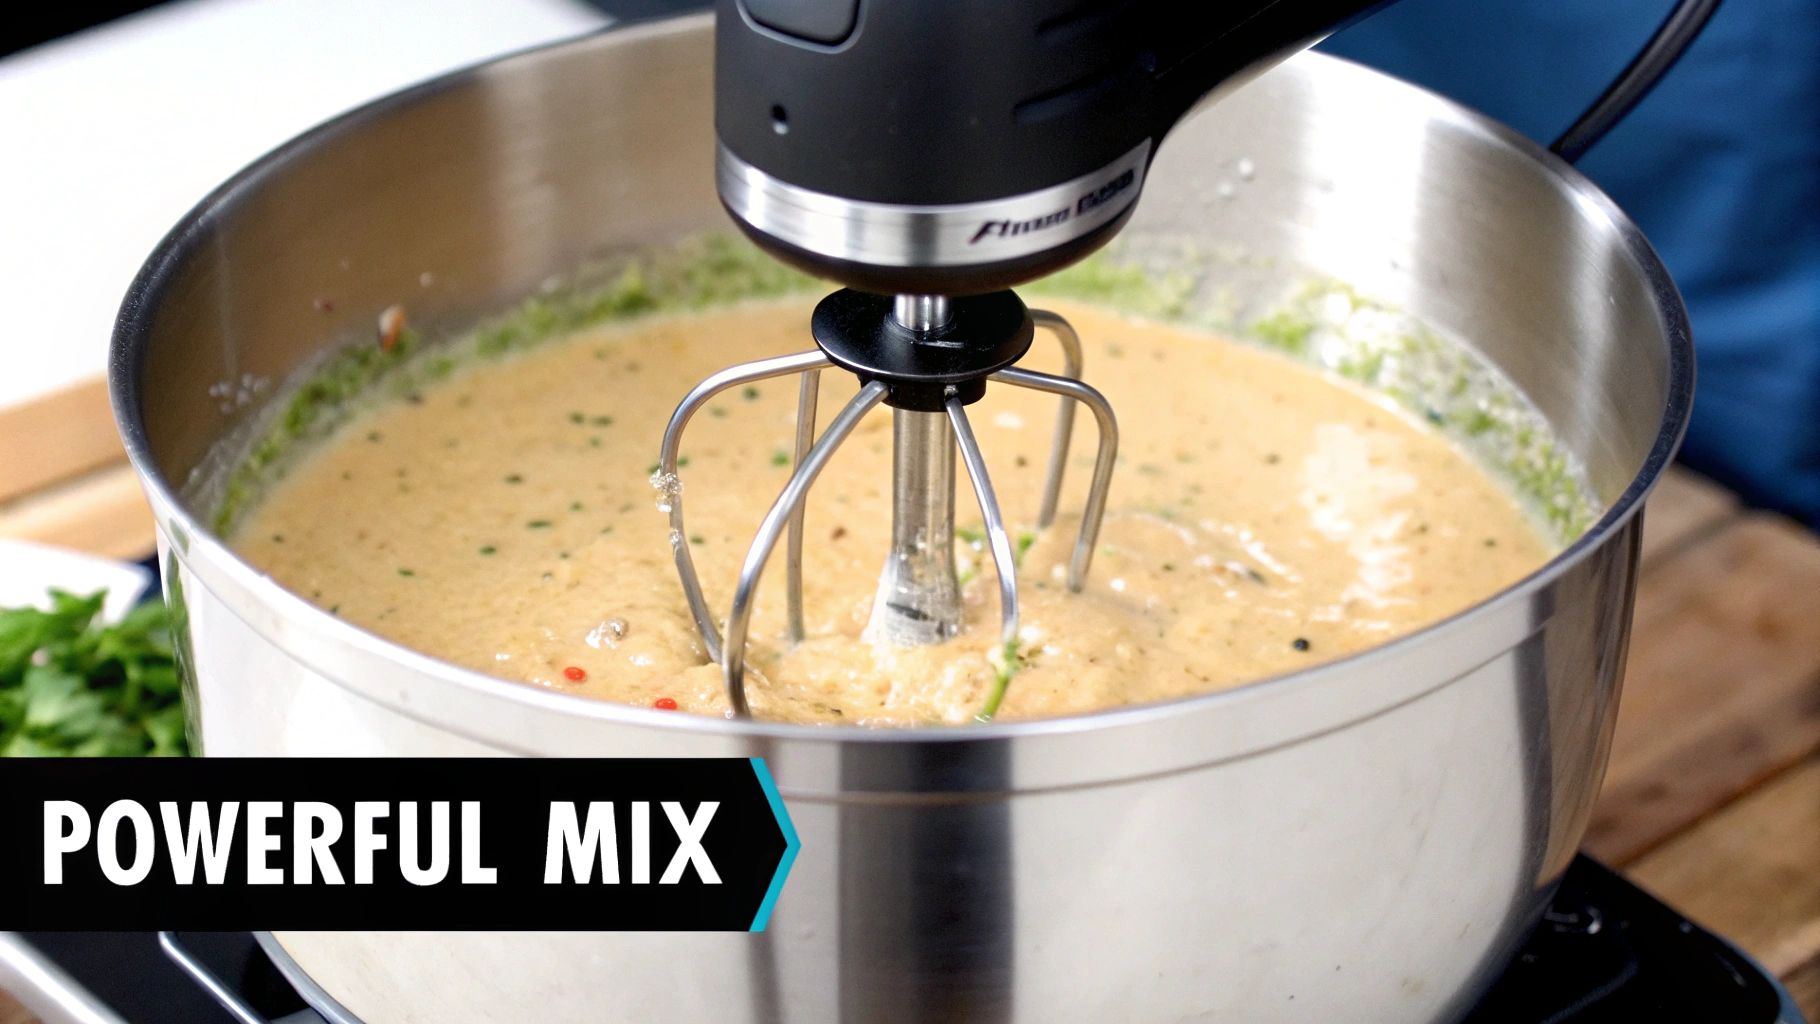
Motor Power: The Engine of Your Blender
The motor is the heart and soul of your blender. Its power, measured in horsepower (HP) or watts (W), determines what you can blend and for how long before it taps out. A stronger motor will plow through thick items like refried beans, dense stews, or frozen fruit purees without breaking a sweat.
Here’s a simple breakdown of motor power:
- Light-Duty (Under 1/2 HP or ~350W): This is your go-to for light soups, dressings, and simple sauces in smaller batches. It’s a perfect fit for cafés or restaurants with lower volume.
- Medium-Duty (1/2 to 1 HP or ~350-750W): This is the sweet spot for most kitchens. It’s versatile enough to handle daily soup production, mayonnaise, and fairly thick sauces, making it a reliable choice for most restaurants and caterers.
- Heavy-Duty (1 HP+ or 750W+): If your kitchen runs a blender nonstop or works with incredibly thick products, this is a non-negotiable. These beasts are built for the toughest jobs and the biggest batches.
Trying to save a buck with an underpowered motor is a classic mistake. You’ll just end up with a strained, overheated machine that dies an early death. It’s always smarter to have a little more power in reserve than you think you need.
Speed Settings And Control
Having control over your blending speed gives you the precision to get things just right. Industrial models typically offer one of two styles: fixed speed or variable speed.
- Fixed Speed: These are the no-frills workhorses. With just one or two speeds, they are simple, incredibly durable, and perfect for straightforward jobs like pureeing soups where you just need to get it done.
- Variable Speed: For the chefs who need total control, variable speed is the way to go. You can use a low speed to gently start an emulsion for a delicate hollandaise, then crank it up to high to obliterate fibrous vegetables into a silky-smooth puree.
This level of finesse is a game-changer for kitchens with diverse menus. You can start a full pot on low to avoid a mess, then ramp up the speed to finish the job quickly. That precision usually comes at a higher price, so you have to decide if your menu justifies the investment.
Construction and Durability
Let's be honest, an industrial immersion blender has a tough life. It’s constantly dealing with heat, moisture, and acidic foods. This is why the build quality, especially the materials, is so important. When it comes to the shaft and blade housing, stainless steel is the undisputed king. It’s non-reactive, won’t rust, and is a breeze to sanitize—making it the only serious option for food safety and a long lifespan.
As you compare models, look for a heavy-duty stainless steel shaft that is completely sealed. This design stops food and liquids from creeping into the motor housing, which is a common cause of equipment failure and a major sanitation headache. Don't forget the handle, either. A comfortable, ergonomic grip makes a huge difference for safety and reduces fatigue during those long prep shifts.
Industrial Immersion Blender Feature Comparison
This table offers a quick look at how different features stack up depending on the size and demands of your kitchen. Use it as a starting point to zero in on the blender that will work best for your team.
| Feature | Small Cafe / Bistro | Medium Restaurant / Catering | Large Production Kitchen |
|---|---|---|---|
| Shaft Length | 12-14 inches | 14-18 inches | 21+ inches |
| Motor Power | Light-Duty (Under 1/2 HP) | Medium-Duty (1/2-1 HP) | Heavy-Duty (1+ HP) |
| Typical Use | Light soups, dressings, small-batch sauces | Daily soups, mayonnaise, purees, medium-thick sauces | Continuous use, thick stews, large-batch production |
| Speed Control | Fixed speed is often sufficient | Variable speed is highly recommended for versatility | Variable speed is essential for control and efficiency |
| Build Quality | Standard stainless steel shaft | Heavy-duty, sealed stainless steel shaft | Fully sealed, heavy-duty stainless steel everything |
Choosing the right blender really boils down to being realistic about your needs. A small café doesn’t need a tank, and a large production kitchen can't get by with a lightweight model. By focusing on shaft length, motor power, and build quality, you can invest in a tool that will serve you well for years to come.
Mastering Your Workflow and Blending Techniques
Owning a powerful industrial immersion blender is one thing; truly mastering it is another. Beyond just turning it on, a few key techniques can elevate this workhorse from a simple appliance to an extension of your own hands. It’s all about working smarter to get better, more consistent results in every dish.
The first skill every pro learns is how to blend without redecorating the kitchen walls. The classic rookie mistake is starting the motor before the blade guard is fully submerged. One flick of the switch, and you’ve got hot soup flying everywhere. Always—and I mean always—submerge the head completely before you hit the power. It's the simplest way to prevent splashes and burns.
The Vortex Method for Perfect Results
The secret to a silky-smooth product isn't brute force; it's creating a vortex. Picture a whirlpool in your stockpot. When you get this right, the liquid circulates perfectly, pulling solids down into the blades on its own. No more chasing stubborn chunks around the pot.
Here’s how you get that perfect vortex going every time:
- Start Submerged: Get the blender into the pot with the blade guard completely below the surface.
- Angle for Action: Don't hold it straight up and down. Tilt the shaft slightly, around 15-20 degrees. This angle is what gets the motion started.
- Find the Flow: Power on at a low speed and gently move the head around the bottom. You’ll see the liquid start to swirl, quickly forming a funnel in the center. That’s your vortex.
- Work the Pot: With the vortex established, you can now slowly move the blender up, down, and around the pot to catch any stray bits. This controlled movement guarantees a flawless, lump-free texture.
This method is hands-down the most efficient way to use your stick blender. It saves time and delivers a far superior result.
Key Insight: Mastering the vortex isn't just about speed; it's about control. It makes the blender do the work for you, pulling ingredients into the blades for a faster, more uniform blend with almost zero splashing.
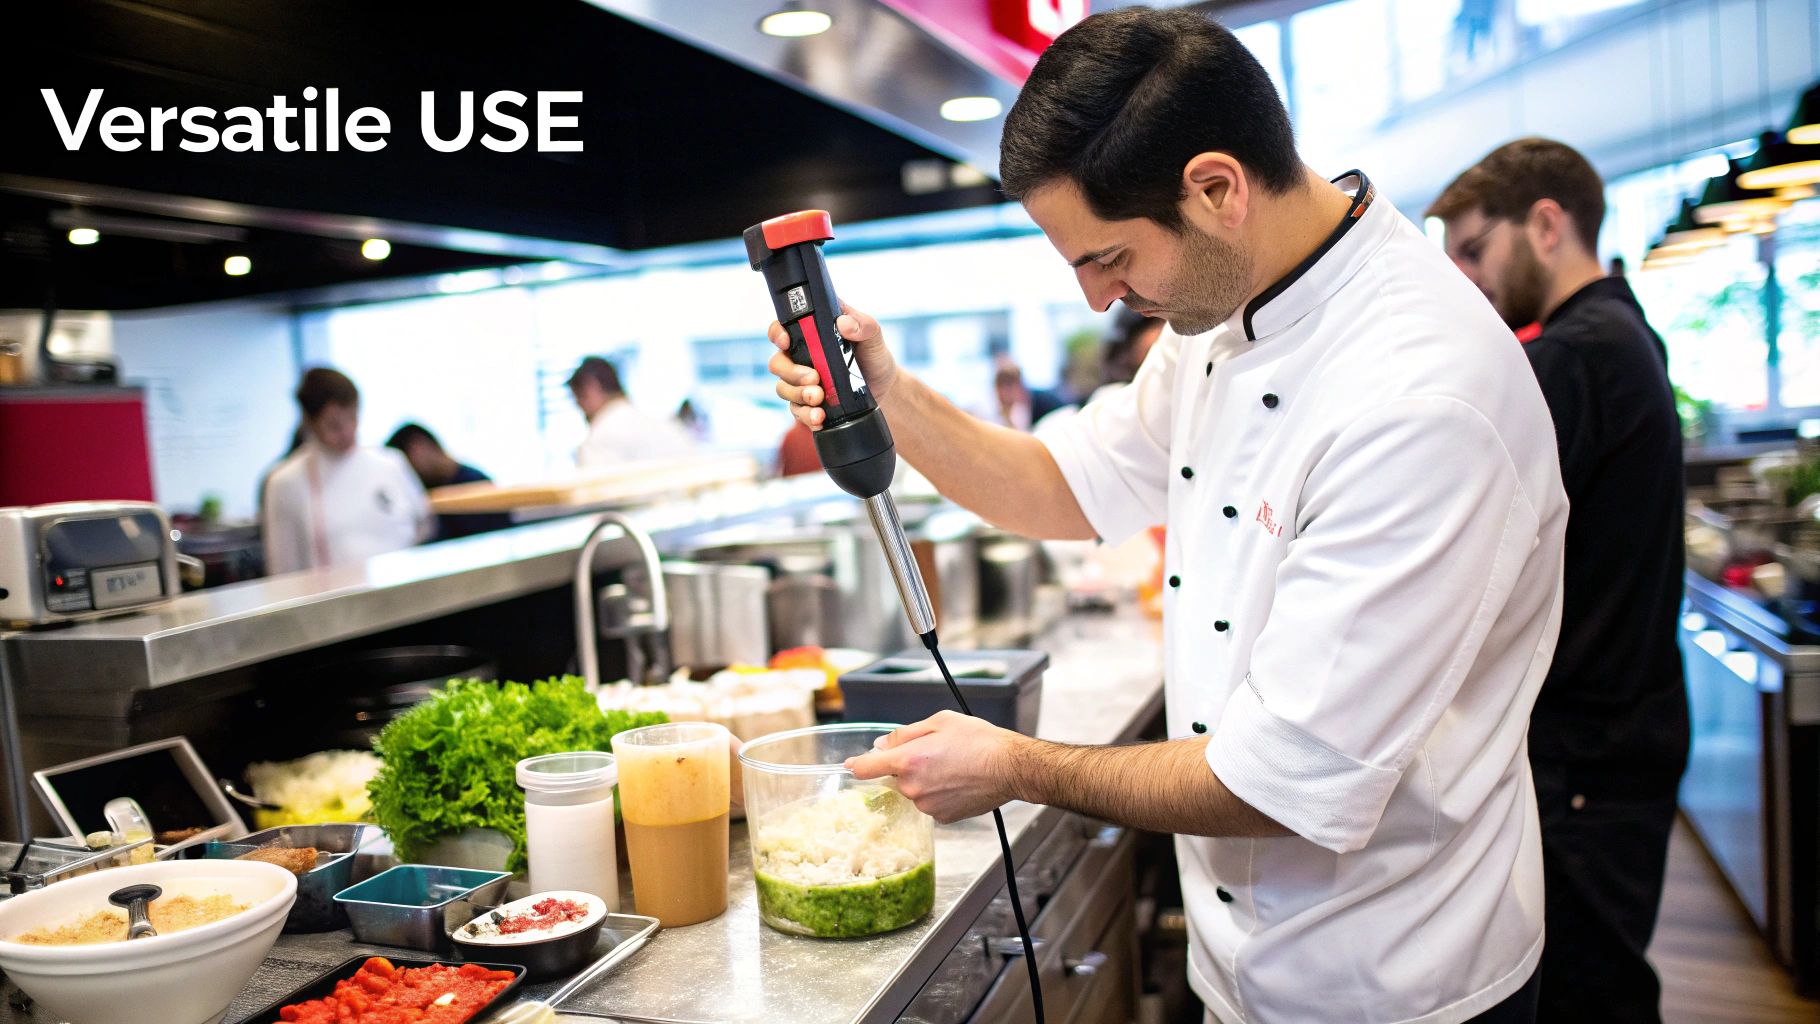
Elevating Your Menu with Advanced Applications
Once you have the basics down, you can unlock the real creative potential of your immersion blender. These tools are absolute champions at creating stable emulsions—those notoriously tricky mixtures of oil and water that form the backbone of classic sauces.
Making a big batch of mayonnaise or hollandaise suddenly becomes simple. The high-speed blades pulverize oil into microscopic droplets, suspending them perfectly in the liquid base. You can just drizzle oil into your egg and acid mixture while the blender is running, and in minutes, you have a thick, creamy, and stable emulsion.
The same idea applies to so much more:
- Vinaigrettes and Dressings: Blend a vinaigrette that actually stays together for hours instead of separating in the service well.
- Aiolis and Creamy Sauces: Create intensely flavorful aiolis or other rich, emulsified sauces with a velvety mouthfeel that's tough to get by hand.
- Velvety Whipped Cream: Pop on a whisk attachment and you can whip up huge volumes of cream to perfect peaks in no time.
- Airy Foams: Add a touch of modern elegance to your plating by creating light, flavorful foams to garnish soups or entrees.
This incredible versatility is why these tools are fixtures in modern kitchens. In fact, the global hand blender market, which includes these powerful commercial models, was valued at USD 4.85 billion in 2023 and is still climbing. That growth is driven by innovations like multiple attachments and stronger motors that can handle almost anything you throw at them. You can read more about hand blender market growth to see where the industry is heading.
By using your blender for these advanced jobs, you aren't just making prep easier—you're opening up a whole new world of creative possibilities.
Essential Cleaning and Maintenance Practices
 An industrial immersion blender is a serious investment in your kitchen's output. Like any high-performance tool, it demands consistent care to keep it running at its best and to ensure it lasts. If you neglect cleaning and maintenance, you're not just risking the machine's lifespan—you're creating a major food safety hazard and setting yourself up for costly, out-of-the-blue breakdowns.
A solid cleaning routine is your best defense against both mechanical problems and cross-contamination. This isn’t just a quick job for the end of the day. It’s an ongoing process that protects your food, your customers, and your business.
The Daily Cleaning Protocol
Here’s the single most important rule of thumb: clean it immediately after every single use. When food bits—especially from thick sauces or starchy soups—get a chance to dry on the shaft and blade, they harden like concrete. This makes them a nightmare to scrub off later and creates a perfect breeding ground for bacteria.
For a fast clean between tasks, like switching from a light veggie soup to something heartier, a quick rinse will do the trick. First, unplug the unit. Then, just dip the shaft into a container of clean, warm water and run the blender for a few seconds. This simple step knocks off most of the debris before you move on.
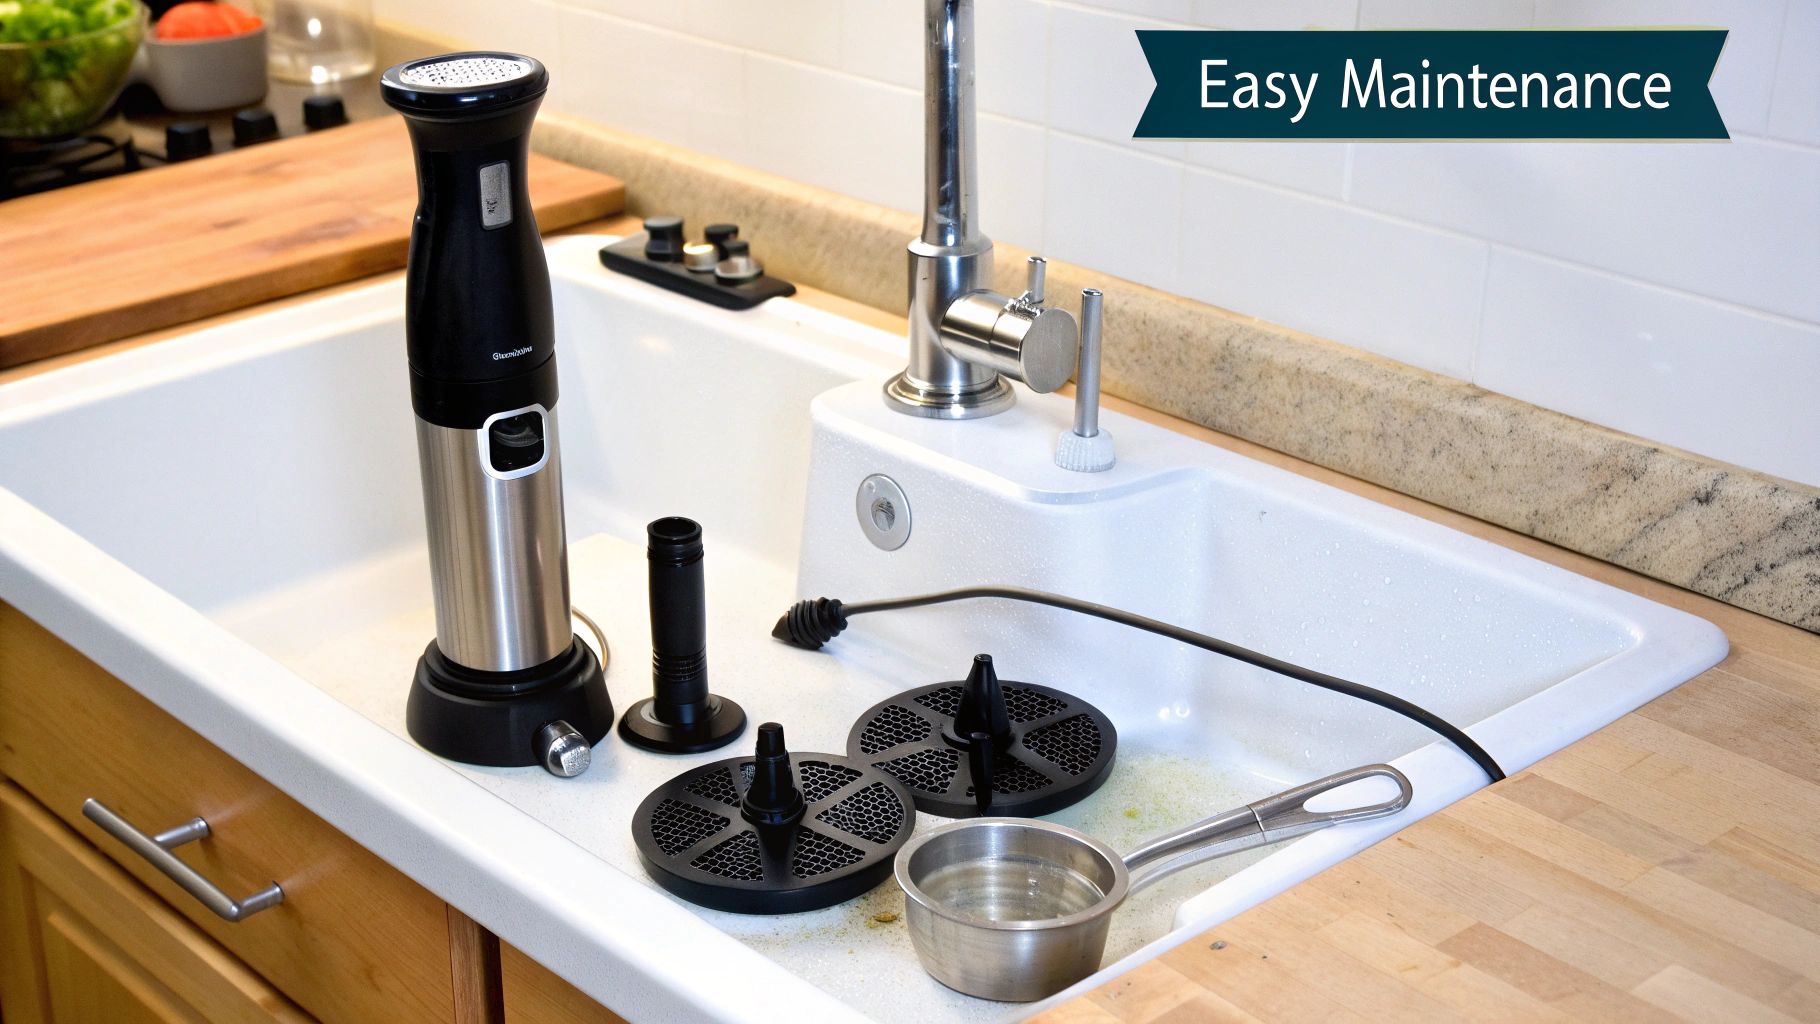
When the shift is over, or if you're switching between ingredients with common allergens like dairy or nuts, you'll need to do a more thorough clean.
- Safety First: Always, always unplug the motor from the wall before you start. Never even think about touching that blade while the unit is plugged in.
- Detach the Shaft: Carefully separate the stainless steel shaft from the motor. This is absolutely critical to keep water out of the motor’s electrical parts.
- Wash Thoroughly: Grab a brush, hot water, and a good commercial detergent. Scrub the shaft, blade guard, and the blade itself. Pay close attention to the tricky spot right behind the blade—that’s where food loves to hide.
- Rinse and Sanitize: Rinse the shaft completely with clean water to get all the soap off. Then, let it soak in a properly mixed sanitizing solution, following your local health code rules.
- Air Dry Completely: Set the shaft on a clean, dry surface or a proper drying rack. Make sure it is 100% dry before you reattach it to the motor or put it away. This prevents moisture damage and stops bacteria from growing.
Periodic Maintenance Checks
Beyond the daily scrub-down, a few regular checks can help you spot small issues before they turn into big, expensive headaches. Think of it as a quick health check for your gear. Take a minute once a week to do these simple inspections.
Key Takeaway: Cleaning the blender right away is non-negotiable. It stops food from hardening, which not only keeps your food safe but makes the whole cleaning process way faster and easier for your staff.
Having a dedicated, clean space for these jobs makes everything much smoother. For tips on setting up a food-safe prep area, you might find our guide on the different types of stainless steel prep tables available helpful.
What to Look For
During your weekly once-over, keep an eye out for these potential red flags:
- Power Cord Inspection: Look over the entire power cord. Do you see any cracks, frays, or exposed wires? A damaged cord is a serious fire and electrical hazard and needs to be replaced immediately.
- Listen to the Motor: Turn the blender on and just listen. Any strange noises like grinding, rattling, or high-pitched whines could mean worn-out bearings or other internal problems that need a professional to look at.
- Check the Fit: Make sure the detachable shaft still locks tightly onto the motor. A loose or wobbly connection can create a ton of vibration, causing parts to wear out faster and creating a safety risk during use.
By building these simple cleaning and maintenance habits into your daily and weekly workflow, your industrial immersion blender becomes more than just a purchase—it becomes a reliable, long-term workhorse for your kitchen.
Choosing the Right Prep Table for Your Workflow
An efficient kitchen is all about flow. It’s like a well-choreographed dance where every piece of equipment and every surface works together perfectly. A powerful industrial immersion blender is definitely a star performer, but it can't do its job without the right stage—a sturdy, sanitary, and well-designed prep table. A stable workspace isn’t just a nice-to-have; it’s non-negotiable for safety, speed, and simple ergonomics.
When you pair your blender with the right table, you create an optimized prep station. It’s what allows a chef to blend a massive, heavy pot of soup directly on a stable surface or move ingredients around without a second thought. This synergy between tool and workspace is what really separates a good kitchen from a great one. Let's walk through the essential stainless steel tables that create this ideal environment.
The Foundation: Standard Flat-Top Stainless Steel Tables
Your most common and versatile option is the standard flat-top stainless steel prep table. Think of this as the blank canvas of your kitchen. Its simple, open design gives you a large, uninterrupted surface that’s perfect for just about anything, from chopping vegetables to portioning out ingredients.
When you’re firing up an industrial immersion blender, the stability of a flat-top table is everything. A heavy-duty table, usually made from 14- or 16-gauge stainless steel, won't wobble or shift when you're blending a huge, heavy stockpot. That stability is what lets you create the perfect vortex for a smooth blend and, more importantly, prevents dangerous spills of hot liquid. For a closer look, you can explore the different types of stainless steel prep tables available and see how they fit into various kitchen setups.
Specialized Workstations: Sandwich and Salad Prep Tables
Moving beyond the basics, we get into tables designed for specific jobs. The sandwich prep table, sometimes called a salad prep unit, is a perfect example. It smartly combines a durable stainless steel work surface with refrigerated wells built right into the back or top of the table.
These refrigerated wells hold all your essential ingredients—sliced tomatoes, onions, lettuce, cheeses—right at your fingertips, kept at food-safe temperatures. For delis and sandwich shops, this design is a total game-changer, making assembly incredibly fast. For a kitchen that uses an immersion blender, that flat workspace in front is perfect for whipping up small batches of house-made dressings or aiolis, which can then be used on the line immediately.
Key Takeaway: The right prep table isn't just a surface; it's an active part of your workflow. Specialized tables like sandwich and pizza prep units integrate storage and workspace to minimize movement and maximize efficiency.
Purpose-Built for Production: Pizza Prep Tables
Much like the sandwich units, pizza prep tables are engineered for a high-volume production line. These tables have a deep cutting board work surface, often made from high-density polyethylene, which is ideal for stretching and topping dough. But the key feature is the refrigerated raised rail that runs along the back.
This raised rail holds all your pizza toppings in pans, keeping them chilled and organized. The whole setup is designed for an ergonomic, assembly-line motion, letting a cook move from dough to sauce to cheese to toppings without missing a beat. While you probably won't use an industrial immersion blender directly on the pizza line, this is where the sauces you made on a nearby flat-top table come into play. A large, perfectly pureed batch of tomato sauce can be portioned into pans and dropped right into the rail, making sure every single pizza gets a consistent, high-quality base.
In the end, the goal is to create a complete system. Your industrial immersion blender makes consistently great sauces, soups, and dressings. Your specialized prep tables provide the stable, organized, and sanitary space needed to use those components efficiently. This combination is the hallmark of a truly optimized commercial kitchen.
Frequently Asked Questions About Immersion Blenders
Even the most seasoned chefs run into questions when wrangling a new piece of powerful kitchen equipment. Let's tackle some of the most common questions we hear from pros about getting the most out of an industrial immersion blender.
Can I Use an Industrial Immersion Blender in Hot Liquids?
Yes, absolutely. This is exactly what they're built for. Industrial immersion blenders are designed with shafts and blades made from tough, heat-resistant stainless steel. This means you can blend soups, sauces, and stocks right in the pot, even while it's still on the stove.
It's one of their biggest advantages over a standard countertop blender. Just remember to keep the blade guard fully submerged before you hit the power button to avoid any dangerous splashing.
What Is the Difference Between an Industrial Model and a Home Stick Blender?
The real differences come down to power, durability, and capacity. Commercial models are workhorses, built with powerful motors for continuous, heavy-duty blending in a busy kitchen. They can chew through huge batches and thick mixtures without breaking a sweat.
Home stick blenders are made for quick, small jobs and often have more plastic parts. Their motors just aren't designed for the relentless demands of a professional setting.
An industrial blender is built for a marathon; a home blender is built for a sprint. The commercial model is designed to withstand the heat, volume, and relentless pace of a professional kitchen day after day.
How Do I Prevent Sauces from Becoming Gummy?
That dreaded gummy texture, especially in things like potato soup, is almost always a result of over-blending. When the high-speed blades work for too long, they rupture the starch cells, releasing a sticky, glue-like substance.
The trick is to use short bursts or pulses. Blend just until you hit the right consistency, and then stop. If your blender has variable speeds, start low. It’s always better to leave a little bit of texture than to turn your beautiful soup into wallpaper paste.
What Is the Best Way to Clean the Blender Shaft and Blade?
Clean it right away. Don't let food dry and harden on the blade assembly. As soon as you're done, unplug the unit and detach the shaft from the motor.
Wash the shaft and blade guard with hot, soapy water. A small brush is your best friend here for getting into the nooks and crannies around the blade. For a quick rinse between tasks, you can submerge the (unplugged) shaft in a bucket of clean water and pulse it for a few seconds. Always dry it completely before putting it away.
Ready to create a more efficient and powerful kitchen workflow? Explore our complete collection of commercial-grade equipment at PrepTables.com. Find the perfect industrial immersion blender, prep table, and refrigeration units to elevate your operation. Visit us at https://preptables.com to get started.