

A Guide to Commercial Kitchen Layout Planning
Planning a commercial kitchen layout is all about strategy. It's the art of designing your kitchen's floor plan to get the absolute most out of your space, making it efficient, safe, and perfectly suited to your menu and service style. This means thoughtfully arranging your work zones—whether it’s an assembly line or an island—to slash ticket times, get rid of staff bottlenecks, and make sure everything runs like a well-oiled machine from the moment a delivery arrives to when a dish hits the table.
Matching Your Kitchen Layout to Your Menu
The real secret to a profitable kitchen isn’t just about the fancy equipment you buy; it’s all about how everything flows together. Before you even start sketching out floor plans, you have to get honest about how your menu and service style will shape the layout. Picking the right framework is the first critical step in designing a space that actually helps you hit your goals.
Think of your menu as the blueprint for your entire kitchen. A restaurant that crafts complex, multi-course meals needs a completely different flow than a high-volume ghost kitchen banging out orders for delivery. Let's dig into the five core layouts and see which one fits your culinary concept.
The Five Foundational Kitchen Layouts
Each of these layouts has its own strengths and is built for different kinds of service. Getting a handle on these options is your first step toward a killer kitchen design.
- Assembly Line Layout: This linear setup is the undisputed champion of efficiency for restaurants with focused, repetitive menus. Think of a fast-casual spot slinging burritos or a pizzeria where each station adds a new topping in a specific order. It’s built for high-volume production and keeps staff movement to a bare minimum.
- Island Layout: In this design, a central block holds all the main cooking equipment—your ranges, grills, and fryers—while prep stations and storage line the outer walls. This setup is fantastic for communication and is a favorite in fine-dining kitchens where a head chef needs a bird's-eye view of every station.
- Zone-Style Layout: A zone-style plan carves the kitchen into specific workstations based on the menu. You'll have a dedicated fry station, a grill station, a salad station, and so on. This is perfect for places with diverse menus, like big hotels or catering companies, because it lets cooks prepare totally different dishes at the same time without tripping over each other.
- Galley Layout: This is the go-to for tight spaces like food trucks or cozy little cafes. A galley layout puts all the equipment and workstations along two parallel walls. It’s incredibly space-efficient, but it can get crowded fast if you don't plan it out, making it best for kitchens with just a handful of staff.
- Open Kitchen Layout: This is all about putting on a show for your customers. Common in upscale restaurants and pizzerias, an open kitchen turns the cooking process into part of the dining experience. It requires a spotless, organized, and visually appealing setup, but it’s a powerful way to build trust and create a buzzing atmosphere.
This decision tree gives you a great visual on how basic things like the size of your kitchen and how many cooking stations you need can point you toward the right layout.
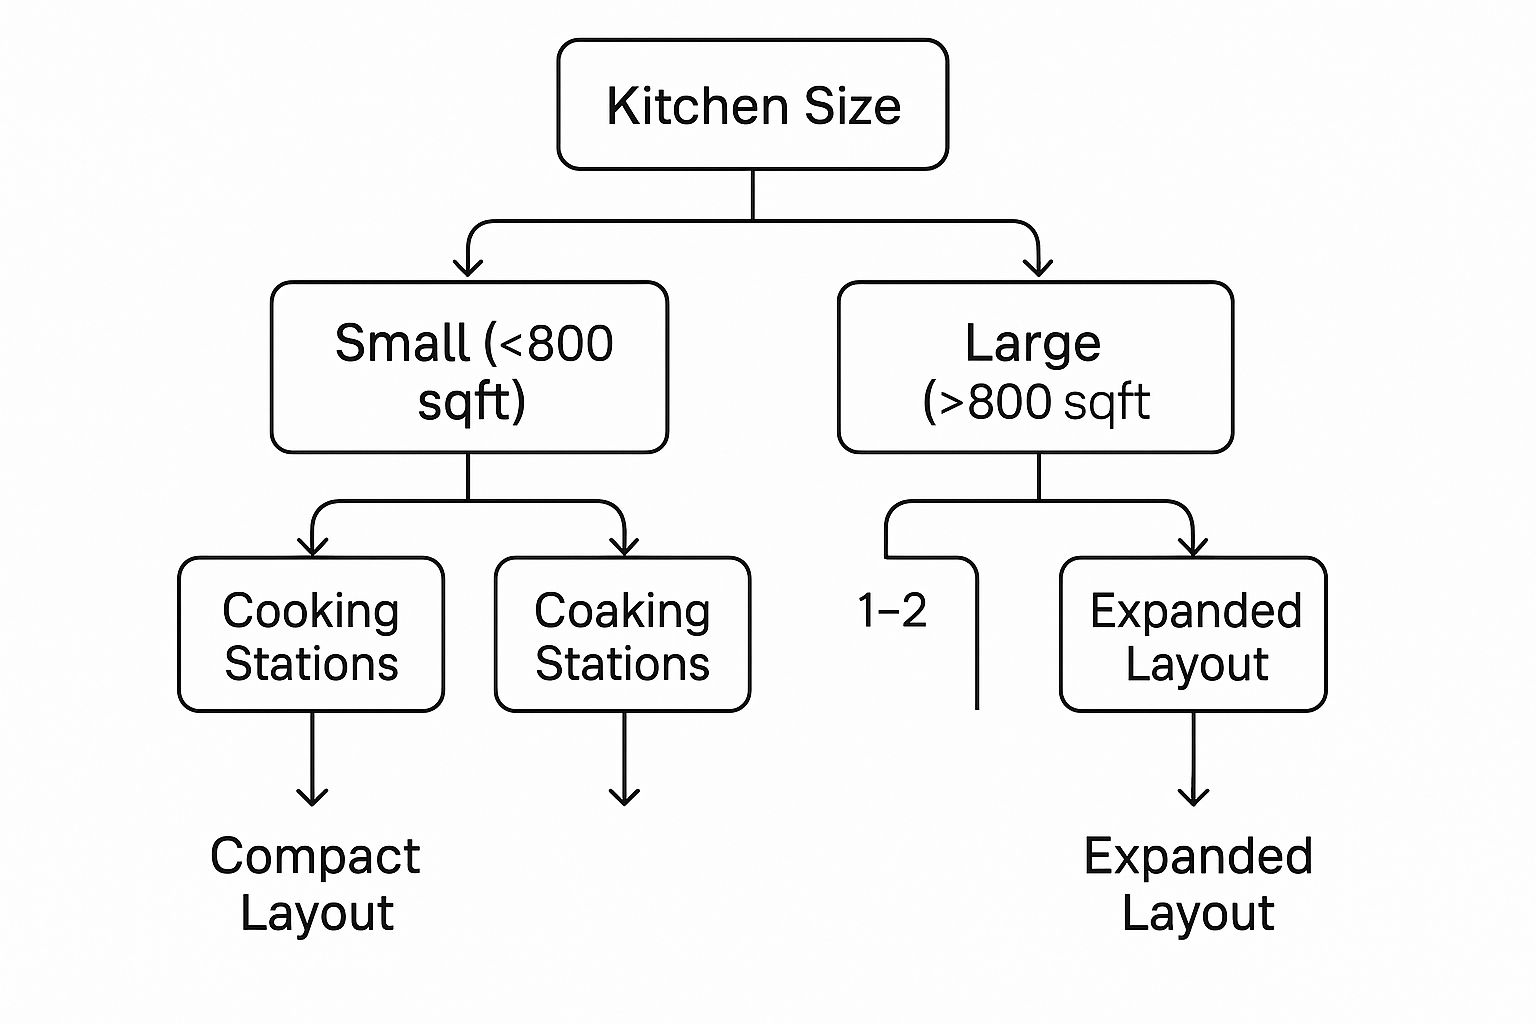
The big takeaway here is that your physical space is the first hurdle. It immediately tells you which of the more complex layouts are even on the table for your operation.
Which Commercial Kitchen Layout Is Right for You?
Deciding on a layout can feel overwhelming. This table breaks down the five core layouts, highlighting what they're best for and their main pros and cons, to help you make a more informed choice.
| Layout Type | Best For | Pros | Cons |
|---|---|---|---|
| Assembly Line | High-volume, limited-menu spots (fast-casual, pizza) | Maximizes speed and efficiency; easy to train staff. | Inflexible; not suited for complex or diverse menus. |
| Island | Fine dining, chef-led kitchens | Excellent for communication and chef oversight; good workflow. | Requires a significant amount of open space. |
| Zone-Style | Large restaurants, hotels, catering with diverse menus | Allows for simultaneous prep of different dishes; organized. | Can lead to less communication between zones. |
| Galley | Food trucks, small cafes, tight spaces | Extremely space-efficient. | Can easily become congested with more than a few staff. |
| Open Kitchen | Upscale dining, concept restaurants | Entertaining for guests; builds trust and transparency. | Requires a clean, aesthetically pleasing setup; no room for error. |
Ultimately, the best layout is the one that supports your specific menu, service style, and team size. Use this as a starting point to narrow down your options.
Why the Right Layout Matters
Picking a layout isn't just about making the space look good; it directly hits your bottom line. An optimized flow cuts down on wasted steps, helps prevent accidents, and gets food out the door faster. A well-planned zone-style layout, for instance, can lead to huge performance gains.
I've seen it time and again—kitchens with thoughtful layouts can achieve up to 20% faster service times, slash food waste by 30%, and boost overall productivity by around 40%.
These numbers aren't just hypotheticals; they show how smart planning translates directly into a more successful and profitable business. If you want to learn more, check out these insights on optimizing your kitchen workflow and see how these changes can help you. Your layout is a tool—and when you choose the right one, you give your team the power to do their absolute best work.
Designing Your Critical Work Zones for Efficiency
A great kitchen flows. It's not just a collection of equipment; it's a system where every step, from delivery to the final plate, has a logical path. When you map out a commercial kitchen, you're essentially choreographing a dance between ingredients and staff. The goal is to eliminate wasted motion and maximize speed and safety.
Getting these zones right is the bedrock of a productive kitchen.

Let’s break down the essential areas and think strategically about where they need to live in your layout.
Receiving and Storage: The Kitchen's Gateway
Every single ingredient starts its journey at your receiving door. This area has to be dead simple for delivery trucks to access and positioned right next to your storage. I've seen kitchens where staff have to haul heavy boxes of produce across the main cooking line during a lunch rush—it’s a recipe for disaster and kills efficiency.
Your storage itself needs to be partitioned. Think of it in three distinct parts:
- Dry Storage: This is for your non-perishables like flour, sugar, and canned goods. Keep it cool, dry, and well-ventilated.
- Cold Storage: Your walk-in coolers and reach-in fridges. This is for anything that can spoil—meats, dairy, fresh vegetables.
- Non-Food Storage: You absolutely need a separate spot for cleaning chemicals, disposables, and extra tools to avoid any chance of cross-contamination.
By keeping receiving and storage together, you get products checked in and put away fast. This preserves food quality and keeps the receiving area clear.
Food Prep: The Creative Core
This is where the magic starts, turning raw ingredients into something special. The food prep zone should logically sit between your storage areas and the cooking line. This creates a natural forward momentum.
Imagine a chef pulling produce from the walk-in, turning to a dedicated prep sink to wash it, then moving to a prep table to chop—all without backtracking or weaving through other stations.
This is where your choice of stainless steel prep tables becomes a make-or-break decision. They’re the primary work surfaces and need to be selected with purpose.
A well-placed and properly sized prep table can shave minutes off every order. When you multiply that by hundreds of orders a day, the impact on your ticket times and labor costs is enormous. It's a detail that separates chaotic kitchens from highly profitable ones.
Think through your menu. Do you need a general-purpose table for chopping and mixing? Or would a specialized sandwich prep table with refrigerated wells and a built-in cutting board make more sense? Getting your prep flow right is a cornerstone of smart commercial kitchen layout planning.
The Cooking Line: Where the Action Happens
The cooking line—or "the hot line"—is the heart and soul of your kitchen. It’s where your heavy-hitter equipment lives: ranges, grills, fryers, and ovens. The entire placement of this zone is dictated by your ventilation hood, which is one of the most expensive and permanent fixtures in the design.
The flow from the prep area to the cooking line has to feel seamless. For example, the grill station should be right next to the prep space where steaks are portioned and seasoned. This tiny detail saves countless steps during a chaotic dinner service, letting cooks focus purely on timing and quality. To get a better sense of how to equip this crucial zone, you can learn more about different kinds of restaurant stainless steel tables and equipment that support an effective line.
Service Pickup and Warewashing: Finishing Strong
The service pickup area, often called the expo line, is the last checkpoint before food reaches the customer. This station must be at the front of the kitchen, creating a clear and efficient handoff point from the back-of-house team to your servers.
Just as important is the warewashing zone. This is where the dirty dishes come back. Crucially, this area must be separate from the food prep and cooking zones. The risk of cross-contamination from soiled dishes is just too high to ignore.
A smart layout will have the dish return located near the dining room entrance. This allows servers to drop off dirty plates without walking through the middle of the kitchen, which prevents collisions and keeps the main workflow humming. A clean separation between the clean exit (service) and the dirty return (dishes) is non-negotiable for both hygiene and efficiency.
How to Choose the Right Stainless Steel Prep Tables
Prep tables are the unsung heroes of any commercial kitchen. They aren't just surfaces; they're the primary workstations where your menu comes to life. Investing in the right stainless steel tables is a foundational step in your commercial kitchen layout planning that has a massive impact on workflow, speed, and even food safety.
Making the right choice goes way beyond just measuring the available space. It's about matching the table's material, construction, and features to the specific tasks your team performs hundreds of times a day.
Understanding Steel Gauge and Construction
Not all stainless steel is created equal. The gauge of the steel refers to its thickness, and it's one of the most important factors you'll need to consider. A lower gauge number means thicker, more durable steel.
-
14-Gauge: This is the heavyweight champion. It's incredibly durable and built to withstand intense, heavy-duty tasks like butchering large cuts of meat or pounding out dough. If you have a high-impact prep station, a 14-gauge table is a smart, long-term investment that won't warp or dent under pressure.
-
16-Gauge: A solid, all-purpose choice, 16-gauge steel offers a fantastic balance of durability and value. It’s perfect for most general food prep, from chopping vegetables to assembling dishes. It can handle most equipment being placed on it without any issues.
-
18-Gauge: This is the most common and budget-friendly option. While not as robust as lower gauges, 18-gauge tables are more than suitable for lighter-duty tasks, storage, or as a landing area for finished plates.
Beyond the gauge, look for practical features like an undershelf. This simple addition nearly doubles your storage capacity without taking up more floor space—perfect for holding small appliances, ingredient bins, or extra cookware. For a deeper dive, our guide on the different types of stainless prep tables offers a complete breakdown.
Specialized Prep Tables for Menu-Specific Workflows
While standard flat-top tables are versatile, specialized prep tables can be a total game-changer for restaurants with a focused menu. These units are designed to integrate storage, refrigeration, and prep surfaces into one efficient station, dramatically cutting down on wasted movement.
I've worked in kitchens where installing a single pizza prep table increased output by over 25% during peak hours. When your staff has every ingredient and tool within arm's reach, they work faster, more consistently, and with less stress.
Let's look at two of the most popular specialized options.
Pizza Prep Tables: The Ultimate Assembly Line
For any pizzeria, a refrigerated pizza prep table is non-negotiable. These units are engineered for one purpose: building pizzas with maximum speed and consistency. They cleverly combine several key features into a single footprint.
A raised, refrigerated rail along the top keeps all your essential toppings—pepperoni, mushrooms, cheese, olives—chilled and organized in pans. This means your pizza maker isn't running back and forth to a low-boy refrigerator for every order.
Below the rail sits a deep cutting board or, for more traditional pizzerias, a marble work surface. Marble is prized for its ability to stay cool, which prevents pizza dough from sticking and becoming overworked. The refrigerated cabinet underneath provides ample storage for backup ingredients and prepped dough balls, ensuring the station stays stocked throughout a busy service.
Sandwich and Salad Prep Tables: Efficiency in a Box
Much like their pizza-focused cousins, sandwich and salad prep stations are designed to streamline the assembly of cold menu items. They are the engine of any deli, cafe, or fast-casual lunch spot.
These tables feature refrigerated wells that hold cold food pans, keeping ingredients like lettuce, tomatoes, deli meats, and cheeses at safe holding temperatures. A full-length cutting board runs along the front, providing an immediate workspace for slicing and assembly.
By having every ingredient prepped and chilled right at the station, a single employee can build complex sandwiches and salads in seconds. This self-contained design minimizes the need for extra steps, which is critical for operations that depend on high-volume lunch rushes. Investing in one of these units can directly translate to shorter ticket times and happier customers.
Strategic Equipment Selection and Placement
Think of your kitchen equipment as more than just tools—it’s a strategic investment. The appliances you choose and where you put them are fundamental parts of your commercial kitchen layout planning. Get this right, and you’re building an efficient, future-proof operation. Your decisions here will ripple out, affecting everything from your daily utility bills to how fast you can pivot to a new menu trend.
This is more important than ever. We've all seen the explosive growth of ghost kitchens, which has cranked up demand for compact, high-output equipment that squeezes every ounce of productivity out of a small footprint. At the same time, the global push for sustainability means savvy operators are choosing energy-efficient combi ovens and eco-friendly refrigeration. It's not just about being green; it's about slashing operating costs.
The numbers back this up. The global commercial kitchen appliances market is huge, valued at around USD 98.34 billion, and it's expected to jump to USD 149.34 billion by 2030. This isn’t just random growth; it’s driven by the non-stop expansion of restaurants, especially QSRs. It’s a clear signal that making smart, forward-thinking equipment investments is absolutely critical.
The Central Role of Ventilation
Before you start dreaming about that perfect six-burner range or a gleaming double-stack convection oven, let's talk about ventilation. It's the one thing you have to get right from the start. Where you place your cooking line dictates your entire exhaust hood system, which is easily one of the most expensive and complex parts of any kitchen build-out.
Your ventilation hood is the anchor for your entire layout. The specific cooking equipment you plan to use—whether it’s gas-fired charbroilers or a bank of electric fryers—determines the exact type of hood you'll need to meet health and safety codes. The most straightforward, and usually cheapest, option is to place this "hot line" against a wall to simplify the ductwork. An island setup might look great and feel open, but it requires a much more complex and expensive canopy hood system.
Plan your cooking line and ventilation first. It is the single most expensive and least flexible element in your kitchen. Getting it right from the start saves you from costly structural changes and ensures your kitchen is safe and compliant.
Once that hood is locked in, the rest of your cooking equipment can fall into place right underneath it, forming the beating heart of your kitchen.
Embracing Smart Kitchen Technology
The next level of kitchen efficiency is already here, and it's all about connected, intelligent appliances. IoT-enabled—or "smart"—equipment isn't some far-off concept anymore. It's a practical tool that helps you manage a modern kitchen. These appliances can give you remote monitoring, run self-diagnostics, and optimize energy use, saving you a surprising amount of money over their lifetime.
- Smart Ovens: Imagine programming complex, multi-stage recipes that cook perfectly every time with minimal supervision. These ovens can also flag maintenance issues themselves, sending you an alert long before a catastrophic breakdown happens mid-service.
- Intelligent Refrigeration: Connected fridges and freezers constantly monitor their internal temperatures. If a door is left open or a compressor starts to fail, you get an alert on your phone. This simple feature can be the difference between a minor adjustment and losing thousands of dollars in spoiled food.
- Energy Management Systems: These systems are like a fitness tracker for your kitchen's utility use. They show you exactly which appliances are your biggest energy hogs, so you can schedule high-draw tasks for off-peak hours or identify older equipment that’s ready for an upgrade.
Yes, the upfront cost can be higher, but the long-term savings in labor, energy, and food waste often deliver a powerful return on investment. If you want to dive deeper into specific appliances, check out our comprehensive guide on essential commercial kitchen equipment. Investing in the right tools isn't just a purchase; it's the final, critical piece of a truly strategic and profitable kitchen design.
Navigating Health Codes and Safety Regulations
A fantastic layout is completely worthless if it fails inspection. You could design the most brilliant, efficient workflow in the world, but it can get shut down in a heartbeat by a single health code violation. This part of your commercial kitchen layout planning isn't about nice-to-haves; these are the non-negotiable rules that protect your team, your customers, and your business.
Think of health and safety regulations as the laws of physics for your kitchen. You simply can't build a functional, legal space without obeying them. These rules dictate everything from how far apart your equipment needs to be to the specific materials you can use on your floors and walls.
Building a Safe and Sanitary Environment
At their core, health codes are all about preventing foodborne illness and stopping accidents before they happen. This starts with the very surfaces your team works on every single day.
Inspectors have a keen eye for the materials on your floors, walls, and ceilings. They're looking for surfaces that are non-porous, smooth, and easy to clean. This is exactly why you see stainless steel, quarry tile, and specially sealed concrete in almost every professional kitchen. These materials don’t give bacteria a place to hide and can handle the aggressive cleaning chemicals that are part of the daily routine.
Proper sanitation stations are another massive checkpoint. Health departments are incredibly specific about the number and placement of sinks. You’re going to need a few different types:
- Handwashing Sinks: These are for hands and nothing else. They must be separate, conveniently located in prep areas and restrooms, and always stocked with soap and paper towels.
- Three-Compartment Sink: An absolute must-have for properly washing, rinsing, and sanitizing all your pots, pans, and utensils.
- Prep Sinks: These are used only for washing produce and other raw ingredients to prevent cross-contamination.
Ensuring Staff Safety and Workflow
Beyond just sanitation, safety rules are there to create a secure place to work. One of the biggest things inspectors look at is aisle space. Jammed-up walkways are a recipe for disaster, leading to slips, trips, and nasty burns.
Most local codes require a minimum of 36 to 48 inches for main pathways. This gives your staff enough room to move around safely, even when they’re carrying a hot stockpot or a full tray. On a busy line, where chefs are working back-to-back and hot oven doors are swinging open, you’ll want to go even wider.
Fire safety is, of course, completely non-negotiable. The cooking equipment you choose and where you place it will dictate the kind of fire suppression system you need. This system, which is built into the ventilation hood over your cookline, is a critical piece of safety hardware that must be professionally installed and regularly inspected.
A rookie mistake I see all the time is finalizing the equipment layout before talking to a fire safety expert. The kind of cooking you do directly affects the suppression system required. Getting this wrong can force you into expensive redesigns and lead to a failed inspection right out of the gate.
Understanding Regional and Global Differences
It's so important to remember that health codes are not one-size-fits-all. The rules can be wildly different not just between countries, but from state to state or even city to city. What’s perfectly acceptable in one town could be a major violation just one town over.
This regional variation is a big factor in the kitchen design industry. For example, the Americas are seeing a huge push for sustainability in their codes, while the Asia-Pacific market is adapting to the explosion of quick-service restaurants. If you're curious about these global trends, you can learn more about the commercial kitchen design services market.
Before you get too far into your plans, your very first move should be to contact your local health department. They’ll give you the exact checklist of requirements for your area. The best way to navigate this is to work with an experienced contractor who lives and breathes these local codes. They’ll ensure your kitchen isn't just a model of efficiency, but 100% legal and safe from the day you open.
Common Questions About Kitchen Layout Planning
Even the most buttoned-up plan will have a few loose ends. Planning a commercial kitchen layout is a game of a thousand details, and getting them right from the start is how you dodge expensive headaches later. Let's tackle some of the most common questions that pop up during the design process.
How Much Space Do I Need Between Kitchen Equipment?
As a general rule, you’ll want to keep at least 3 to 4 feet of clear aisle space in your main walkways. This isn't just about making things comfortable; it's a non-negotiable safety measure. It gives your team room to move without collisions, especially when they're carrying hot pans or heavy stock pots. A cramped aisle is just an accident waiting to happen.
For the main cooking line, where chefs are constantly moving back and forth, I'd even push that to 4 to 5 feet. That extra bit of room is a lifesaver when someone has to quickly open an oven door or bend down to grab something from a low-boy refrigerator. Before you finalize anything, though, always double-check your local health and safety codes—they have the final say and their minimums are law.
What Is the Biggest Mistake to Avoid in Kitchen Planning?
The single most common and costly mistake is designing a layout around the shiny new equipment instead of the actual workflow. It’s tempting to start by placing your biggest toys, but if that shiny new combi oven forces your team to take ten extra steps every time they plate a dish, you've just built a bottleneck into your operation. That kind of disjointed flow burns out your staff, wastes precious time, and dramatically increases the chances of an accident.
Another huge oversight is underestimating your storage needs. If you don't plan for enough dry, cold, and chemical storage from day one, you're signing up for a future of clutter. That’s not just an efficiency killer; it's a fast track to health code violations.
Should My Kitchen Design Be Flexible?
One hundred percent, yes. The restaurant world moves fast. Your menu will change, delivery might suddenly account for half your business, and new trends will pop up. A rigid kitchen design becomes a liability almost overnight. Smart operators build their kitchens to adapt.
Your kitchen shouldn't be set in stone. The smartest operators design spaces that can adapt. A layout that can't change with your business is a liability, not an asset.
Here are a couple of practical ways to build in that flexibility:
- Put It on Wheels: Using heavy-duty casters on prep tables, holding cabinets, and even some smaller cooking units means you can reconfigure a whole station on the fly.
- Think Modular: Design workstations that can pull double duty. A well-planned prep station should be able to shift from building salads for lunch service to plating desserts for dinner without a major teardown.
This kind of thinking lets you pivot without having to pay for a full-blown renovation every time your business evolves.
How Important Is Ventilation in The Layout Process?
Ventilation isn't just important—it's foundational. You absolutely cannot treat it as an afterthought. The placement of your cooking line is what determines the size, position, and type of your exhaust hood system, which is a massive structural and financial commitment.
Proper ventilation does more than just clear smoke and grease; it's required by law for fire safety and is crucial for keeping your team from overheating. Because the hood effectively anchors your entire cook line, its location should be one of the very first decisions you make with your design team.
Ready to build a kitchen that’s as efficient as it is durable? At PrepTables.com, we offer a wide range of NSF-certified stainless steel tables, specialized prep stations, and commercial-grade equipment to bring your ideal layout to life. Explore our collection and start planning a workspace that works for you at https://preptables.com.